


MeFoto Backpacker Tripod Review
Christmas isn't far away now at all. If you're still thinking of what it is you would like for Christmas then this could well be a perfectly timed post for you. Today I want to tell you about the MeFoto Backpacker Tripod.
I have something of a disclaimer before I continue though...
I am not endorsed or sponsored by any company or product. Everything I ever review, good or bad, is a product I've purchased with my own money. As I have said before I would change brands at the drop of the hat if I genuinely felt that a different product made my work noticeably better and the change was financially sensible. I am well aware that I can often seem to be an Olympus fan-boy, but if I believe a product is a bad product I'll say so.
Don't get me wrong, If Olympus want to come and sponsor me I will welcome it because I believe that Olympus cameras and lenses have elevated and unlocked my creativity. But even if I were sponsored, I don't see that it would change the way I review or talk about products
So, with all that said let's get into the subject of this post: The MeFoto Backpacker Tripod!
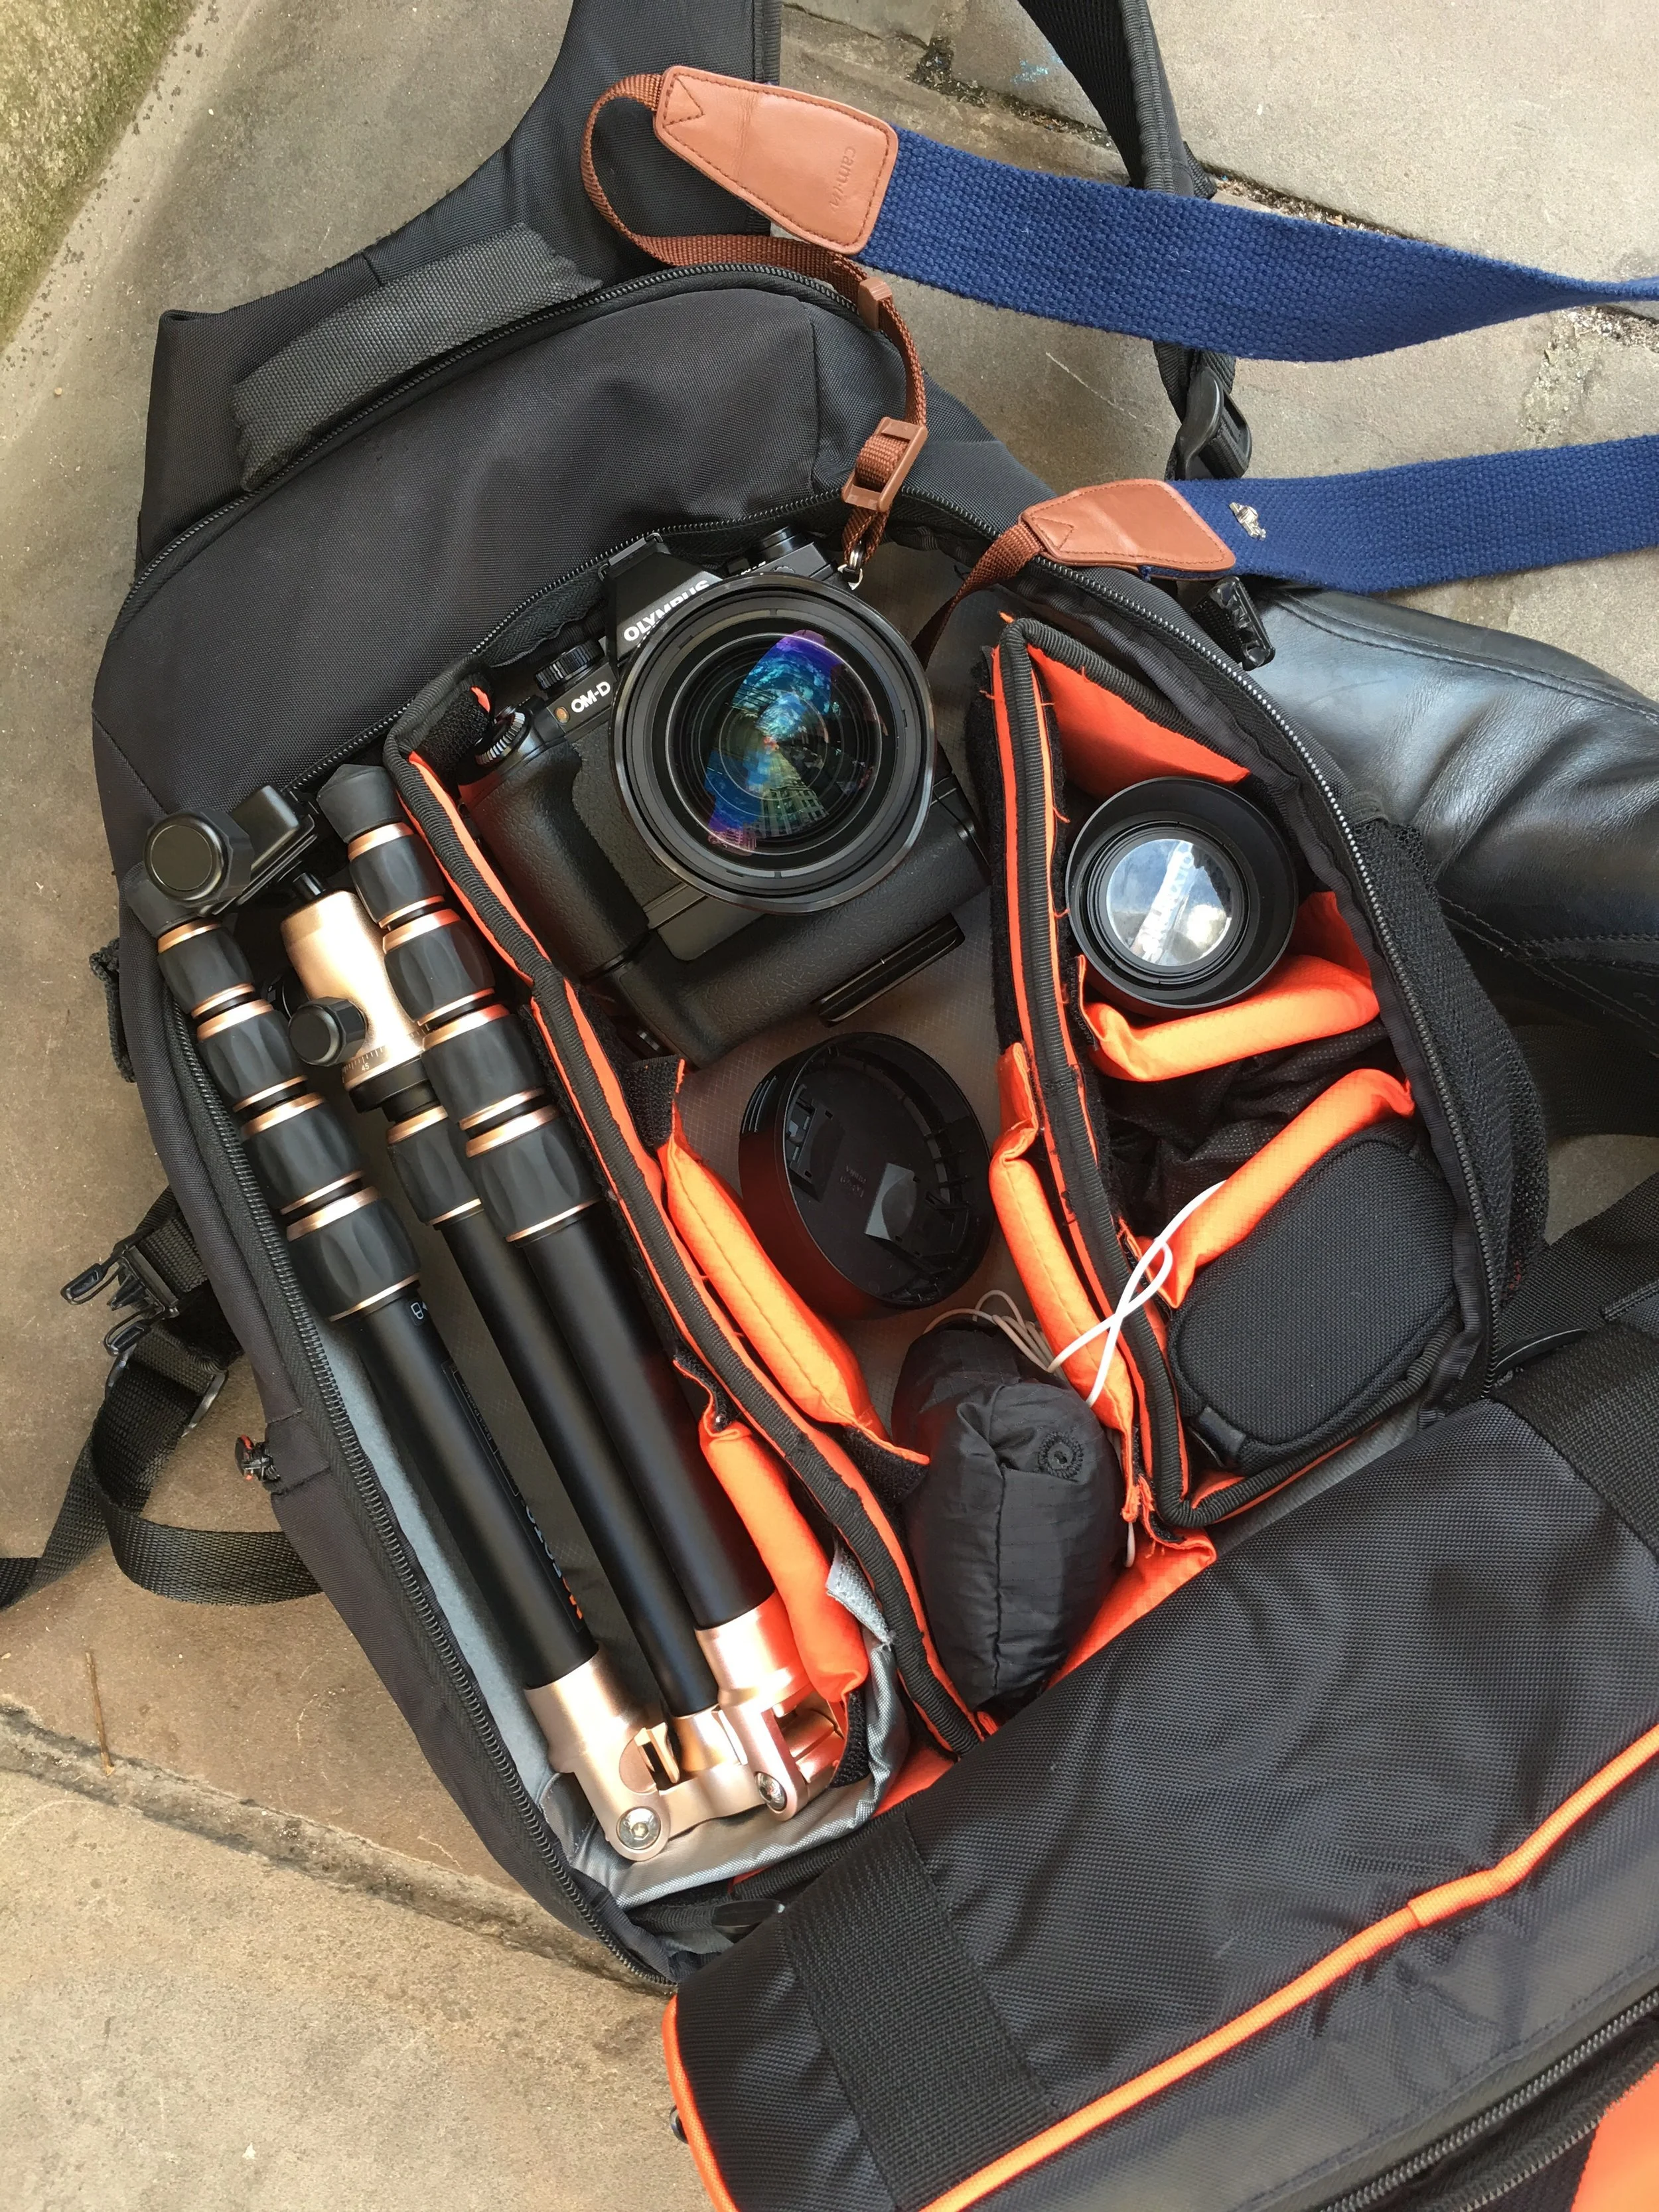
The diminutive MeFOTO folded away to it's smallest size. Fits snug inside my small Caselogic backpack
Small Camera allows for smaller accessories
Since moving to an all-Olympus setup back in January 2015, most of my other gear and accessories have also shrunk in size too: smaller flashes and smaller bags for example. But one thing that I hadn't downsized until recently was my Tripod.
For the longest time I've relied on my trusty Manfrotto Tripod; a heavy-ish and not-so-compact tripod by any means, but it was certainly sturdy most of the time and able to support the weight of my old Canon DSLR's combined with battery grips, a 580EX II Flash and my old favourite Canon 70-200 f/2.8 L II lens (that was possibly the heaviest setup I would ever have had on it back then at about 4Kg's).
I had that tripod for around 4 or 5 years and used it for everything from landscapes to wildlife and sports to weddings. It traveled all over the UK and Europe and the Middle East with me and even went along with me to two Le Mans races where it took a bit of a battering. In addition to being a tripod I've used it as a light stand, a climbing pole and a stick to beat down fern bushes as I waded through forests to photograph Deer and the like. It's been in sand, mud and seawater and still to this day works pretty well. Every now and then when I extend the legs you can hear the 'crunch' of sand between the extending leg sections. Also, those latch-type / lever leg locks become a little loose over time too.
But, 'Ol' reliable' was getting exactly that; Old.
So, naturally when it came time to seek out a replacement I looked for something smaller, lighter and more in-keeping with the size and weight of the Olympus gear I choose to use these days. I made a list of the things I was looking for in a tripod, and this is what I came up with:
- Small & Compact when folded away (ideally could fit in to my bag)
- Lightweight
- Sturdy enough to support my Olympus OM-D E-M1 with a battery grip and my Olympus 40-150 f/2.8 PRO lens
- Twisting leg mechanisms to lock them in place (instead of levers) both to ave weight and to ensure that sand can't get into those parts and ruin the way it works
- Arca Swiss style plate* (reasoning explained later)
- £200 Budget
The MeFOTO Backpacker ticks all the boxes
I did a lot of research and tried out a few tripods at The Photography Show back in March here in the UK and the result was that the MeFOTO BackPacker just seemed to be the best of the bunch. And as a bonus it also came in at the lower end of my budget too which was a pleasant and welcome surprise.
The MeFOTO BackPacker has those twisting locking mechanisms on the legs, it's the smallest of all of the options and is one of the lightest too. At the same time it is able to support the required weight of my Olympus Gear. The included Ball Head is simply something to behold as well (especially at this price point!). In design terms it is relatively similar to the premium products on offer from Really Right Stuff.
One of my favourite things about it though is that the dials and knobs used to adjust the tension and movement are big and chunky, meaning even with gloves on I can make the most of this tripod!
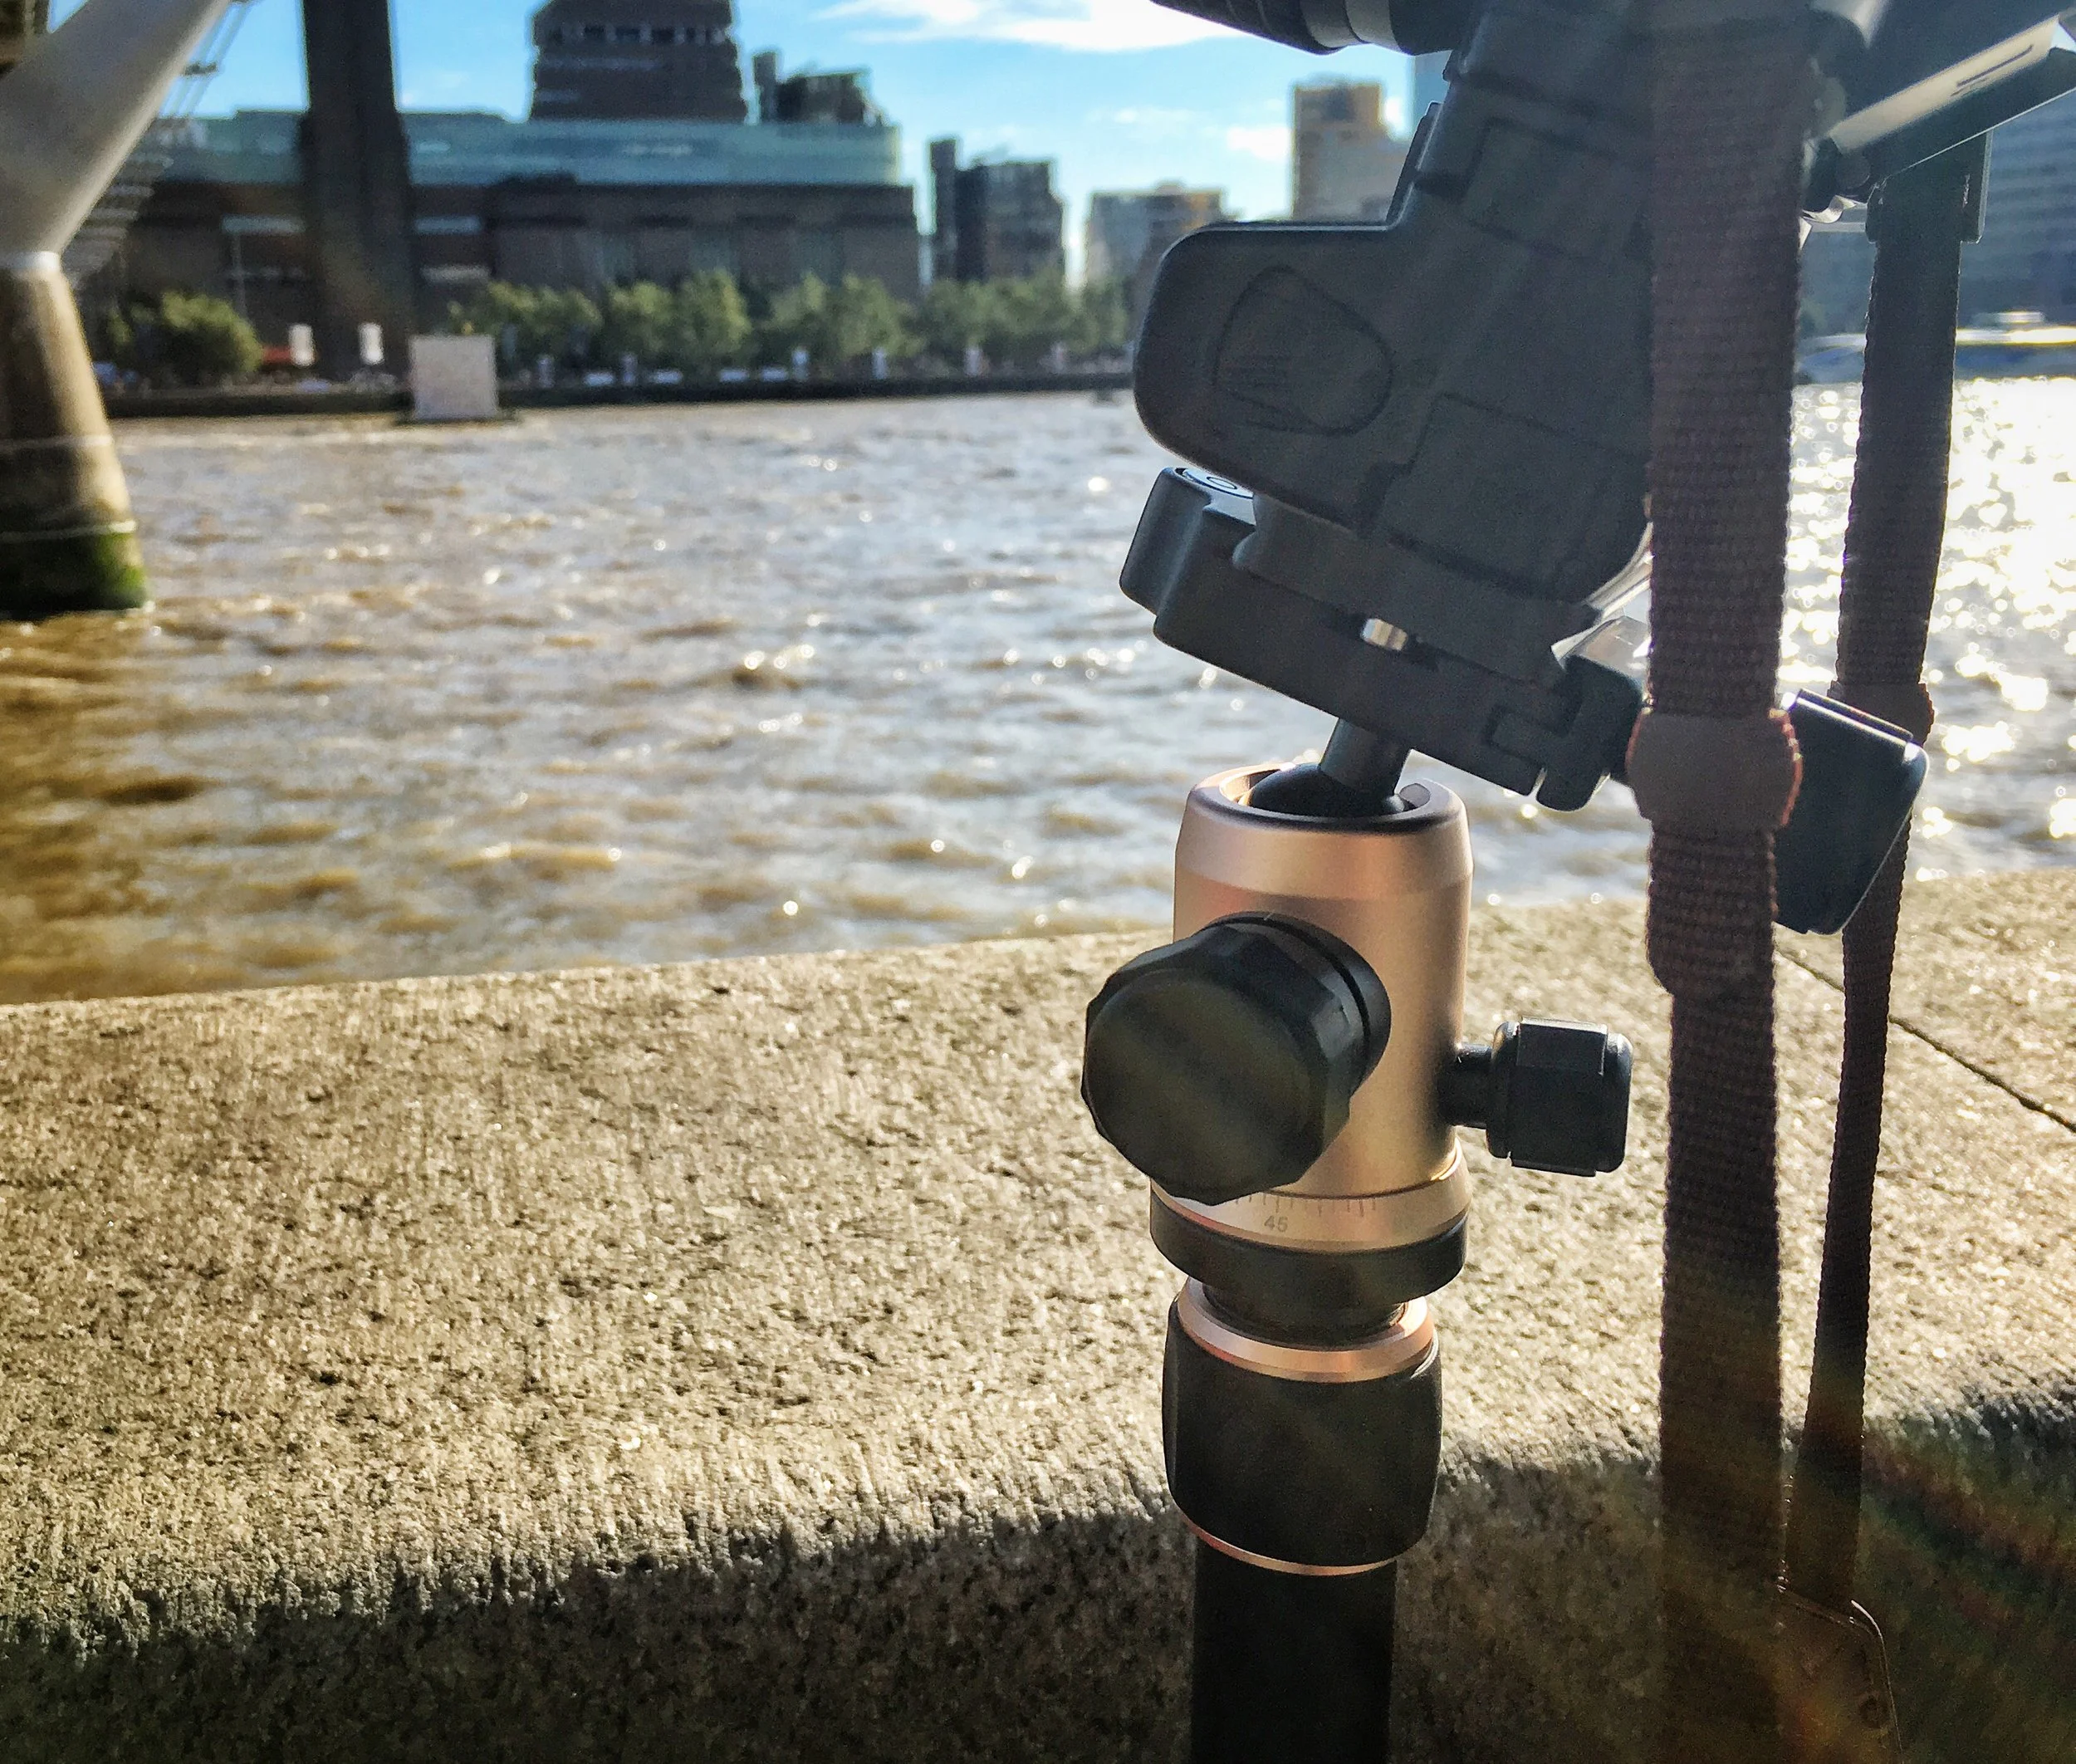
Chunky Dials on the ball head. Finished in gold to match my iPad and iPhone :)
Why The Need for Arca Swiss?
So, it was light, small and within the budget, but why was it I wanted that Arca Swiss plate so much you ask? Here's why: An Arca Swiss style plate offers more options in terms of compatibility with cameras and mounts. All tripods and monopods I know of work in the same way; that being a plate that screws in to your camera (or lens) and then a system of some description on the tripod head will latch onto said plate. Some monopod's so will screw directly into a lens, sure, but if you want to use a ball head you'll need some sort of plate to fix your camera or lens to it. Most manufacturers, such as Manfrotto, have come up with their own unique shaped plate that will then fit only their tripod (or tripod heads).
This is where Arca Swiss is different: You still have a plate, sure, but this particular plate mounts to whichever ball head is also Arca Swiss compatible, which you can find on offer from a wide variety of manufacturers. Arca Swiss style plates and tripod heads attach to one another using a dovetail approach with (usually) a screw mechanism to then tighten the grip of that dovetail.
Furthermore, because the Arca Swiss is considered a more widely adopted mounting system the plates themselves are usually a little more adjustable in terms of their positioning so that they can work and be better suited to the size and shape of the various cameras they may be used on.
This was really only apparent to me when I saw this video from David Thorpe over YouTube with his review of the Olympus PEN-F.
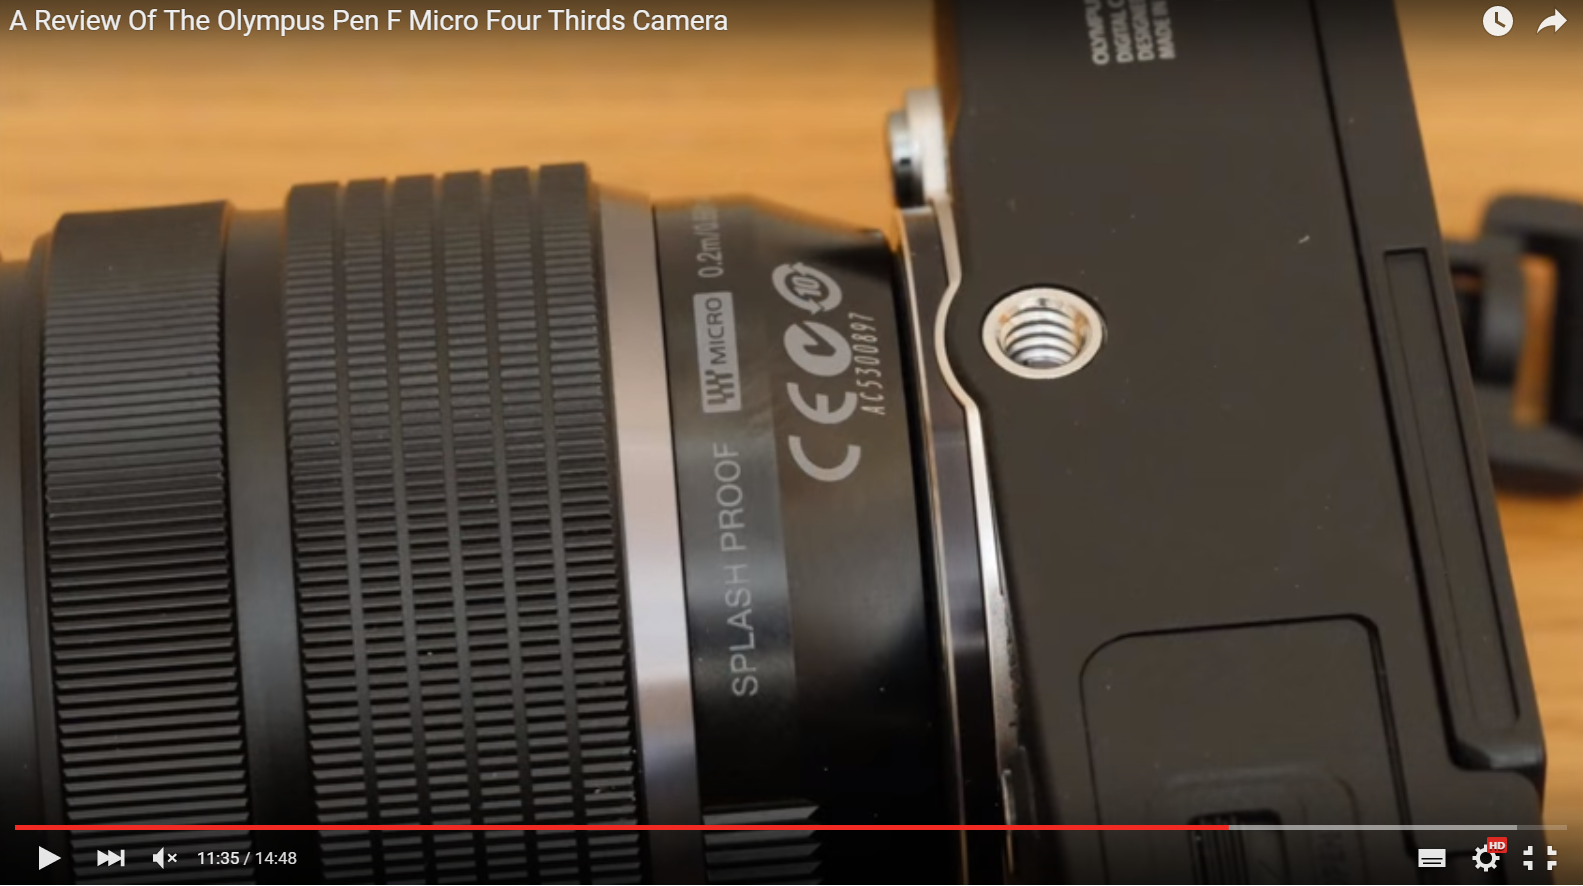
In his review David highlights the point that the awkwardness of the threads' position on the PEN-F, which is relatively forward on the camera, affects the possible compatibility of certain plates: When you mount one of the PRO lenses, such as the M.Zuiko 12-40mm f/2.8 or the M.Zuiko 40-150mm f/2.8 you may find that mounting a plate and therefore tripod of your choosing is a tight fit (or worse, not possible at all). It's for this reason that I wanted the Arca Swiss plate: they offer a little adjustment and movement and being something of a standardized type of plate, as opposed to a brand-specific plate like Manfrotto's, should mean that if the new Olympus OM-D E-M1 mark 2 (which I will be sure to get when it is released) features the same issue as the PEN-F, I should be able to continue to use the MeFOTO backpacker, or at least find a plate that works from a company such as Really Right Stuff (thanks Martin Bailey).
Now, typically I use a battery grip, so it would give me plenty of clearance no matter which one of my lenses I'm using. But, when investing in a new tripod I just wanted to be sure I wasn't going to encounter any issues at all. After all, as I've found out my Tripod should out-last my camera and so giving thought to this should mean I am future proofing myself (I hope)
So, that said, I've had the MeFOTO Backpacker tripod for a few months now and have had some to get out and use it and am thoroughly enjoying it. As you can see from the sample images here I've gone for the gold option. It may be a bit 'flashy' for some people's tastes, but my Wedding Photography branding is golden & yellow and thought that this matched quite neatly indeed. It also neatly matches my iPad Pro and iPhone too :)
There are also a series of other quite colours available, but I felt the yellow and the red were perhaps too loud and could even possibly get in the way when photographing Deer at Richmond Park and wildlife in general, where subtlety is your friend!
All in all the MeFoto is sturdy, folds up to a wonderfully compact size and comes with a generously high quality ball head with chunky, solid dials and mechanisms. It's build quality gets top marks too.
I've not been this excited and impressed with a tripod...well...ever!
Alternative Tripods to the MeFOTO & what I found
So now let's talk about the competition and why it is I felt the MeFOTO won out over them.
I stumbled across this comparison of lightweight travel tripods from Digital Camera World and found quite quickly that it was down to one of three tripods (and this was generally the consensus from many other comparisons too): The Manfrotto BeFree Aluminium, the Nest Traveller or the MeFoto Backpacker. Each of these most closely met my requirements and often came in among the best rated for travel / lightweight tripods.
Initially of course, being a previous Manfrotto tripod owner I was pleased to see the Manfrotto BeFree making the cut and being mentioned as one of the better Tripods available. Being a Manfrotto user all these years I felt compelled to remain loyal and to stick with a brand I know. But, then I realised it had the lever-type mechanisms to lock the legs in place. I wasn't a fan of that on my old tripod. It only took me about a week to lose the plastic tool that comes with the tripod to allow you to tighten those levers, due to them loosening over time. It also didn't feature the Arca Swiss head I wanted. So, the Manfrotto option was removed from the table, leaving me with the Nest Traveller and the MeFOTO BackPacker.
Nest & MeFOTO - Neck and Neck!
It really was neck and neck between the two remaining tripods. Both had everything I was looking for; they were nearly identical, even on price!
Both Tripods were available for between £120 - £140 each online. Both featured the Arca Swiss ball head, twist-to-lock legs. Both even featured a recessed hook hidden in the central column so you can hang some weight from it to keep it steady and a bonus in-built bubble to level the tripod. Each came with a padded shoulder bag too. Handy! The only remaining thing to tell them apart was their size and weight.
In terms of weight, the Nest comes in at 1.75Kg (or 3.8lbs). The MeFOTO BackPacker was lighter at 1.18Kg (or 2.6lbs). That's a pretty decent difference in weight.
The size difference when folded away was a similar story: the Nest is a neat 415mm (or 16.3 inches) whereas the MeFOTO was smaller still at 320mm (or 12.6 inches).
In fact, the only thing that the Nest won a point on was it's maximum height when extended. The nest could reach a maximum height of 1500mm or 59 inches, beating the MeFOTO, which can only go to 1300mm or 51.2 inches.
For these reasons, the MeFOTO better met my brief and it was my new tripod of choice.
Criticisms / Issues
So far, so good. The built quality is superb and the moving parts are expertly machined I have to say, but if there was one thing I would say about the MeFOTO is that when it's extended to it's absolute maximum height (the legs are out and the center column is as tall as it can go) there does seem to be a little bit of wobble going on. The legs slide into one another to hide away. It's the thinnest legs at the very end that seem to have a little bit of flex. Typically speaking when I use a tripod I am shooting with a trigger or using a 2 second delay time to ensure I've not touch the camera when the image is captured, so this isn't too much of an issue, but I would prefer if it were stiffer.
I haven't yet tried to tackle this issue by attaching a weight to the concealed in-built hook, but I'm sure that would go some way to helping reduce or prevent this behavior by centering the weight of the tripod to keep it grounded.
It could well just be me though and my expectations of a travel tripod are way off the mark. After all I am coming from a massive, heavy and rather clumsy aluminium Manfrotto.
All that said, the shake in question doesn't appear to have impacted the resulting images at all. They're sharp to me and I'm happy. The fact that it fits inside my backpack is a bonus and one that I don't think I would be willing to lose moving forward. It's a good compromise.
Conclusion
I'm not shy of spending good money on good accessories in the belief that they'll last longer, but having not looked at tripods in such a long time (not needing to) I was surprised to find that generally I was able to find far more value for money than I was 5 years ago when I picked up my Manfrotto.
I imagine, thanks in part to the growth in popularity of mirrorless cameras, that the tripod market is now far more diverse. Historically purchasing a tripod meant you spent a lot of money or your purchase would involve some sort of compromise of weight, the weight it could support or it's general quality:
- A heavy tripod could support a heavy weight and cost less.
- A light tripod that could support more weight was typically made of carbon fibre and as such the price would soar too.
- Alternatively you could pick up a cheap tripod from eBay and throw it away after just a few uses as plastic components broke and aluminium parts would buckle or dent!
These days though, with my gear weighing less I can focus more on the weight of the tripod and be less concerned about how much weight it can support. As such I've found that Tripods in the £100 - £200 region appear pretty reasonably equipped and very well reviewed indeed!
The MeFoto was my pick of the bunch for a mirrorless-ready tripod and so far I'm very happy with my choice. Time will tell. For now though, The old manfrotto comes along with me to most weddings as a stand for the video light or ends up staying in the boot of the car, with my MeFoto backpacker more often out in the field.
Ready Steady Pro Returns (to a new home)
Depending on how it is you came across this blog and my work, you may or may not know about Ready Steady Pro.
Between 2013 and 2015 I ran a pretty successful Photography Podcast. I recorded and produced the show as well as hosting it too. Many of you who will be reading this blog post as an email in your inbox (thanks for subscribing by the way!) may be following me from the days of Ready Steady Pro and it may be something you are already familiar with. But for those of you that haven't heard of RSP, allow me to tell you a little more about it...
What was Ready Steady Pro about?
Frank Doorhoff, David DuChemin, Valerie Jardin, Steve Saporito, Neil Buchanan-Grant, Damien Lovegrove, Andrew Hellmich and a whole bunch of other fantastic photographers and business experts lent me their time so we could put together 20 insightful and in-depth interviews & round-table discussions, all with the intent and focus of helping photographers to establish and grow a photography business. In total there are over 25 hours worth of audio to listen to and learn from. So whether you shoot weddings, portraits, stock, landscapes or sports; the knowledge these guys shared with all of us through RSP was invaluable!
The average episode reached around 8,000 downloads/streamed plays through iTunes and countless more on the website, whilst other episodes, such as the interview with Frank Doorhoff (13,400 downloads) and my conversation with Valerie Jardin (21,780 downloads) were even more popular!
Photography related podcasts are in no short supply. So, I tried to set Ready Steady Pro apart from the others that were available at the time by aiming most specifically at those photographers who were starting out. Further more, I had guests on the show who were in that exact position themselves too (save for those already established names you may already know about). Those who were still hustling to get their photography business off the ground and profitable. It was a sort of 'for the people, by the people' approach, whereby Instead of the podcast being run and edited by a large media network it, it was instead a simple 'we're in this together' type show. This often meant I was in a position to ask the questions that the listeners wanted to ask, because I too was a listener of the show.
The format was (is) a combination of both round-table discussions with a group of photographers and then one-on-one interviews to dive deeper into certain aspects of what it takes to build and run a photography business. Topics varied from discussions about social media and how to use it effectively for your business to talking about customer services. The guests that you may not have heard of certainly warrant listening to though. I've found as many gems in those interviews as I have with those photographers who have found a level of fame in the industry. As mentioned I had Frank Doorhoff and Valerie Jardin on the show, I was also fortunate enough to have people such as Steve Saporito, Damien Lovegrove, Neil Buchan-Grant and even David DuChemin. All of these guys were super generous with ther time and had so much wisdom to share (as well as some great stories too!).
Why did Ready Steady Pro stop?
For a long time Ready Steady Pro had it's own website and maintained it's position in the 'New & Noteworthy' Section in iTunes (a very proud moment for me). But, following a house move to a new area it all had to stop. The new open-plan layout wasn't ideal for podcasting as I would keep waking the children in the evening's when interviewing guests and having discussions; the sound would carry through the house and keep everyone awake. As a result the consistency with which episodes were recorded and released dwindled until I decided that rather than releasing an episode every 3 months and paying a small fortune for hosting the podcast and its' website, that it would be better to shelve the project and re-visit it at a later date. It's better to do something as best I can and consistently as possible, or not at all. (At least, that's how I see it).
Ready Steady Pro was a project that required a lot of time and maintainenance to keep it going. Although I drafted in help for the Facebook community, and opened up the website to contributors I realised that unless I drove the content it wouldn't move forward at a pace that satisfied me. Generating that new content consistently was getting harder and harder.
What has changed?
Nothing has changed as such in order for me to want to being RSP back to the world, it's just public demand has pushed me to make these episodes available once again: I receive at least one email each week asking me 'What happened to RSP? ' or 'Where can I listen to RSP?'. So, as a result I've decided to re-publish the episodes right here on my website for people to view. I'll likely re-submit the show to iTunes as well at a later date.
Over the coming weeks I'll re-release an episode per week (up to episode 20). For now though I've put the first 8 episodes of the show are up on the website for you to get your teeth into. I assure you also that the show get's better and better with each episode too! It's even evident in Episode 10, where I spoke with the first 'big name'; Frank Doorhoff, that I was nervous as hell! But eventually It all starts to settle down.
Where I can listen?
For now you can listen right here on the website. Just head on over to the Podcast feed and hit play. In addition you can also download the episodes to take away and listen on your favoured device, if that's your thing. Moving forward I'll be submitting the show to iTunes and Stitcher Radio too, so you can once again listen to new episodes using your favourite podcaster subscription app.
Some of the later episodes were recorded via Google+ Hangout and those episodes remain available on YouTube too. But for those of you that prefer to listen to audio-only, perhaps whilst you're on the go, you can listen to those episodes in the usual way. (I'll let you know each week if an episode is available on YouTube too).
If you have a suggestion as to where else I should be posting the show, please do get in touch to let me know.
Will You let me know when new episodes are released?
Absolutely! I'll be posting new episodes to the blog, so if you already subscribe you will receive an email direct to your inbox each time I release a new episode. New episodes are going to be released on Monday's.
So, whether you are new to Ready Steady Pro or even if you are an original listener I hope you find lots of value in the content! As ever comments, feedback and suggestions are welcome in the comments below...
Micro Four Thirds Depth of Field Explained
Hold on to your hats folks, because this weeks' post is a long and technical post! But In recent weeks I've seen quite a lot of misinformation going around when it comes to Aperture and Depth of Field with Micro Four Thirds Cameras. So today I want to put a stake in the ground and set out in the simplest of terms exactly what impact a Micro Four Thirds Sensor (and an APS-C crop sensor for that matter) has on Aperture, Depth of Field and Effective Focal Range.
If you're in a position to listen then go ahead and hit play on the audio player below, if not, scroll down a little further and you can read through today's post in your own time. Either way, the audio is the same as the text to make sure you're not missing out. After hitting play give it about 5 - 10 seconds to start:
I spoke briefly about this in a post I wrote called 'Why Olympus' in which I looked to demystify many of the myths about the MFT format. But the subjects of Depth of Field (or, an apparent lack of according to some) and the focal lengths of lenses are debates I have seen come up again and again.
I expect many people who subscribe to my blog to already be familiar with the concepts of crop factors and the impact they have on a lens and a resulting image, but for those of you who are very new to photography; my aim is to make this as clear as I possibly can and to start with the very basics. Here I'll explain aperture and focal lengths in as basic a way I can.
If at any point you don't understand please do get in touch with me via email or message me on Facebook - I'm always happy to chat directly.
Before I start I want to make a few things clear:
- A mirrorless camera is not a worse or lesser camera than a DSLR
- The fact that a camera has no internal mirror in front of the sensor doesn't mean it is 'lacking' something. This is by design and gives the camera a series of benefits over a DSLR. It arguably also represents some challenges too, but these are mostly things of the past now.
- The inclusion or exclusion of a mirror does not affect Depth of Field.
- Depth of Field is affected by the lens and the sensor
Sensor Sizes
In recent years (in the digital age at least) the three most common sensor types found inside cameras that the masses of photographers use, are:
- Full Frame Sensors. This includes such cameras as:
- APS-C Sensors. Cameras include:
- Micro Four Thirds Sensors. Cameras include:
In order of size from largest to smallest in the list above, it is Full Frame, APS-C, MFT.
There are a series of other sensor sizes too, such as Medium Format etc, but if you're reading this post you're most likely interested in one of the three above. For the sake of this post, I will only be looking at these.
Full Frame vs APS-C vs MFT - Affects on lenses
Quite simply, a sensor size will affect all of the properties of a lens; it's aperture and it's focal range.
When you buy a lens it will have both a focal range and an aperture. These will be written on the box and also on the lens itself (most of the time). For example, let's look at the Canon 24-70mm f/2.8: with this lens, the '24-70mm' part denotes its' focal range or, if you like, its' zoom range: the smaller the number the wider the field of view. The larger the number - the longer it is able to reach. The Aperture is then reflected as 'f/2.8'. The lower aperture number is; the shallower the depth of field (again in simple terms lets say that a lower number will give you a blurrier background. For example the Canon 50mm f/1.8 will give you a really blurry background...)
Our example lens; the 24-70mm f/2.8 will fit and work on both Full Frame Canon camera bodies and also their Crop sensor bodies. BUT, these cameras have different sized sensors and so the lens will behave differently on each system. This is due to what is called the Crop Factor. IF these lenses could somehow fit an MFT camera (they won't, unless you use an adaptor), the lenses would again take on different characteristics. The different effects that these sensors cause is due to their 'Crop Factor'
Again, trying to use the simplest terms possible, the crop factor is, if you like, effectively the magnification rating. (this isn't technically entirely accurate, but, if you're new to this concept then this will help to explain).
A Full Frame has a crop factor of x1, an APS-C has a crop factor of x1.6* and a Micro Four Thirds Sensor has a crop factor of x2.
*The APS-C sensors from Canon and Nikon are actually slightly different sizes and therefore have slightly different crop factors. See the table below for more details.
How Crop Affects Focal Range
What you may already be aware of is that the differing sensor sizes and as such crop factors actually change the effective focal range of a lens. This is worked out by very simply multiplying the lens' focal range by its crop factor. For example, on a Full Frame Body, a 100mm lens is multiplied by a crop factor of 1. Therefore, the focal range remains 100mm.
On an APS-C sensor, that same 100mm lens will be multiplied by 1.6. 100 x 1.6 = 160mm
It's even easier with a Micro Four Thirds sensor as the crop factor is x2. So, without much thought at all, you could work out that a 100mm lens then takes on an effective field of view of 200mm.
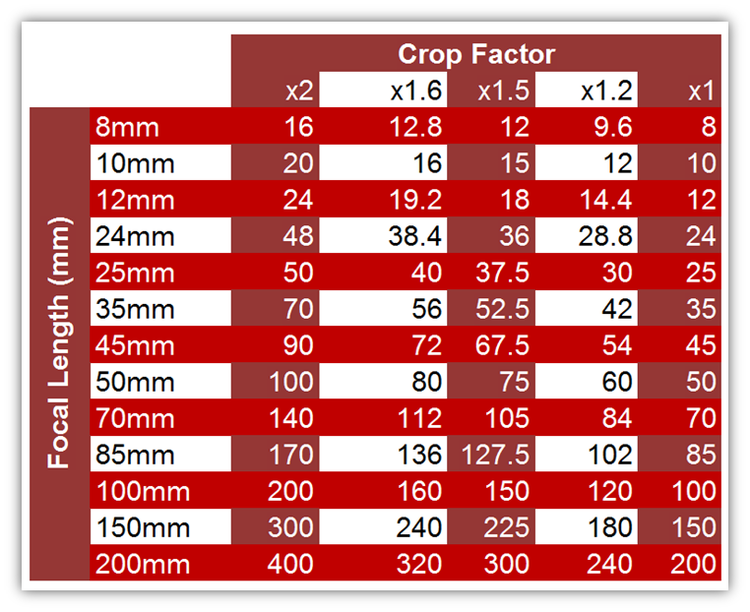
This table below sets out a series of common focal ranges with their respective, inherent effective focal ranges when used on each of the different sized sensors
X2 = Micro Four Thirds
x1.6 = Canon APS-C
X1.5 = Nikon APS-C and Fuji X Series
x1 = Full Frame Cameras
Your initial thought could simply be that surely a smaller sensor is a good thing right? After all, you get more zoom from a lens! To many this certainly is an advantage of APS-C over Full Frame as it can negate the need for you to buy a longer lens. However, it isn't always the case that this extra reach is wanted; those ultra wide lenses you can buy then become slightly less ultra wide.
Secondly, the effective aperture is also affected too:
How Crop Affects Aperture
In continuation of keeping this very basic, I won't explain in full exactly what aperture is, but rather I'll explain the things it affects. Put simply it affects the blur of the background in an image (Depth of Field) AND it determines how much light is let through the lens to hit the sensor. The second part is important because the more light that comes through to the sensor will mean that an image can potentially be less noisy and grainy.
Depth of Field
Again, sticking with the idea that I am explaining this in it's simplest form; Depth of Field is basically this: From the point of sharp focus on your subject how much immediately after does the scene or subject begin to blur and how blurry is that blur. Experienced photographers may be reading this cringing with this description, but remember I'm trying to keep this is as simple as possible. You can look up a better definition of Aperture and Depth of Field on Google. I'm not here to explain that, I'm trying to explain how a lens affects this property: So, remember how the focal range was multiplied by the crop factor to give a new focal range? Well, we do the exact same thing with the aperture to give us our new values: f/1.8 will become f/3.6 on a Micro Four Thirds Sensor (1.8 x 2 = 3.6) . F/2.8 will become f/5.6 on a Micro Four Thirds Sensor (2.8 x 2 becomes 5.6) and f/4 will become f/8 (4 x 2 = 8) and so on. You can work out the APS-C Aperture difference by multiplying those same details by 1.6 too. So let's again say that f/1.8 x 1.6 = 2.88 (or 2.9 if we round up).
Now, if you know anything about aperture you will know that the lower the f number, the blurrier the background and the shallower the depth of field (the amount of your subject that is in focus). So, if you buy an f/1.8 lens you need to know that it will less shallow on an ASP-C than it would, were that same lens on a Full Frame camera.
The Martin Bailey Podcast Companion App, with DoF calculator
If you want to learn more about Depth of Field I strongly advise you look at Martin Bailey's eBook 'Sharp Shooter', available through Craft & Vision. In this book, Martin goes into great depth about aperture and it's effect on an image. Martin runs a superbly educational podcast and is an excellent photographer to boot! If you're interested in listening that podcast you can subscribe via iTunes or download Martin's Podcast Companion App from the App Store. Handily, this app also includes a Depth of Field Calculator, so when you're learning about Depth of Field you will be able to use this to help.
The relationship of Aperture & Speed
Often, when we talk about lenses with low f numbers, such as f/1.8, f/1.4 or f/1.2 you may hear photographers referring to them as 'Fast' lenses. The reason for this is that these lenses let a lot of light through them, which will afford you the use of a lower ISO or a higher shutter speed. A lower ISO will invariably give you a cleaner, less noisy image and a faster shutter speed will aid you in freezing fast moving subjects and potentially sharper images. Now you may assume at this stage, give that the focal range and depth of field properties have been impacted by the sensor size, that the amount of light a lens can gather is also affected. This is not true.
In terms of depth of field yes - an f/1.8 lens on a Full Frame sensor will give a shallower DoF than if it were mounted to a Micro Four Thirds sensor. That I think we have established now. But, the lens' aperture rating in terms of its ability to let through light remains the same regardless of the sensor it is paired with. The 'speed' remains the same.
So, now that we know that your camera (or rather its' sensor) will have an effect on the lenses you're using, this should aid you in choosing the right lenses for the right job...
DSLR Lenses - One Lens - Multiple Sensor Sizes
When it comes to DSLR's from Canon and Nikon, the best lenses are typically designed to work best with their Full Frame models. Even now you know that an f/2.8 lens is not the same on an APS-C as it is on a Full Frame sensor, they are still advertised and sold as an f/2.8. (they don't tell you that a 100mm will become a 150mm or a 160mm for example). You're left to work this out for yourself. But, this is to be expected; these companies develop lenses that can be mounted to two different sensor formats.
Fuji & MFT - Lenses designed to take crop factor into account
When it comes to Fuji and Micro Four Thirds lenses are developed to take the crop factor into account. Each lens for a Fuji Camera, for example, will only fit (natively) onto a Fuji X-Series camera, meaning at the point of designing the lens they know it will be affected by a 1.5 crop factor.
The same is true of Micro Four Thirds, hence the reason Panasonic lenses fit Olympus bodies (and vice-versa). These lenses are optimised for one size of sensor. The crop factor is embraced!
You may be more familiar with the more traditional and mature lens stables from Canon or Nikon. If that is the case then some of the focal ranges on offer from Fuji, Panasonic and Olympus may seem odd at first, and the number of f/1.2 & f/1.4 lenses on offer may seem quite 'exotic' too, but these odd focal ranges and exotic apertures (a 23mm or a 27mm for example) are intentional.
Going back to our crop factor multiplications from earlier, let's look at some of the lenses on offer from Fuji, Panasonic and Olympus to see why these lenses have literally odd numbers...
Olympus Lenses
We'll start with Olympus purely because these are the lenses I am most familiar with.
In the process of moving from Canon to Olympus, I sought out similar focal ranges in the system in an effort to more seamlessly replace my Canon System. My favourite lenses were my Canon 70-200mm f/2.8 and my 85mm f/1.8. Without being familiar with the topics in this post, it may at a glance appear that Olympus don't have their own equivalent lenses. But they do.
So, remembering that the crop factor is x2 on an Olympus camera, such as the OM-D E-M1 we know that the equivalent lens for Canon's 70-200mm f/2.8 is arguably the Olympus M.Zuiko 40-150mm f/2.8 (80-300mm equivalent field of view, remember?). (You can read my review of the 40-150mm f/2.8 right here by the way)
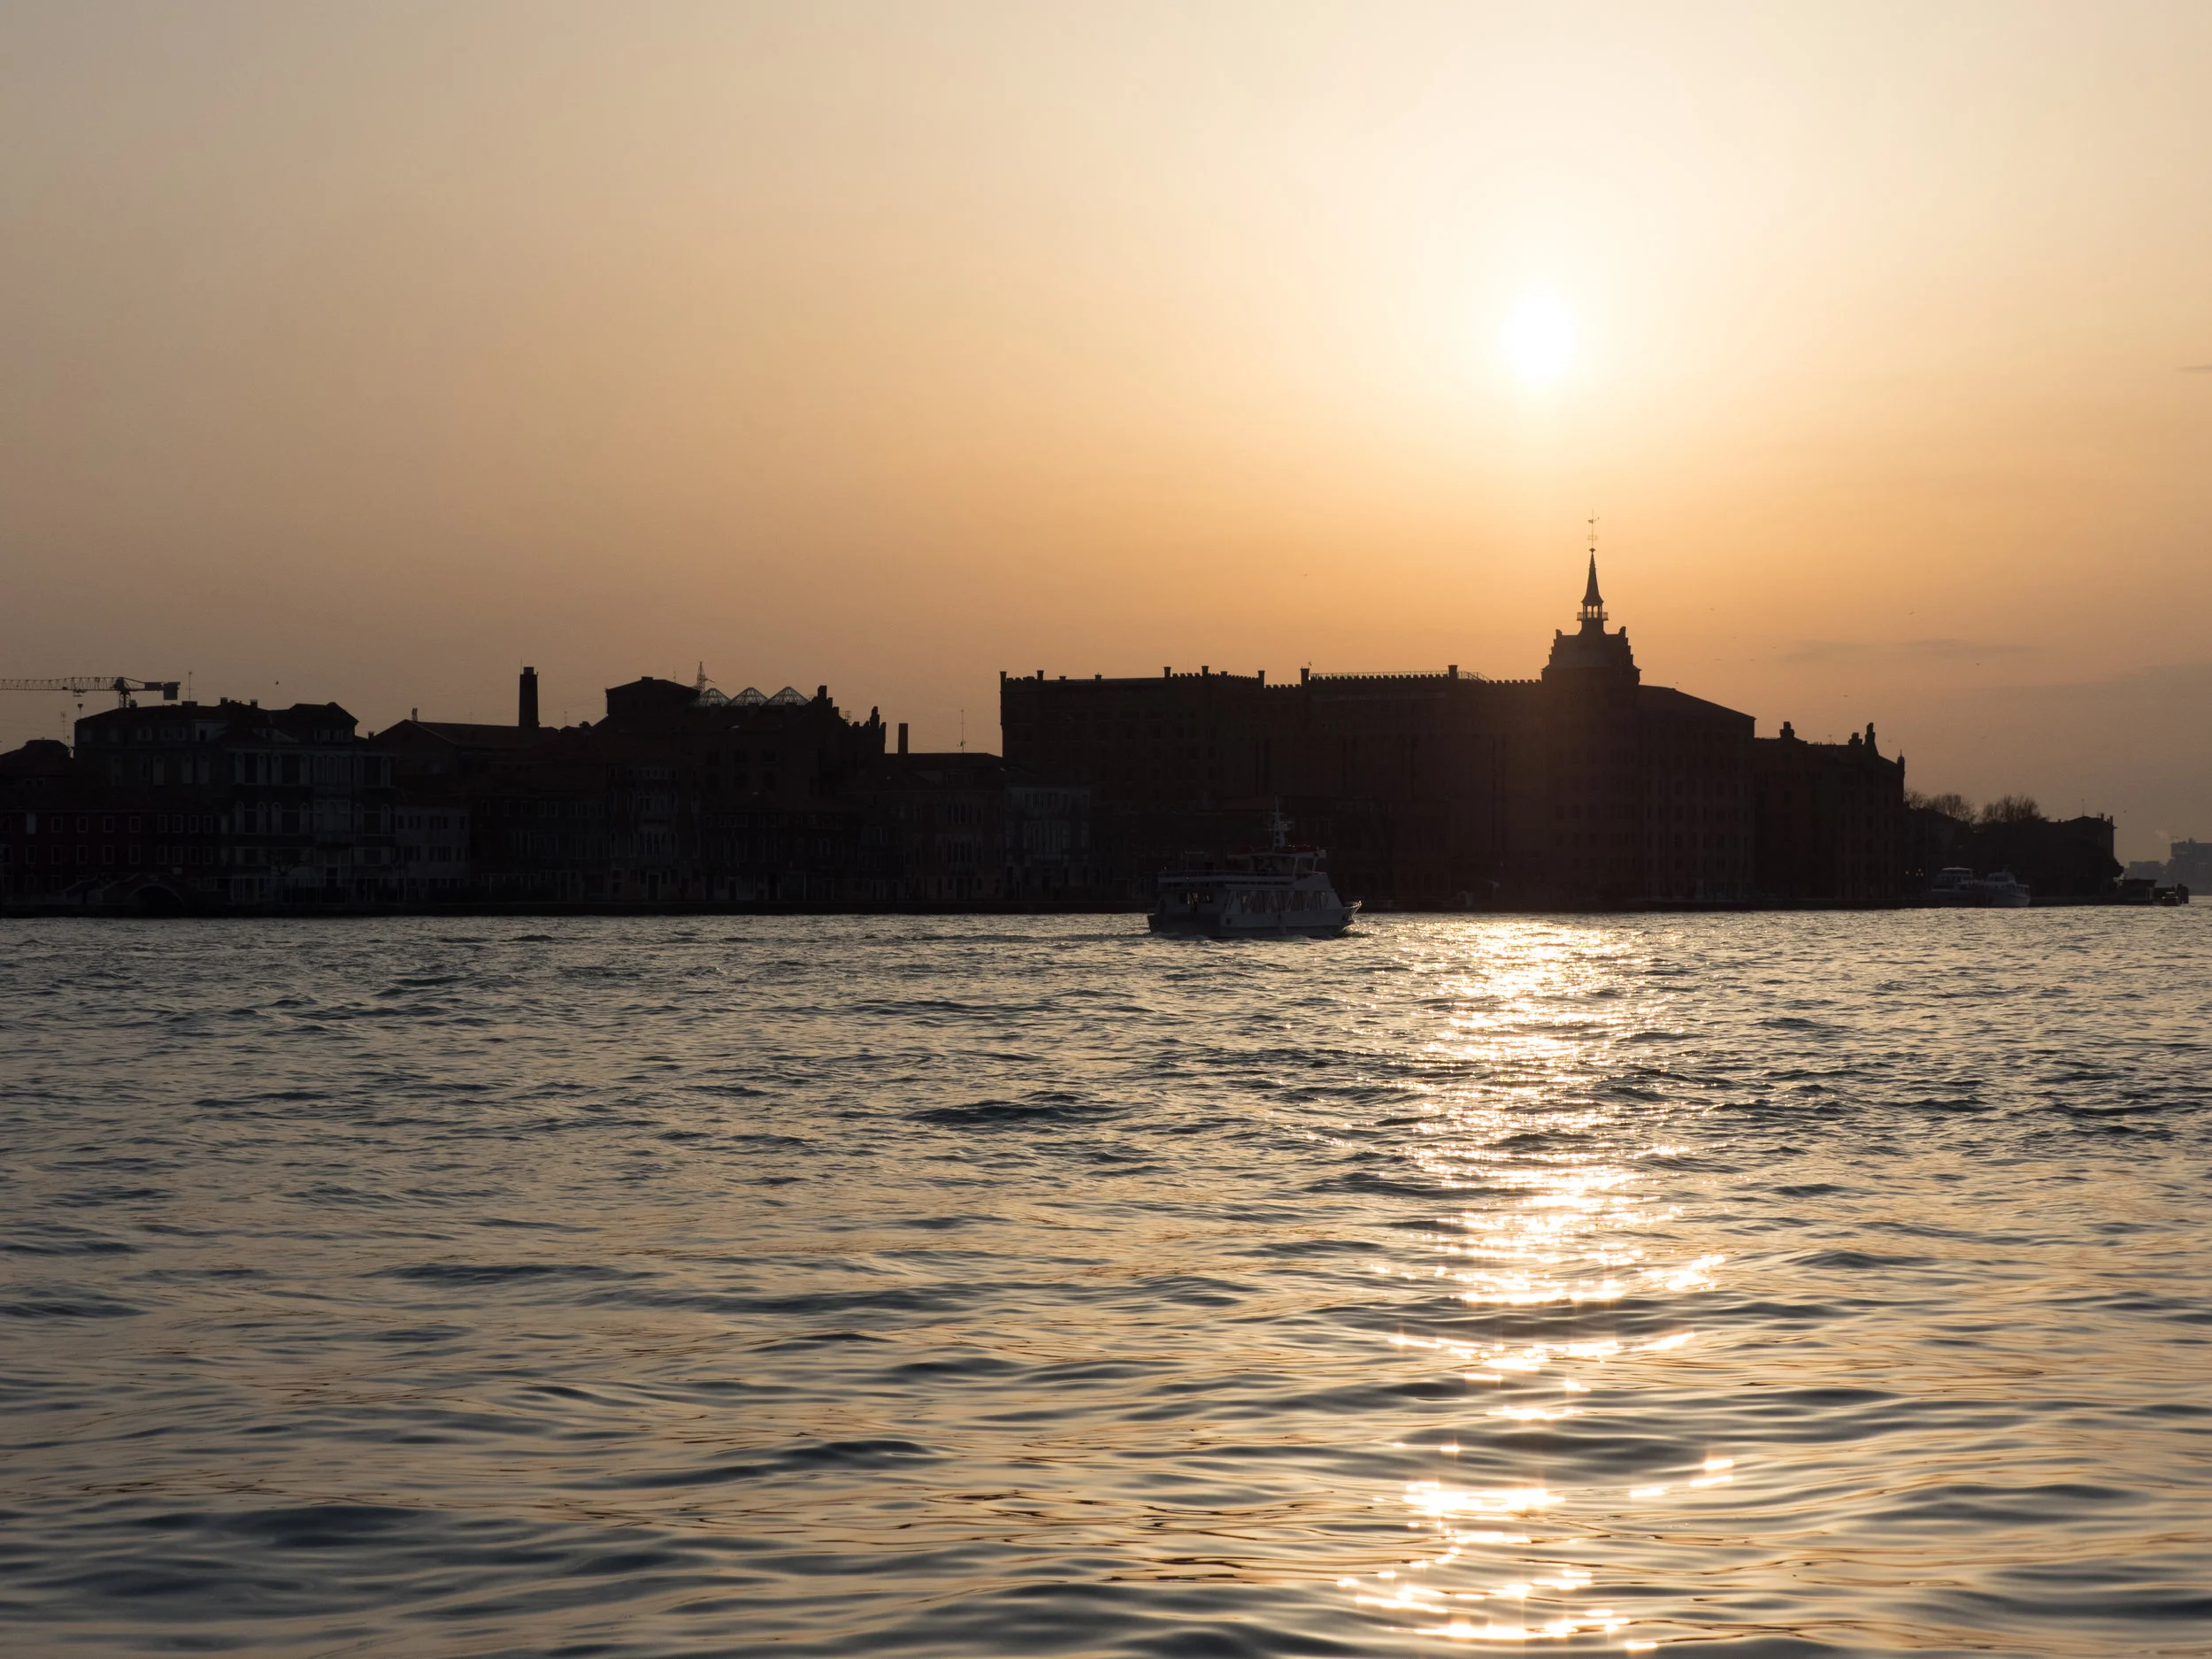
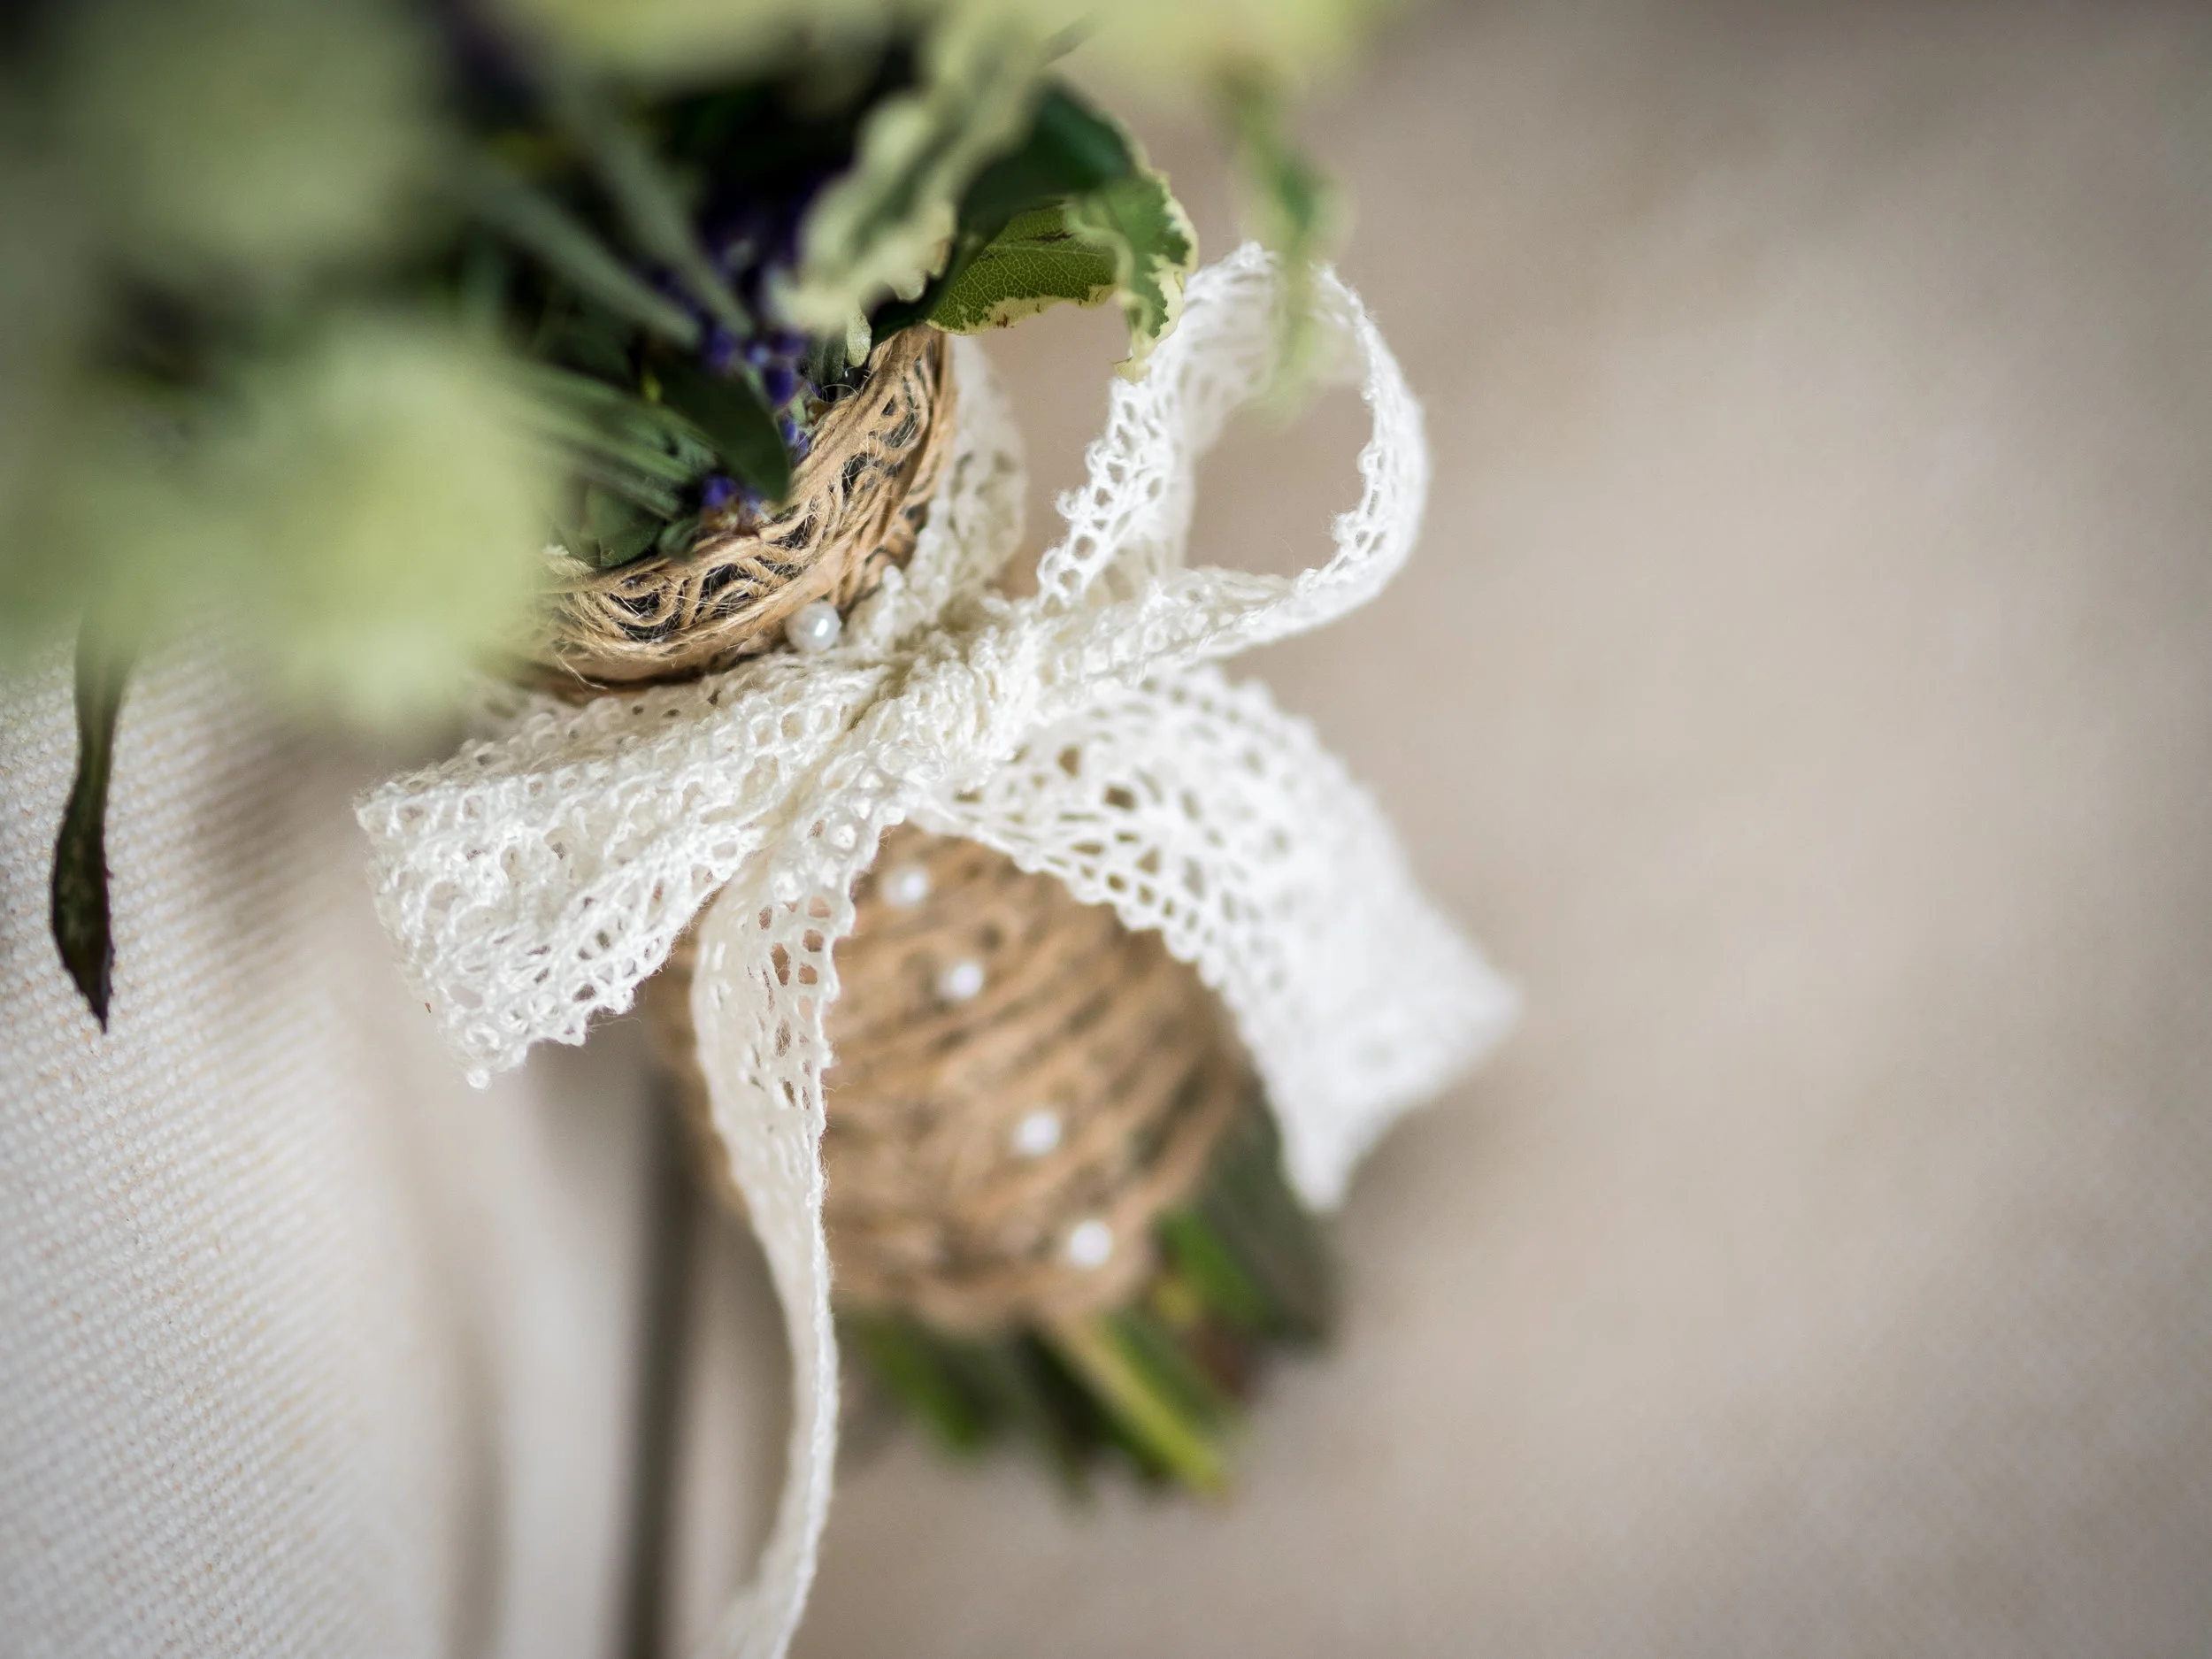
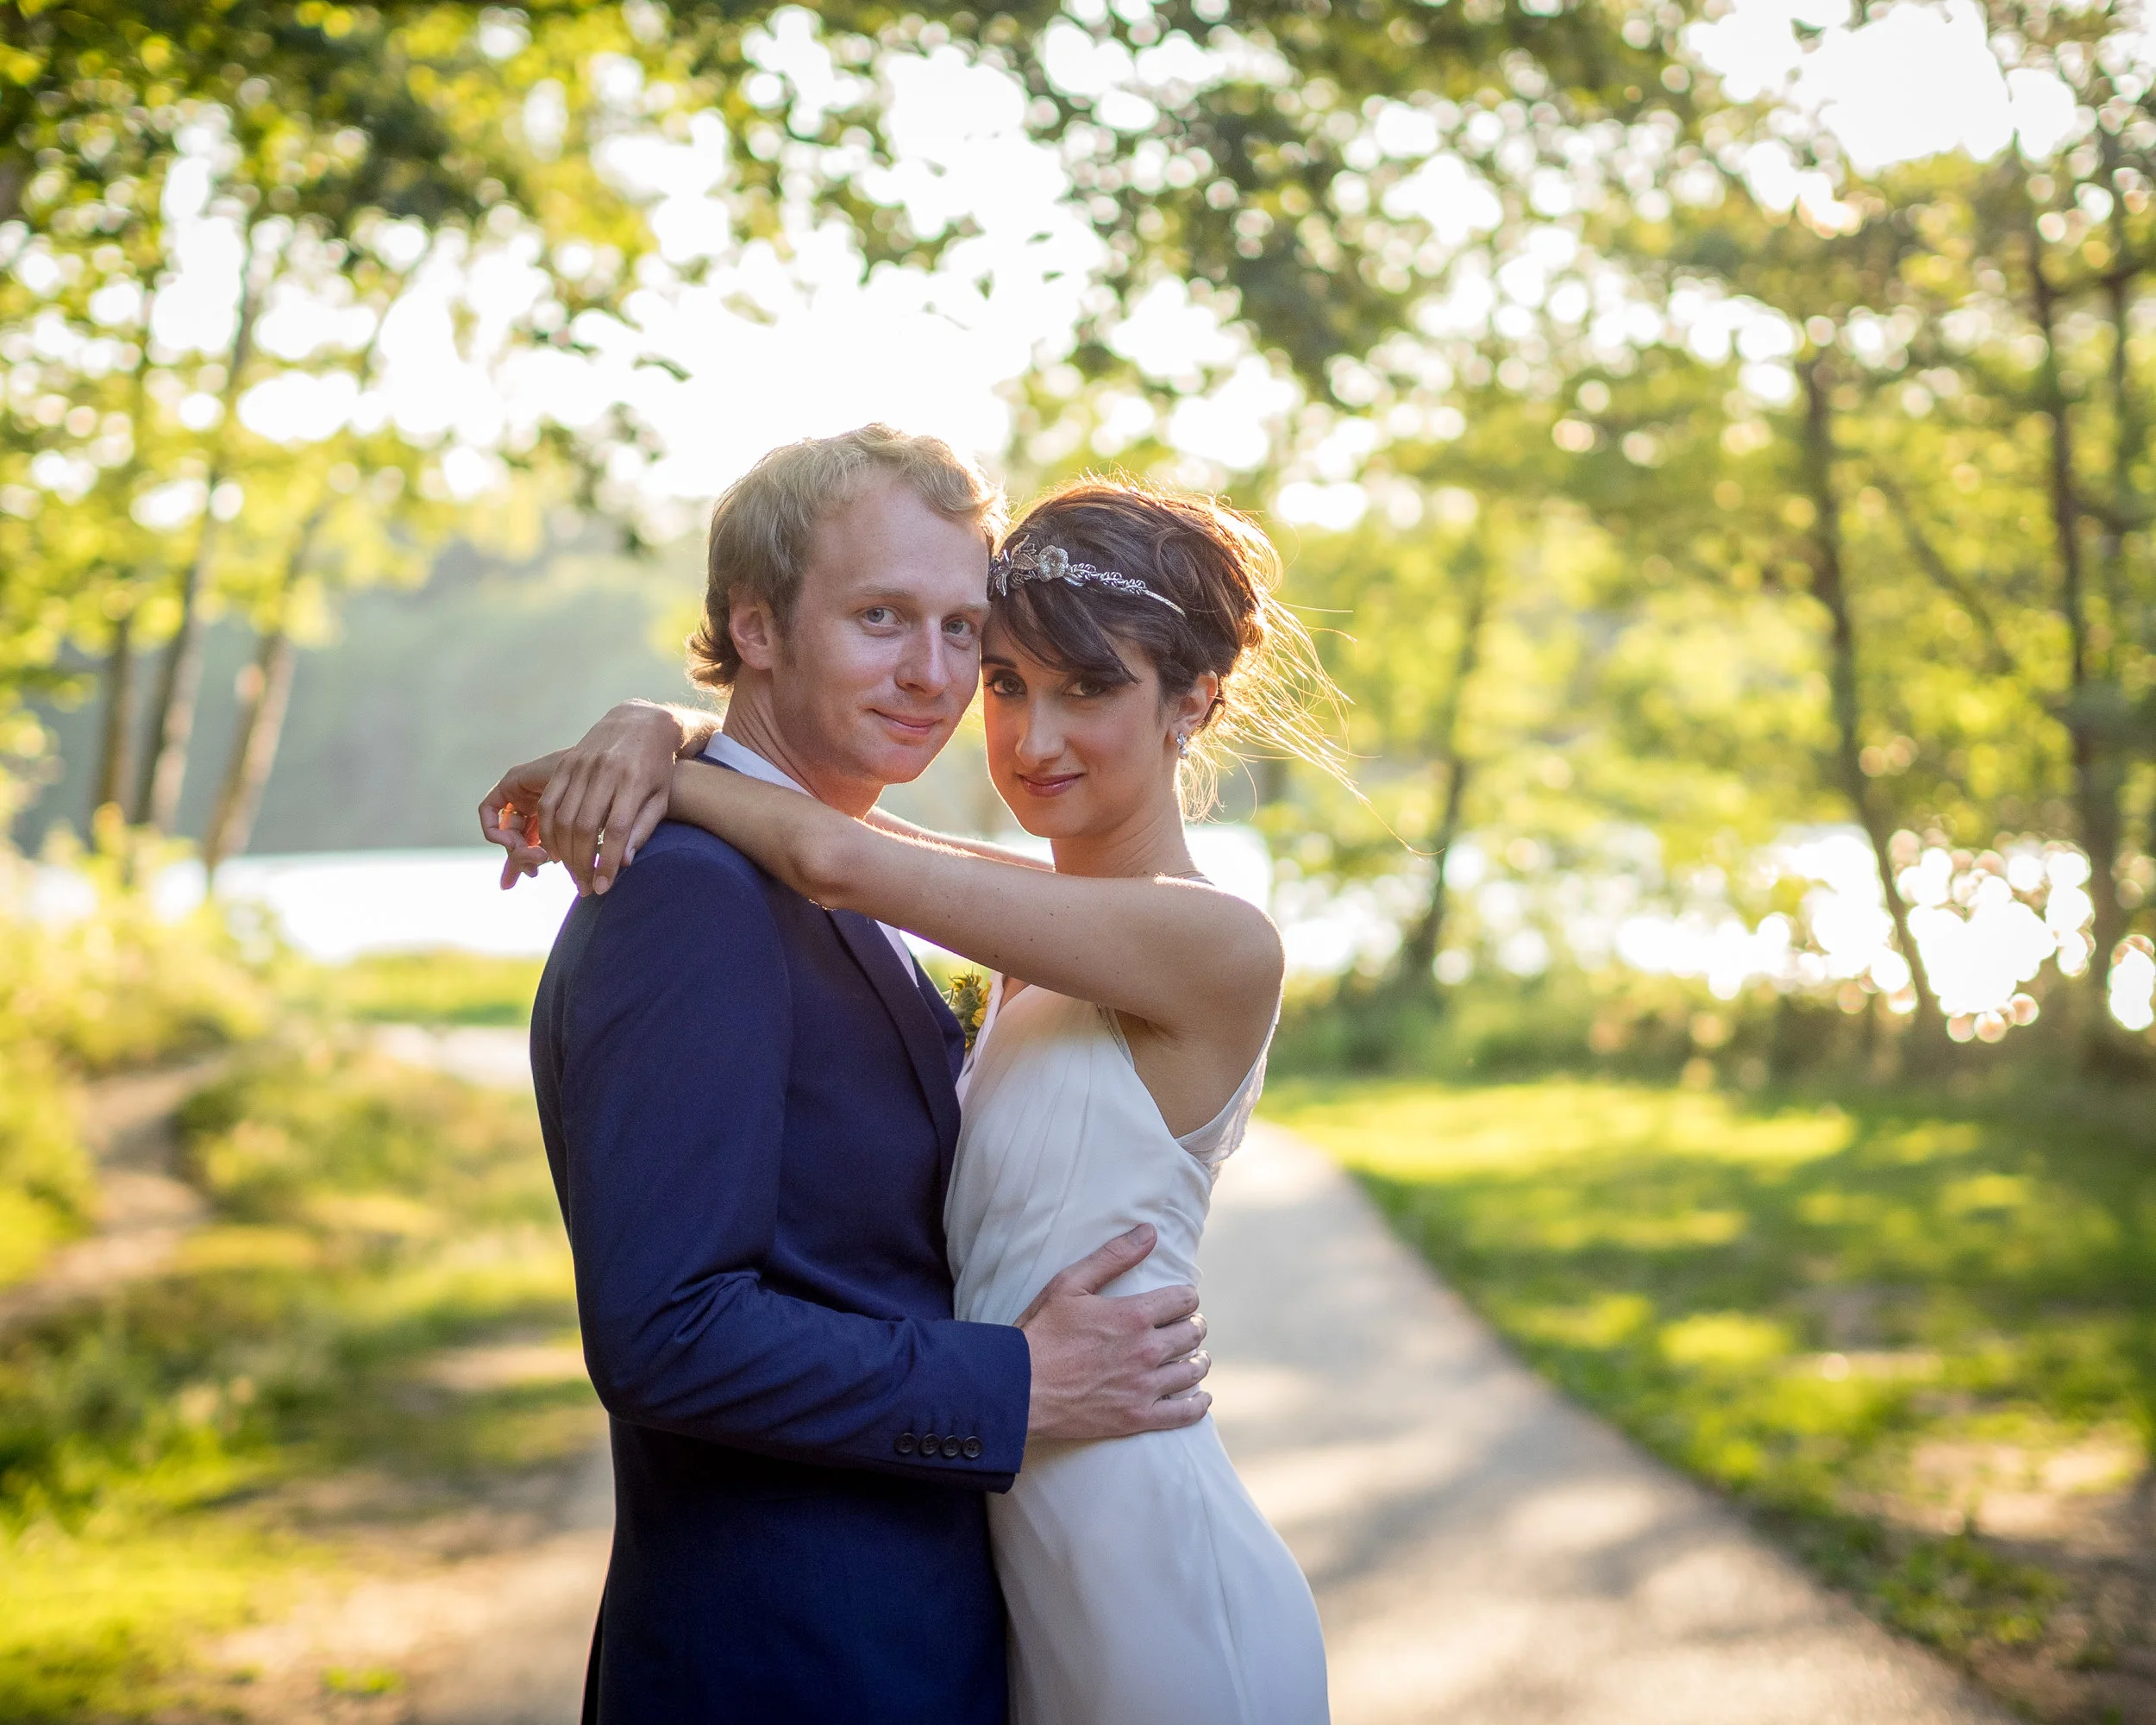
Here are a couple of images shot with my new favourite lens, the Olympus M.Zuiko 40-150mm f/2.8 PRO
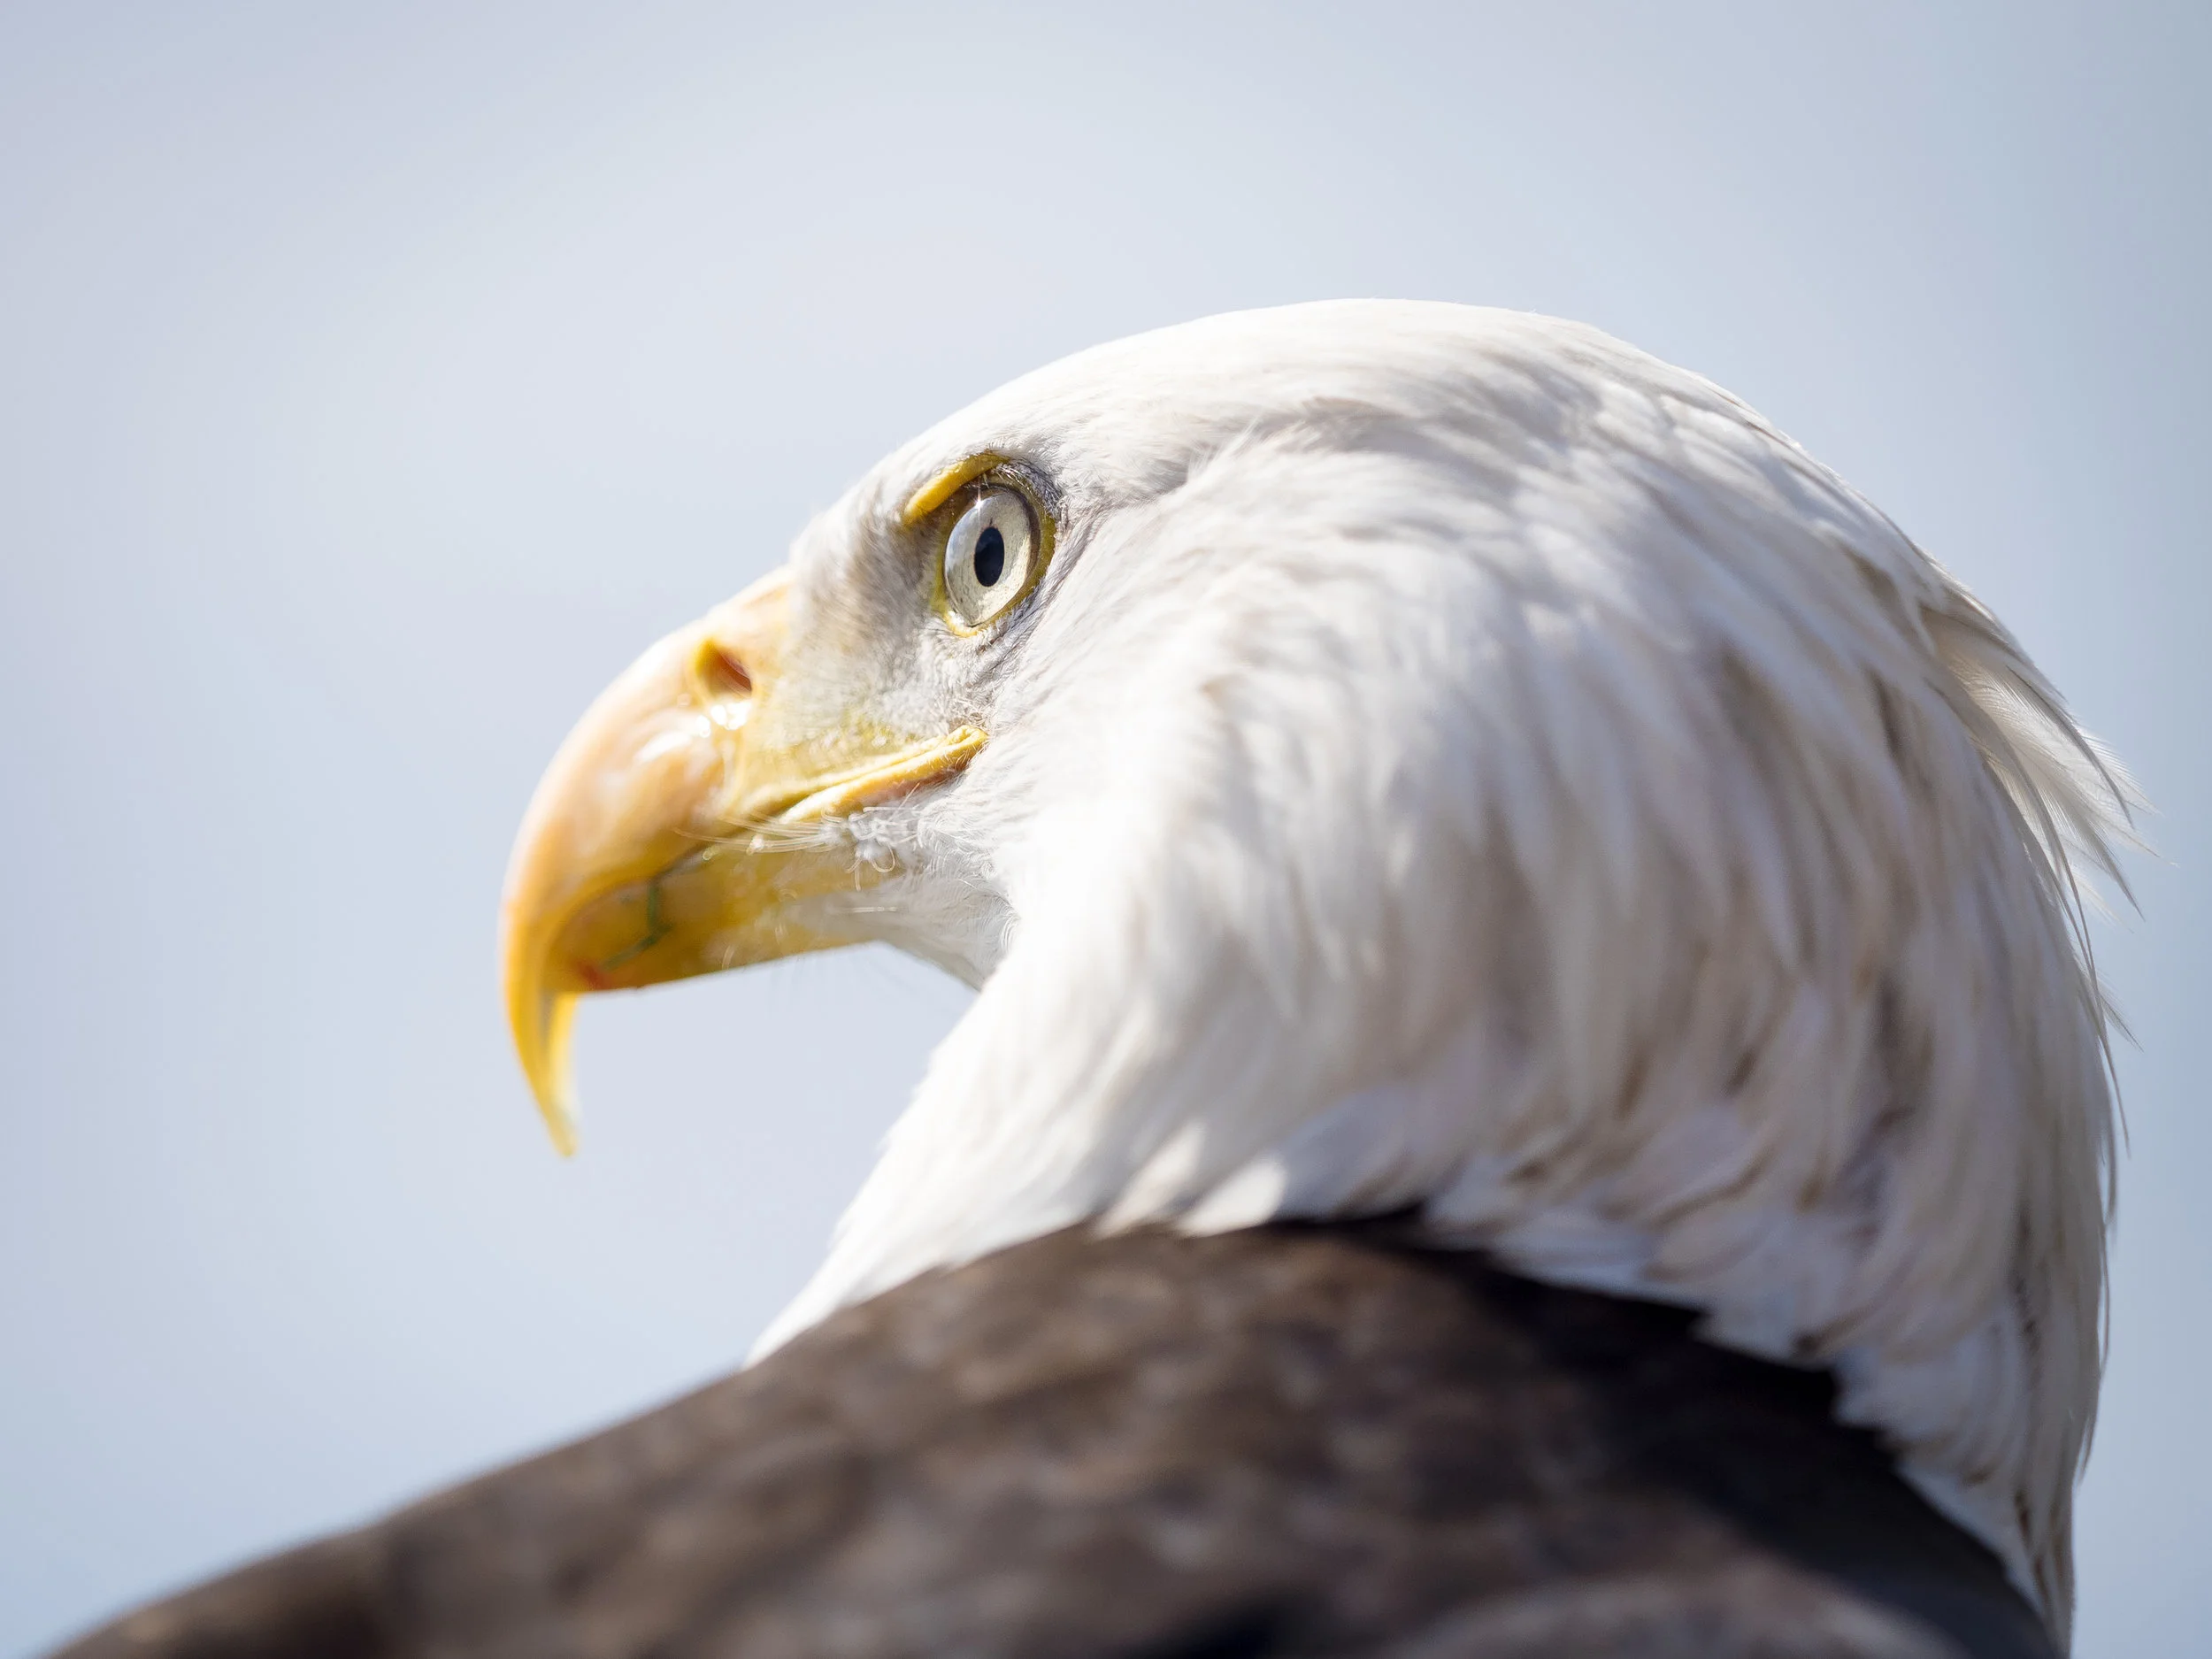

What about my favoured Canon 85mm portrait lens? Well, Olympus offer us the M.Zuiko 45mm f/1.8 (45 x 2 = 90mm of course).
The 90mm focal range is very versatile; from close up details, to head & shoulder portraits to wider portraits too. Great focal range coupled with shallow Depth of Field.


You may at this stage be thinking that the apertures simply aren't the same. If we apply that same x2 crop factor to the 40-150mm f/2.8 we effectively have an 80-300mm f/5.6 after all). Well, this is where you now have to weigh up whether that extra reach and compact system size are of more benefit to you than the difference in aperture. Remember, though, the DoF may be equivalent to f/5.6, but it is still an f/2.8 in terms of its speed, as per our lesson earlier in this post.
Fuji Lenses
When I first dipped my toe into Mirrorless this time round it was Fuji that I looked at. Initially, found the focal ranges quite odd at a glance, but again, if we apply the 1.5 crop factor that the Fuji X-Trans APS-C offers, the focal ranges actually equate to more 'traditional' ranges that we're likely to find with a DSLR. For example:
Fuji has the 23mm f/1.4 XF lens. Whoever heard of a 23mm lens? Why not 25mm? Well, if you do the same math as before, the 23mm f/1.4 works out to be a 34.5mm f/2.1 when mounted to a Fuji X-Series camera. It's near enough a 35mm f/2 equivalent.
Another example could be the 56mm f/1.2 XF Fujinon lens. Multiply that and you now have a fast and shallow portrait lens: 56 x 1.5 = 84mm. 1.2 x 1.5 = 1.8. So, let's agree that it is, in effect, an 85mm f/1.8 lens that would suitably replace the Canon 85mm I mentioned earlier.
The difference between 84mm and 85mm is so negligible that it hardly matters really.
Additional Reading and Factors affecting Depth of Field
I mentioned a few times at the start of this post: this post is written in an attempt to keep things as simple as possible. However, one thing that can't be left out is the factor of camera-to-subject-distance and the effect that has on Depth Field and Background separation. But, rather than me explaining this I would really encourage you to go and pick up Martin Bailey's book: 'Sharp Shooter'. In this, Martin discusses focal distances and how to calculate a depth of field. His explanation and illustrations are far better than I can explain!
Has this helped? Anything to Contribute? Let me know what you think
I hope that this post has helped to explain in some detail exactly how Aperture and Depth of Field are affected by sensor size. If you were unfamiliar with the lenses on offer from any of the camera manufacturers heavily invested in the mirrorless market then I also hope that this has helped to clarify the use of their focal ranges too. If this post has been helpful in any way at all please do remember to like, share and tell your friends. Oh, and please do leave a comment below. Feedback and contributions are always welcome!
For more great content just like this direct to your inbox - don't forget to subscribe!

Olympus Launch the OM-D E-M1ii
At last! On the 19th September 2016 Olympus announced the long awaited OM-D E-M1ii.
When the original OM-D E-M1 was launched it was able to quite comfortably replace (and improve upon) so much of what a traditional DSLR offered. This attracted many to make the switch (including me as I waved goodbye to over £10K worth of Canon equipment!). In the time since that camera was released though we've seen Sony and the 'Big Two' in the DSLR market continue to iterate and improve with mark 2's of their own. Us OM-D E-M1 owners were all scouring the rumour sites for possible mentions and specs of the E-M1 mark ii, but Olympus kept us waiting for the official launch to play their hand.
This latest OM-D feels long-overdue for many. But now it's finally here! And we all know what they say about good things coming to those who wait...
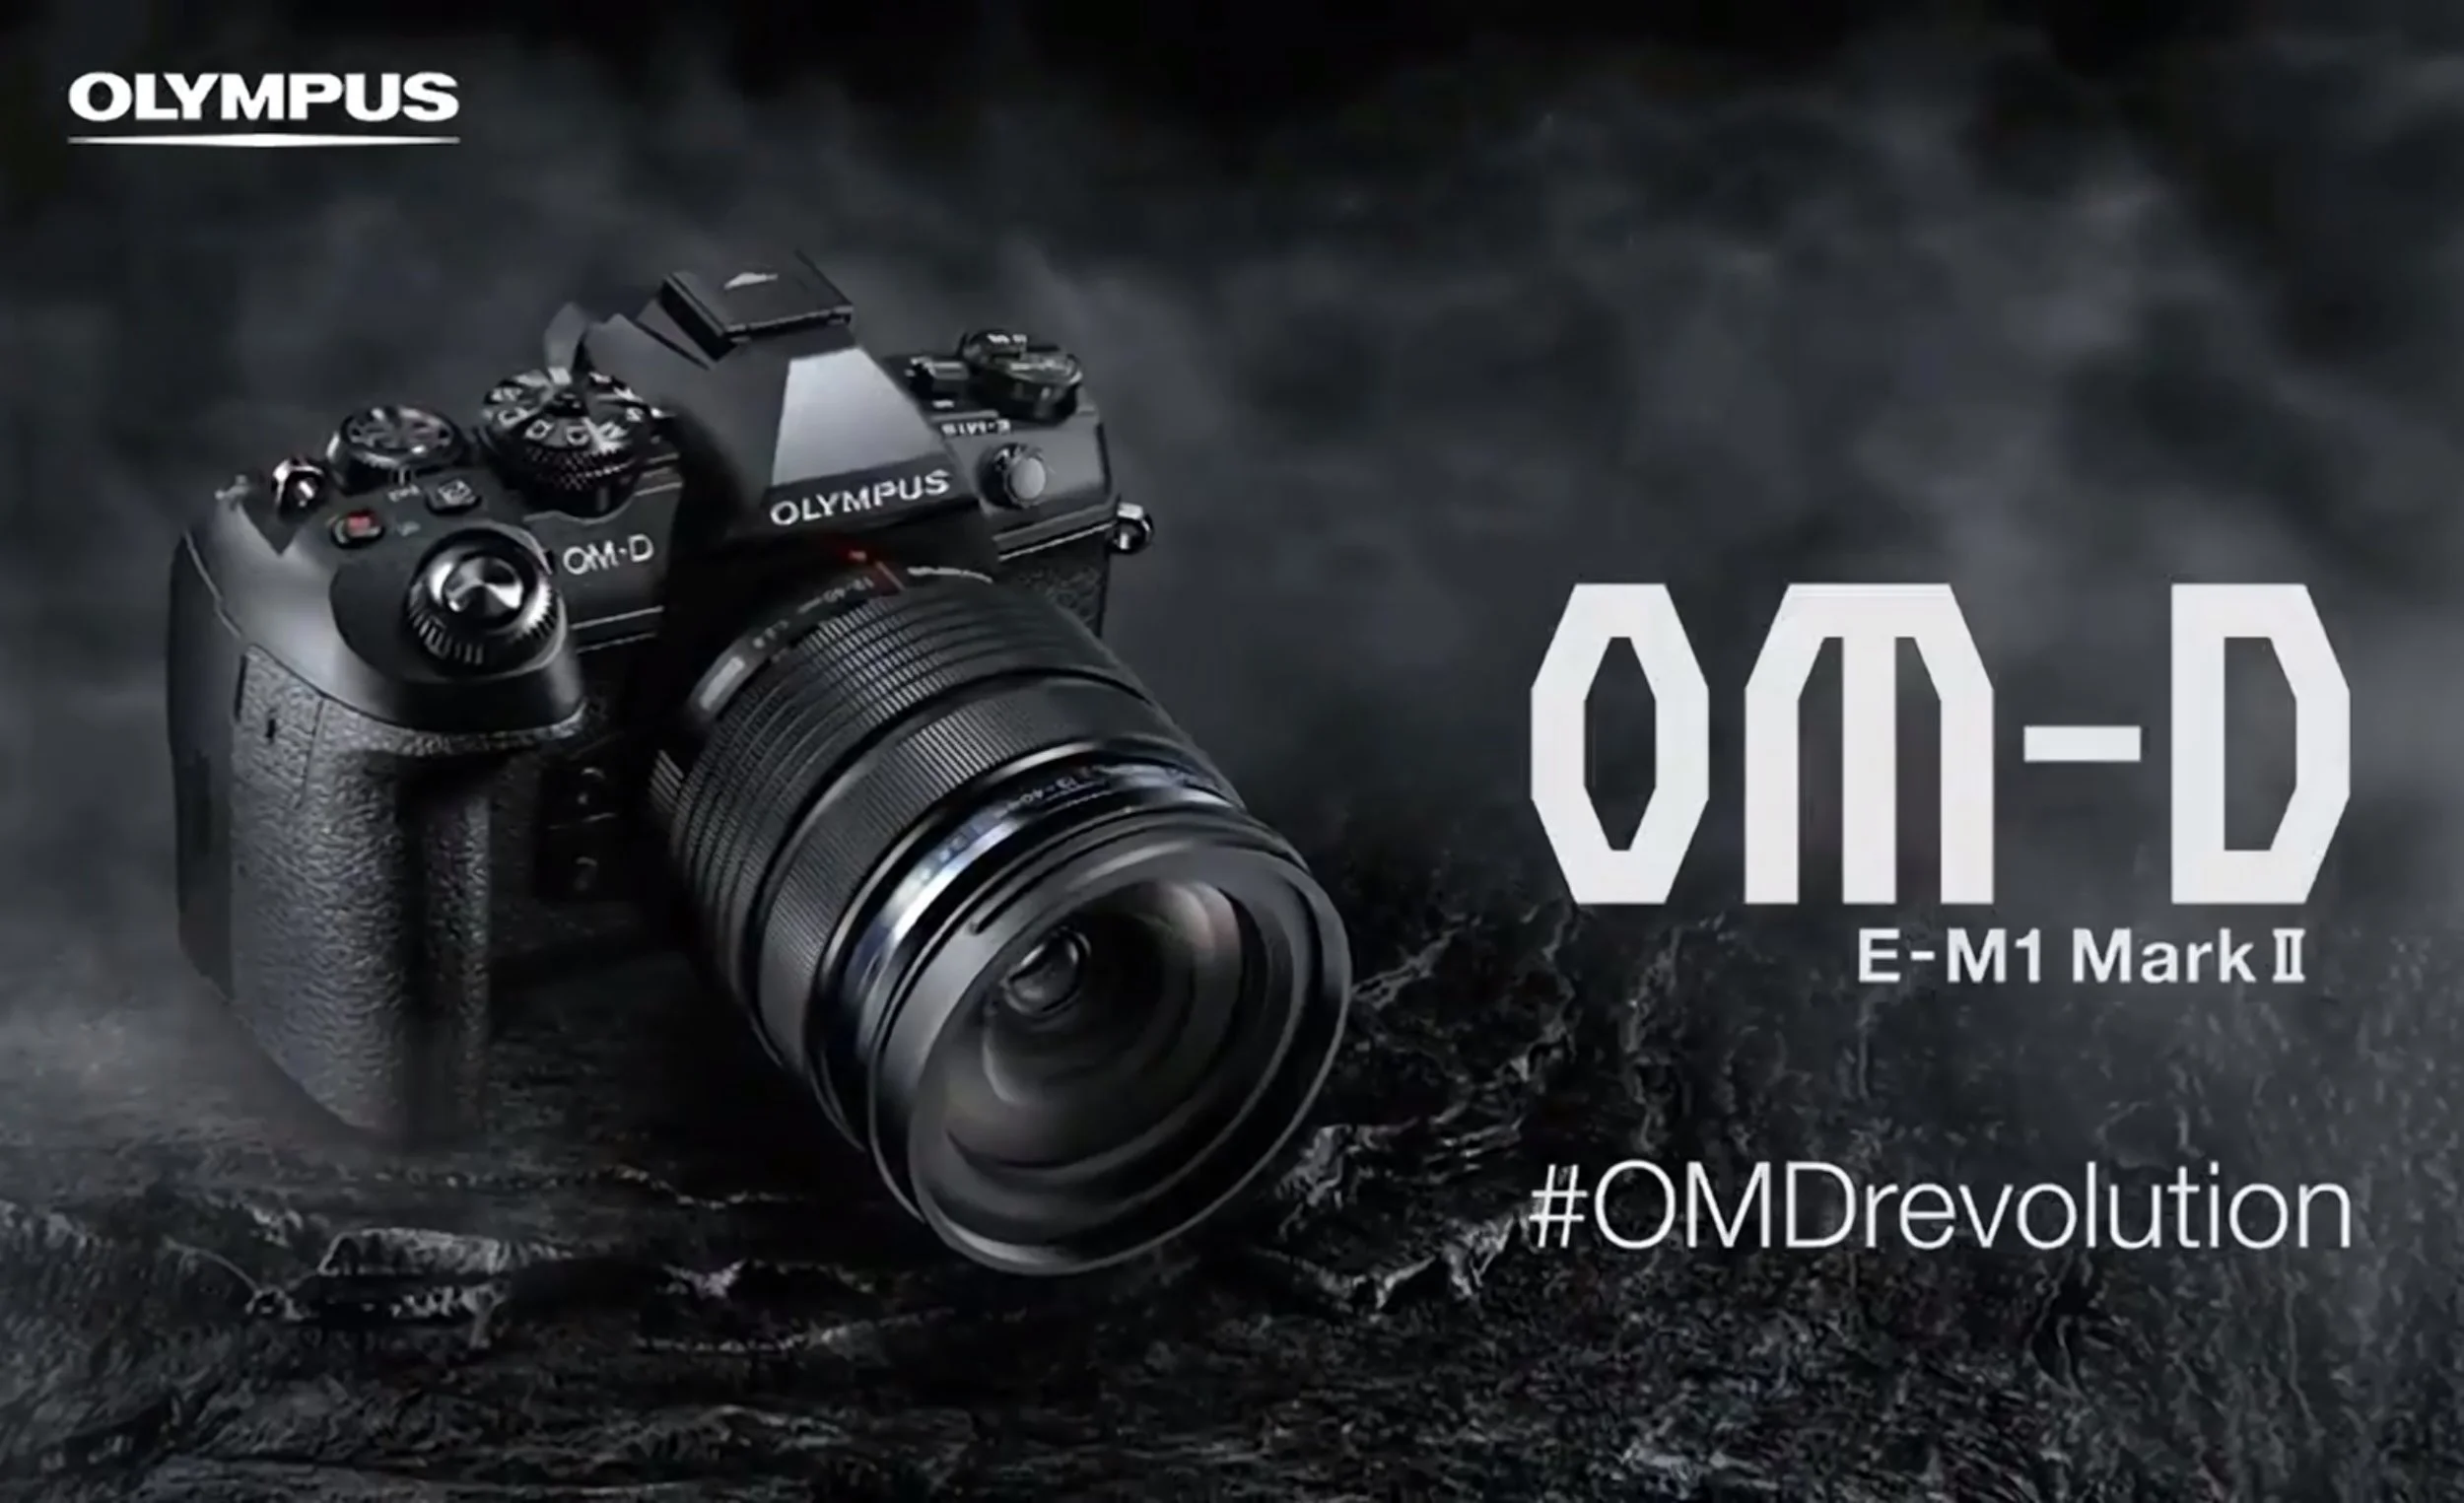
#OMDRevolution - the Olympus OM-D E-M1ii has been announced! The OM-D E-M1ii will sit firmly at the top of the OM-D range and is Olympus' new flagship Mirrorless Micro Four Thirds Camera.
Incase you missed it; Olympus streamed the entire launch in rather Apple-esque fashion by talking through each of the new features with an accompanying slide to detail the changes.
If you want to watch the entire presentation just hit play below. Or if you are just looking for a summary of the features packed into the new E-M1ii, then scroll down a little further.
Spec Summary
In the announcement presentation Olympus provided two very useful slides. The first showed the new and impressive headline specs of the E-M1ii, with the other then showing how much each area is imroved upon vs the original OM-D E-M1:
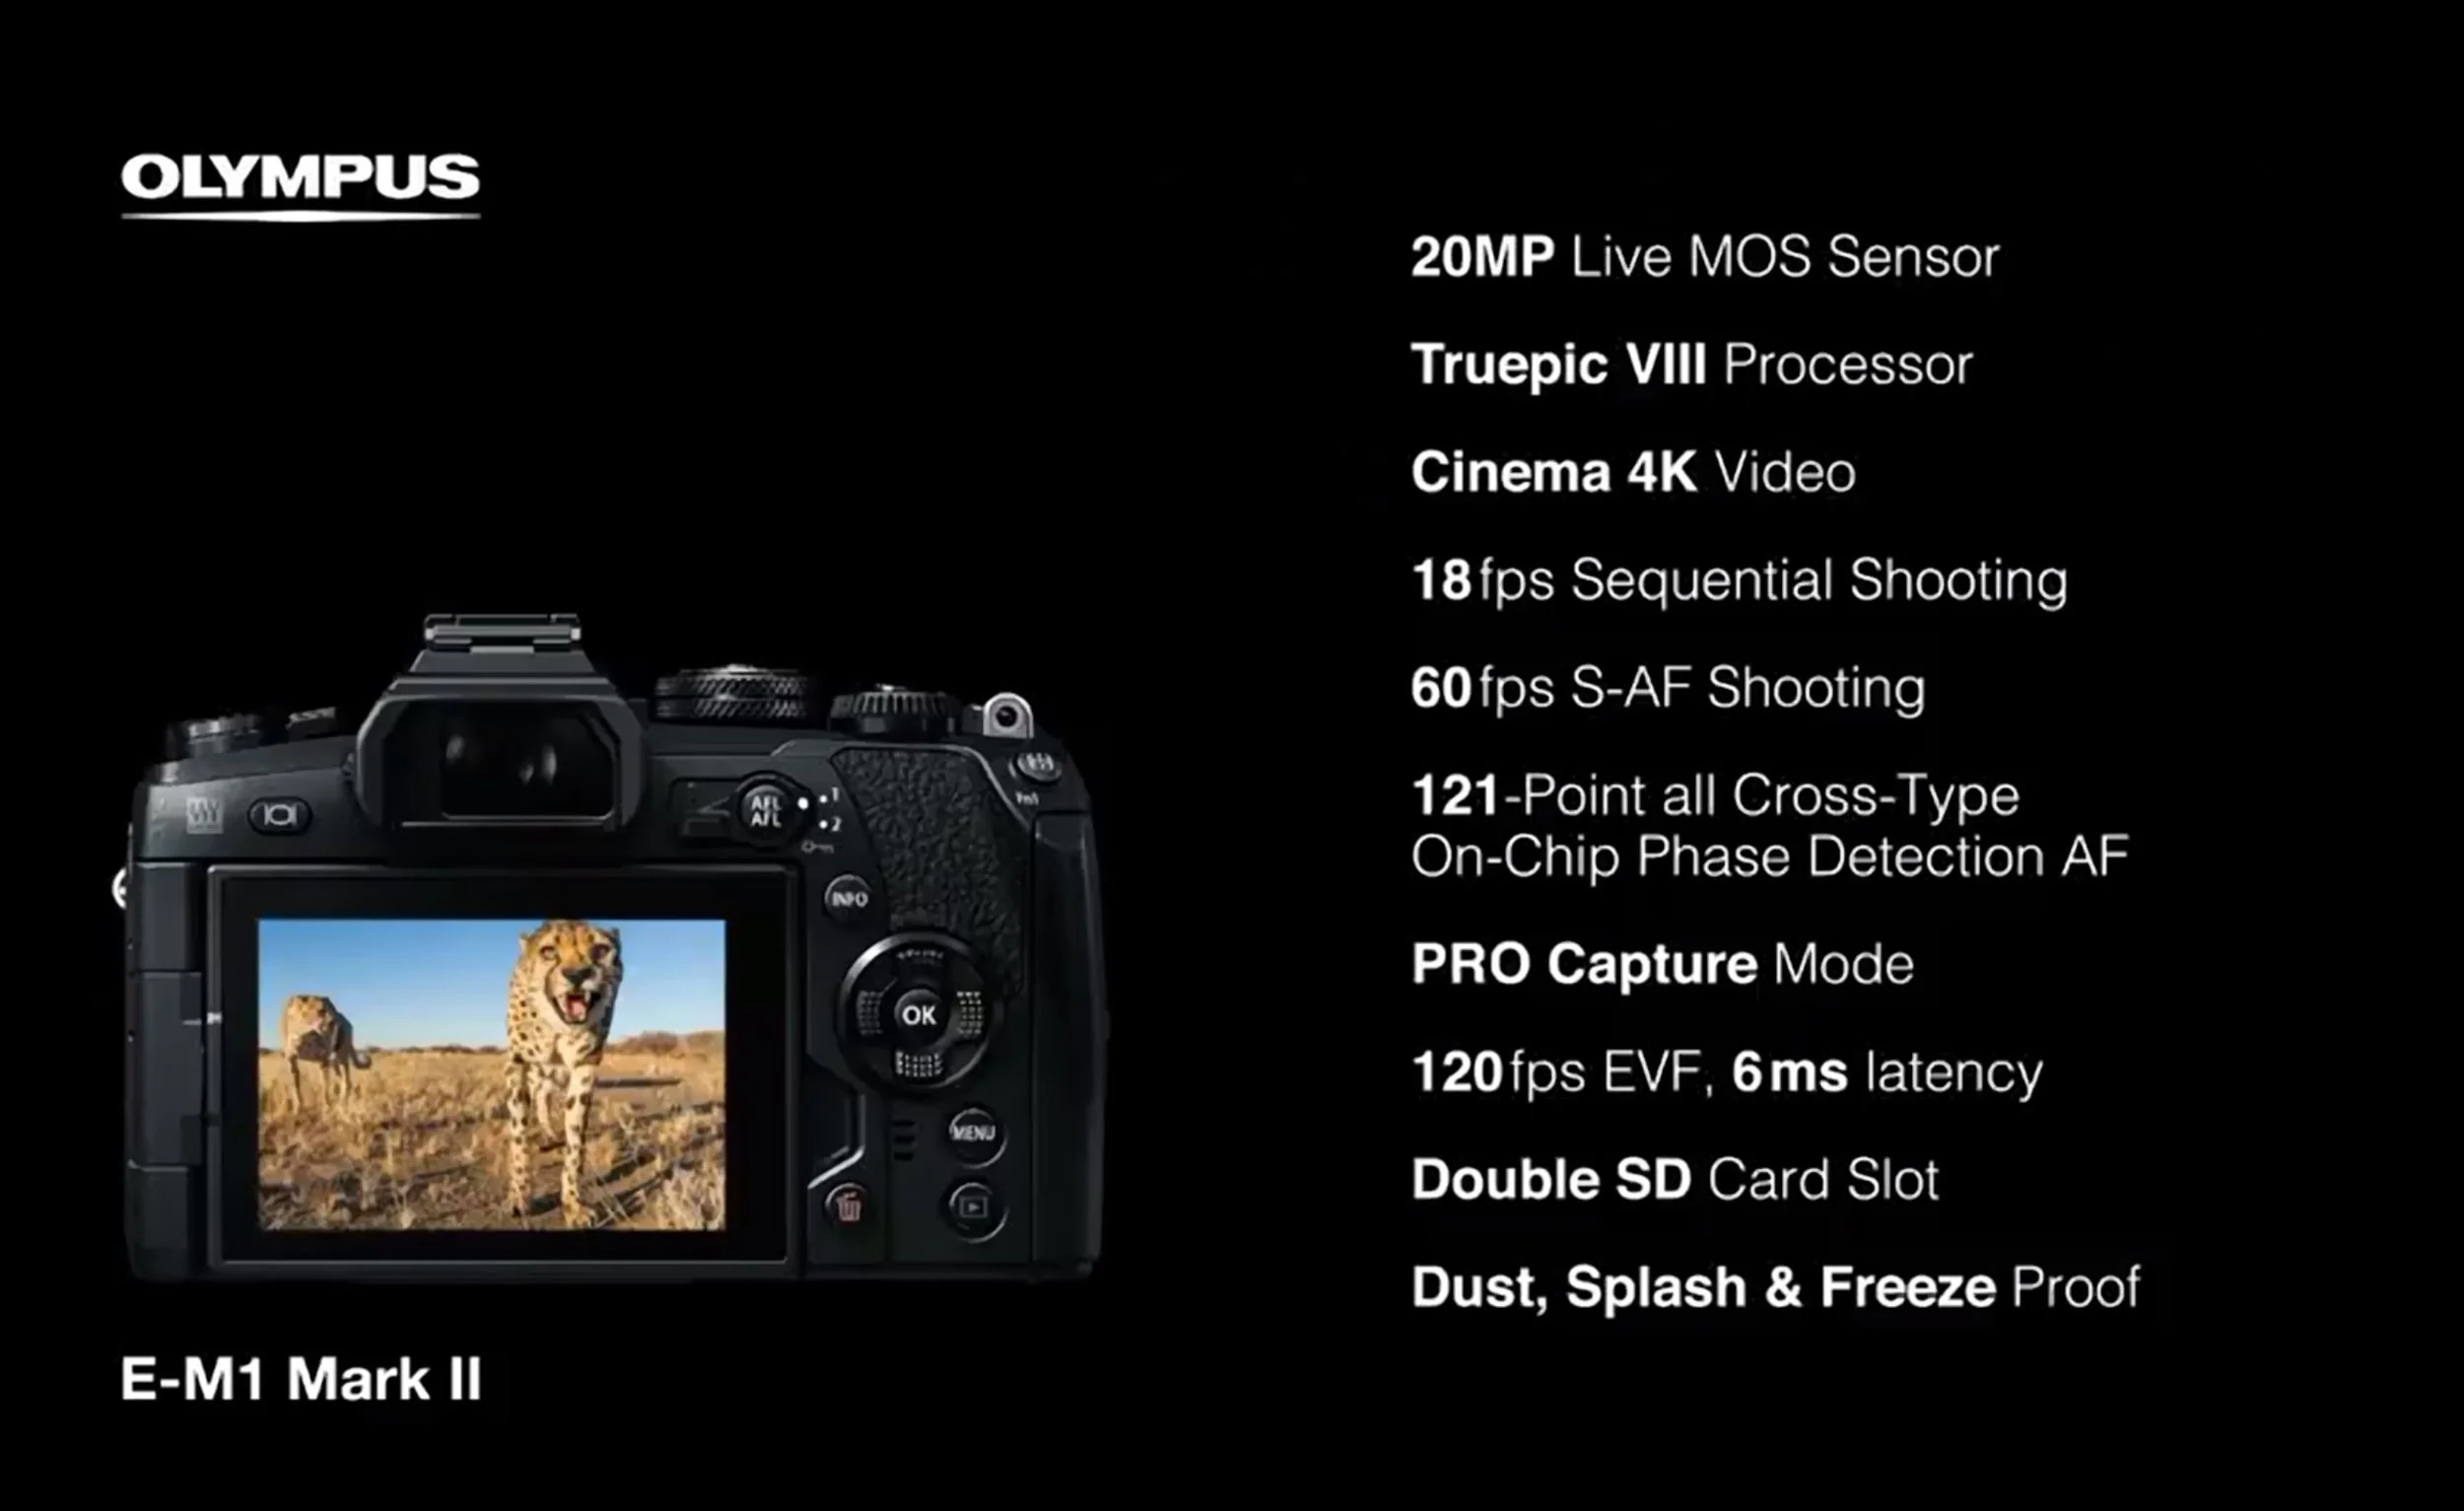
The new E-M1ii spec, including a new 20Mp sensor from Sony, capable of 4K video, 18 frames per second and 121 focus points, all of which are on-chip phase detect and ALL of which are cross type!

63% Faster EVF response rate...this new viewfinder is apparently pretty impressive!
It seems that Olympus really have listened to what photographers were asking for. Countless times in the Olympus groups I've heard photographers demanding better AF tracking, two card slots and a bigger EVF.
All of these things find their way into the mark 2 with a series of other very welcome improvements too. In the presentation Olympus of course put a lot of focus (no pun intended) on the E-M1ii's focussing abilities. It was said that as well as being faster and more accurate to focus, thanks largely to the 121 all cross-type on-chip phase detect focus points, that this new mark 2 will also be able to maintain and track focus on a moving subject far, far better than before. I rarely heard any complaints about auto focus with the E-M1, but if there ever was one, this was probably it.
Olympus Pro Service
The topic of the the E-M1ii's focusing system was discussed for quite some time and it was after this that I thought they would draw the announcement to an end. What else could there be to add?
Well, as I've discussed and written about before, it's one thing to have a camera and a system capable of helping you to make professional-grade images, but it's something else entirely to have the support of the manufacturer when it comes to warranty, support and repairs. To this end Olympus announced the launch of their new pro level support plans too:
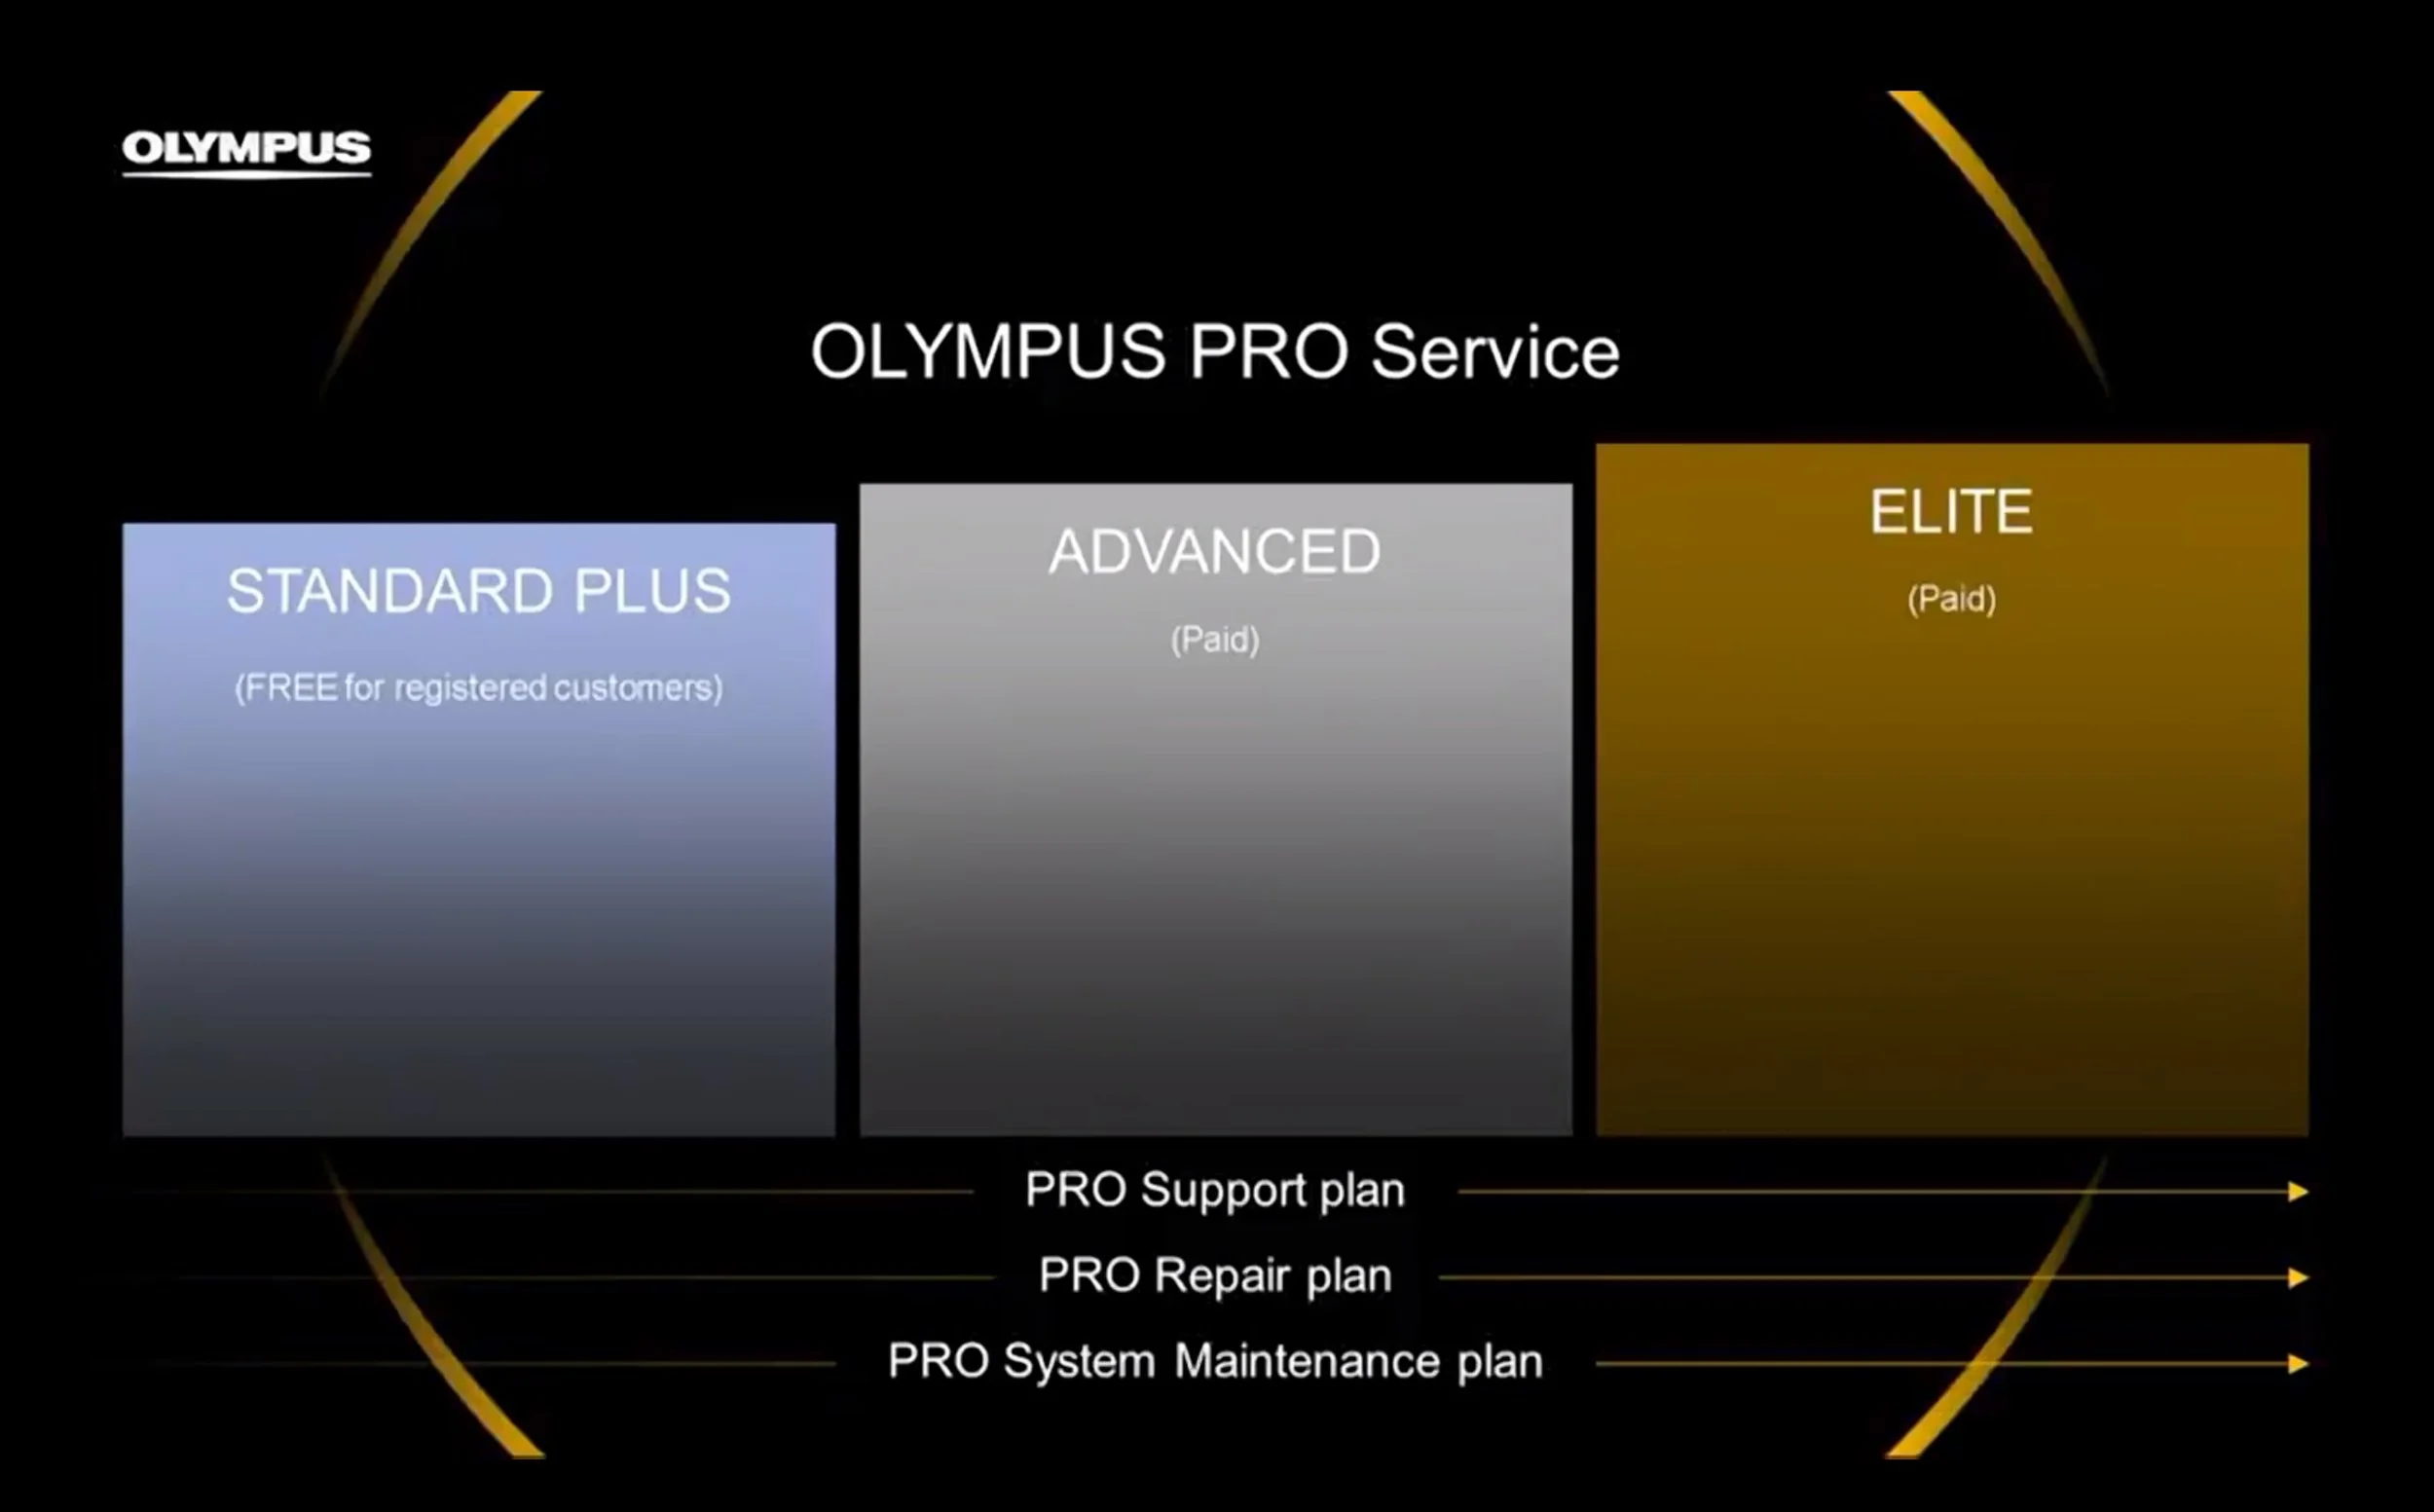
Standard, Advanced and Elite Service options will be available. Although not shown in this slide, it was mentioned in the presentation that next-day loan cameras would be available with a plan...
The E-M1ii and Pro Level Service offerings were not the only announcements today though. I've included some of the other details at the bottom of this post, such as the new battery grip and other accessories.
My Thoughts on the OM-D E-M1ii
In all honesty, in a bid to have this post released in as timely a fashion as possible I had much of it pre-written with the expectation I would just add a few images from the live stream. Much of what I had written still stands, but, the entire presentation - in combination with the E-M1ii's specs and the Pro Service plans - reveal so much more to me than just a new camera. There is a message being sent from Olympus here: Olympus are after the professional market in a big way and not just weddings, portraits, pets, landscapes and wildlife - we're talking top level sports photography too!
The original OM-D E-M1 was a camera ahead of it's time trying to muscle it's way into the world of sports and serious professional photography against a field full of mature DSLRs and big white lenses. Whilst some (myself included) felt it was good enough to seamlessly step into the arena's of wedding and portrait photography and that it was even capable of shooting motor sports with great success, it perhaps didn't ever quite cut it as a top-level sports camera for the professional sports photographer. The omission of dual card slots, limited (or at least a lack of) pro level support and it's ability to track a subject being lesser than that of a DSLR, meant that many pro sports photographers just thought of it as another fad mirrorless camera. This was all despite the original E-M1 having always been widely acknowledged to be the best of all of the mirrorless cameras when it came to auto focusing capabilities - even today! (sorry Fuji Shooters, but it's true!).
However, the E-M1, like every DSLR and mirrorless, had it's limitations. You wouldn't have any trouble convincing many wedding and portrait photographers that the E-M1 was a capable replacement for a DSLR when it came to their work. I certainly felt that it was more it was up to the task and it has proven to be great.
To me at least, as great as the E-M1 was / is, professional sports photography always felt just one step beyond its' reach. Shooting top level team sport events such as football (Soccer) or situations where the subject changed direction and distance rapidly presented the E-M1 with just a little too much to handle. As a result the E-M1 was never largely adopted by professional sports photographers and failed to garner recognition as a true replacement sports photographers' camera, which quite possibly hampered its' bid to be more widely recognised and acknowledged as a professional level camera.
The OM-D E-M1 mark ii now sets out - backed by Olympus PRO service - to take that one final step that it's predecessor arguably couldn't quite make. With it's much improved auto focus system and array of features that any professional sports photographer would demand it appears well placed to do just that! Spec-for-spec the E-M1ii aims to stand toe-to-toe with those big old DSLRs and over-sized white lenses. This is a massively bold move from Olympus. It's something that Sony and Fuji just aren't attempting (or at least they don't appear to be attempting or advertising that this is something they want to achieve). Olympus have set out their stool. Can a camera seen by many professional sports photographers as 'plucky' and 'diminutive' really move in on what has traditionally been the home of those behemoth size camera bodies and lenses?
Even if the OM-D E-M1 mark ii can't do it yet - Olympus are the only company that appear to be trying to take mirrorless cameras in the right direction by attempting to break into that market. With the announcements on offer from Canon and Nikon at Photokina I'm left feeling incredibly un-inspired by those brands and the directions in which they are heading. If we see OM-D's at the next Olympics and pitch-side at Premier League football matches, I can see the perception swinging so heavily that it may just kick start a complete sea change in what it is photographers consider a mirrorless camera capable of being: a truly professional camera suitable for everything from weddings, macro, product, portraits and, the holy-grail; sports photography.
What do you think of the E-M1ii?
Are you going to be buying the Olympus OM-D E-M1 mark 2? What do you think of the new model? Can you see this camera taking over in the field of sports photography? Let me know your thoughts in the comment section below.
Some more slides from the Olympus OM-D E-M1ii Announcement
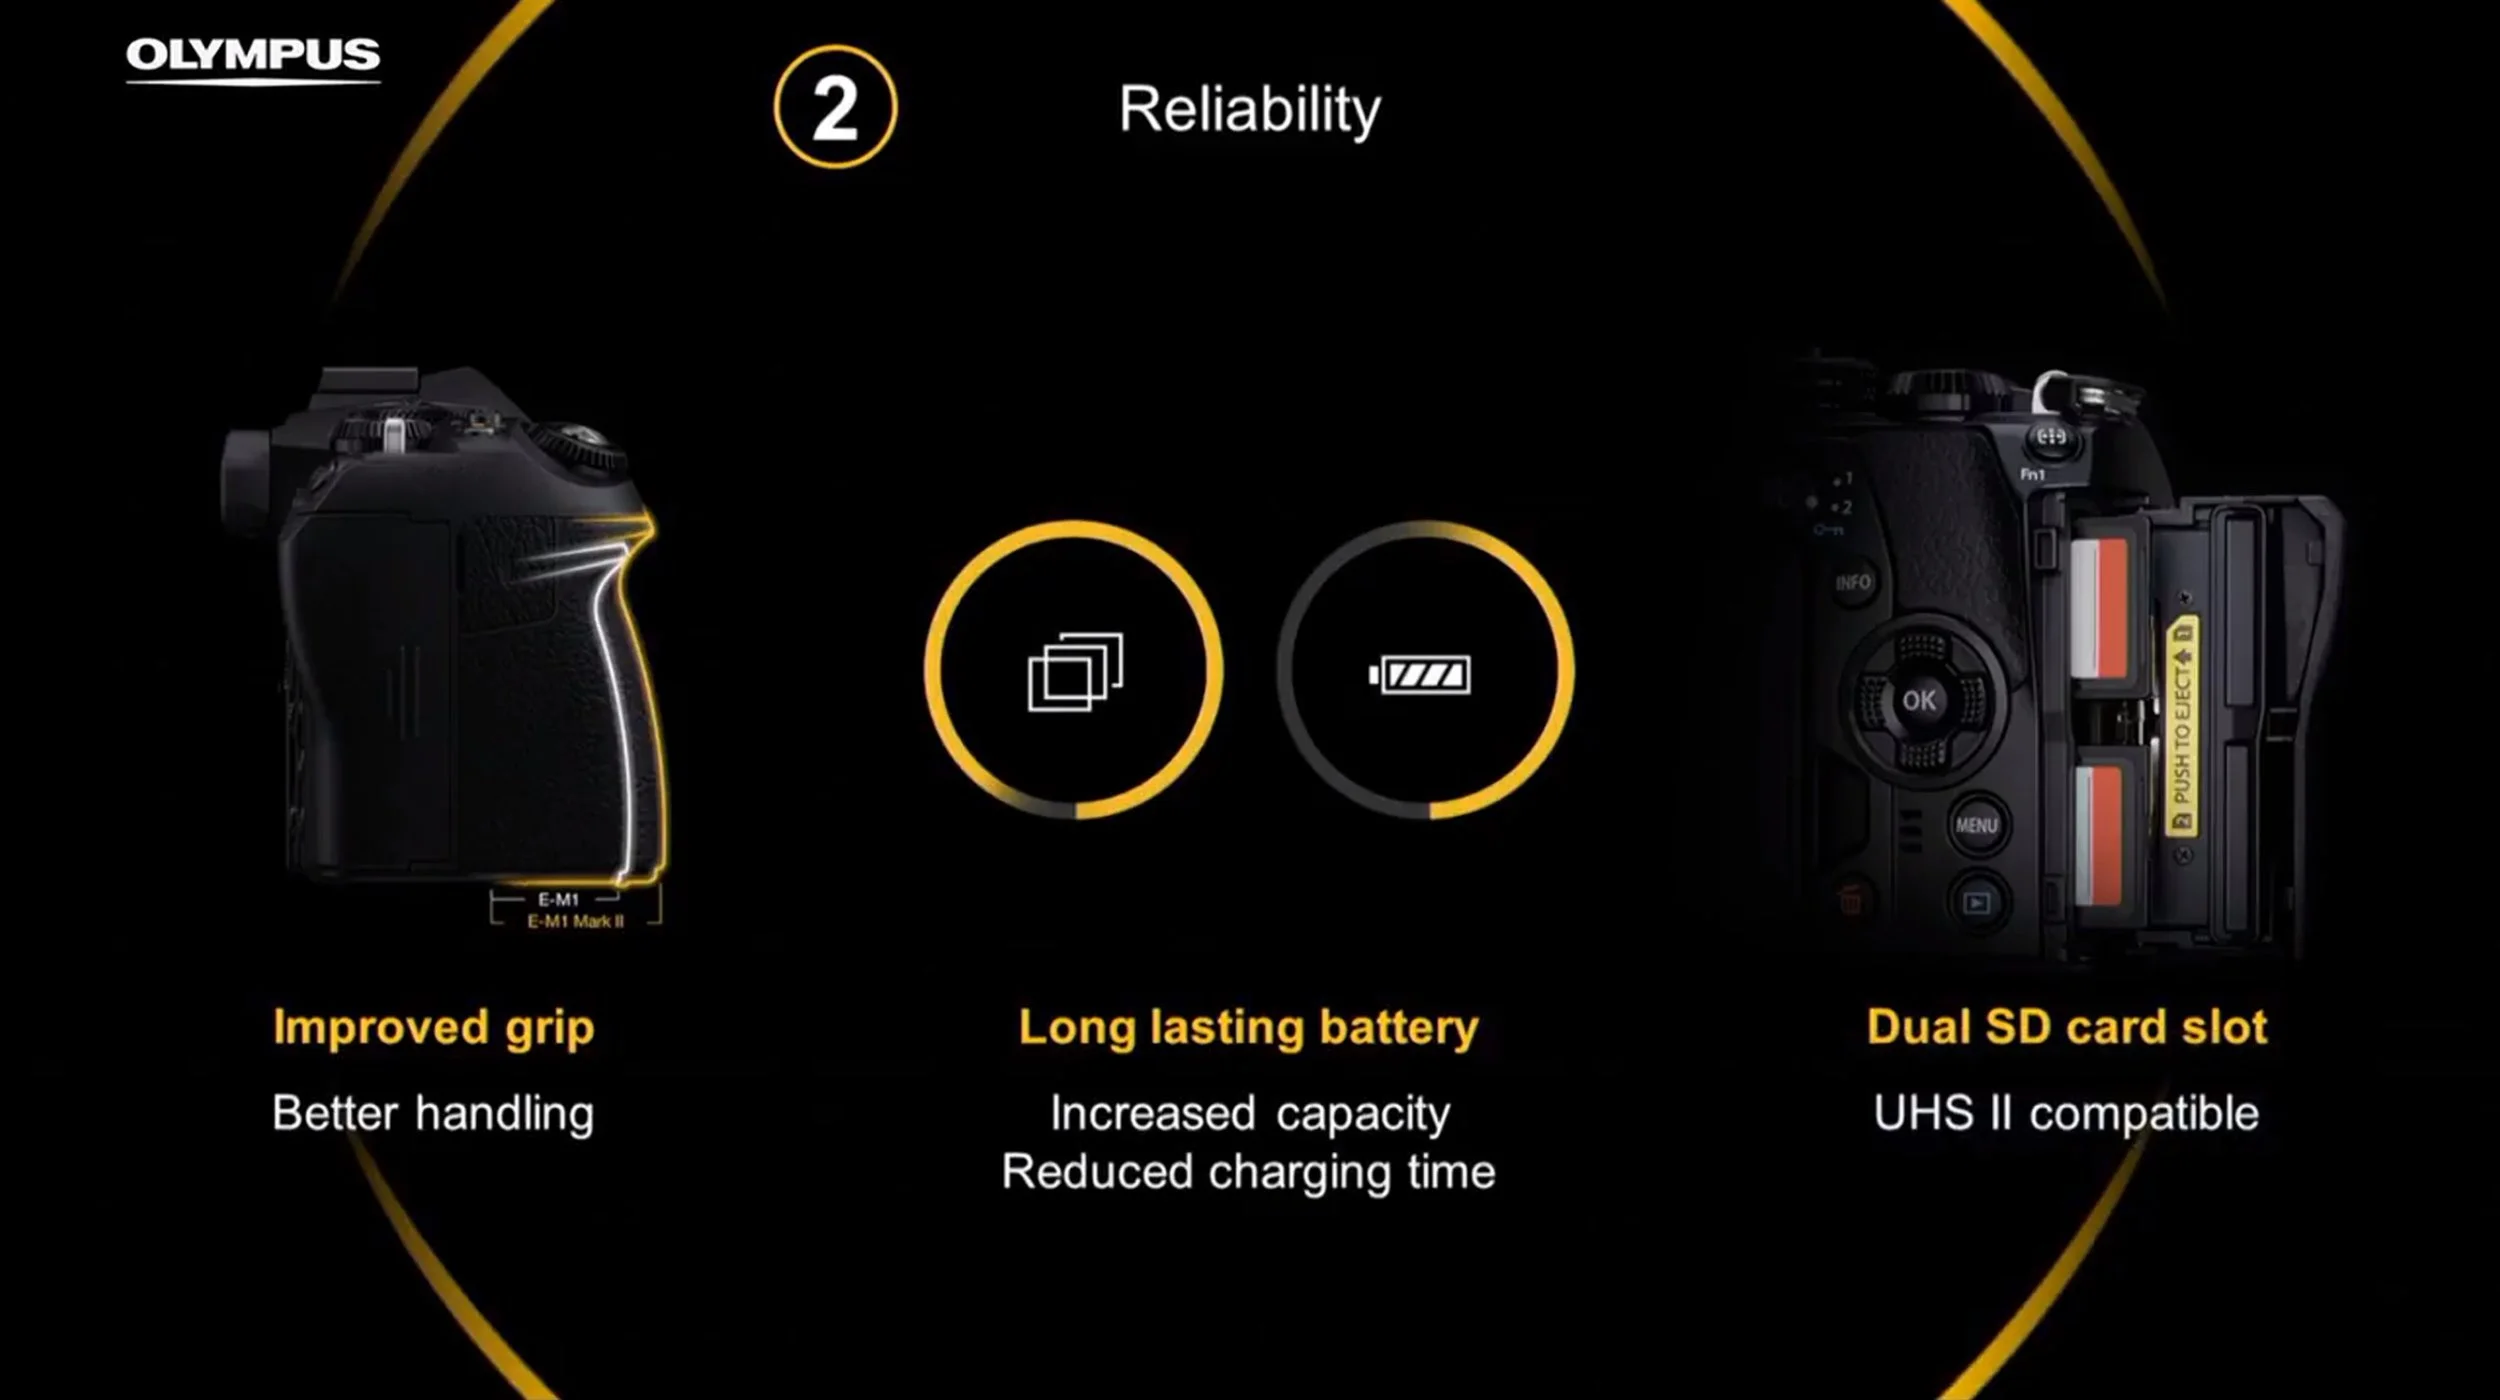
The front grip has been made larger, which makes sense considering the largest M.Zuiko lenses (the 40-150mm f/2.8 and the 300mm f/4 were released after the original E-M1 was first made. Dual card slots and improvements to battery longevity were also mentioned...hallelujah!
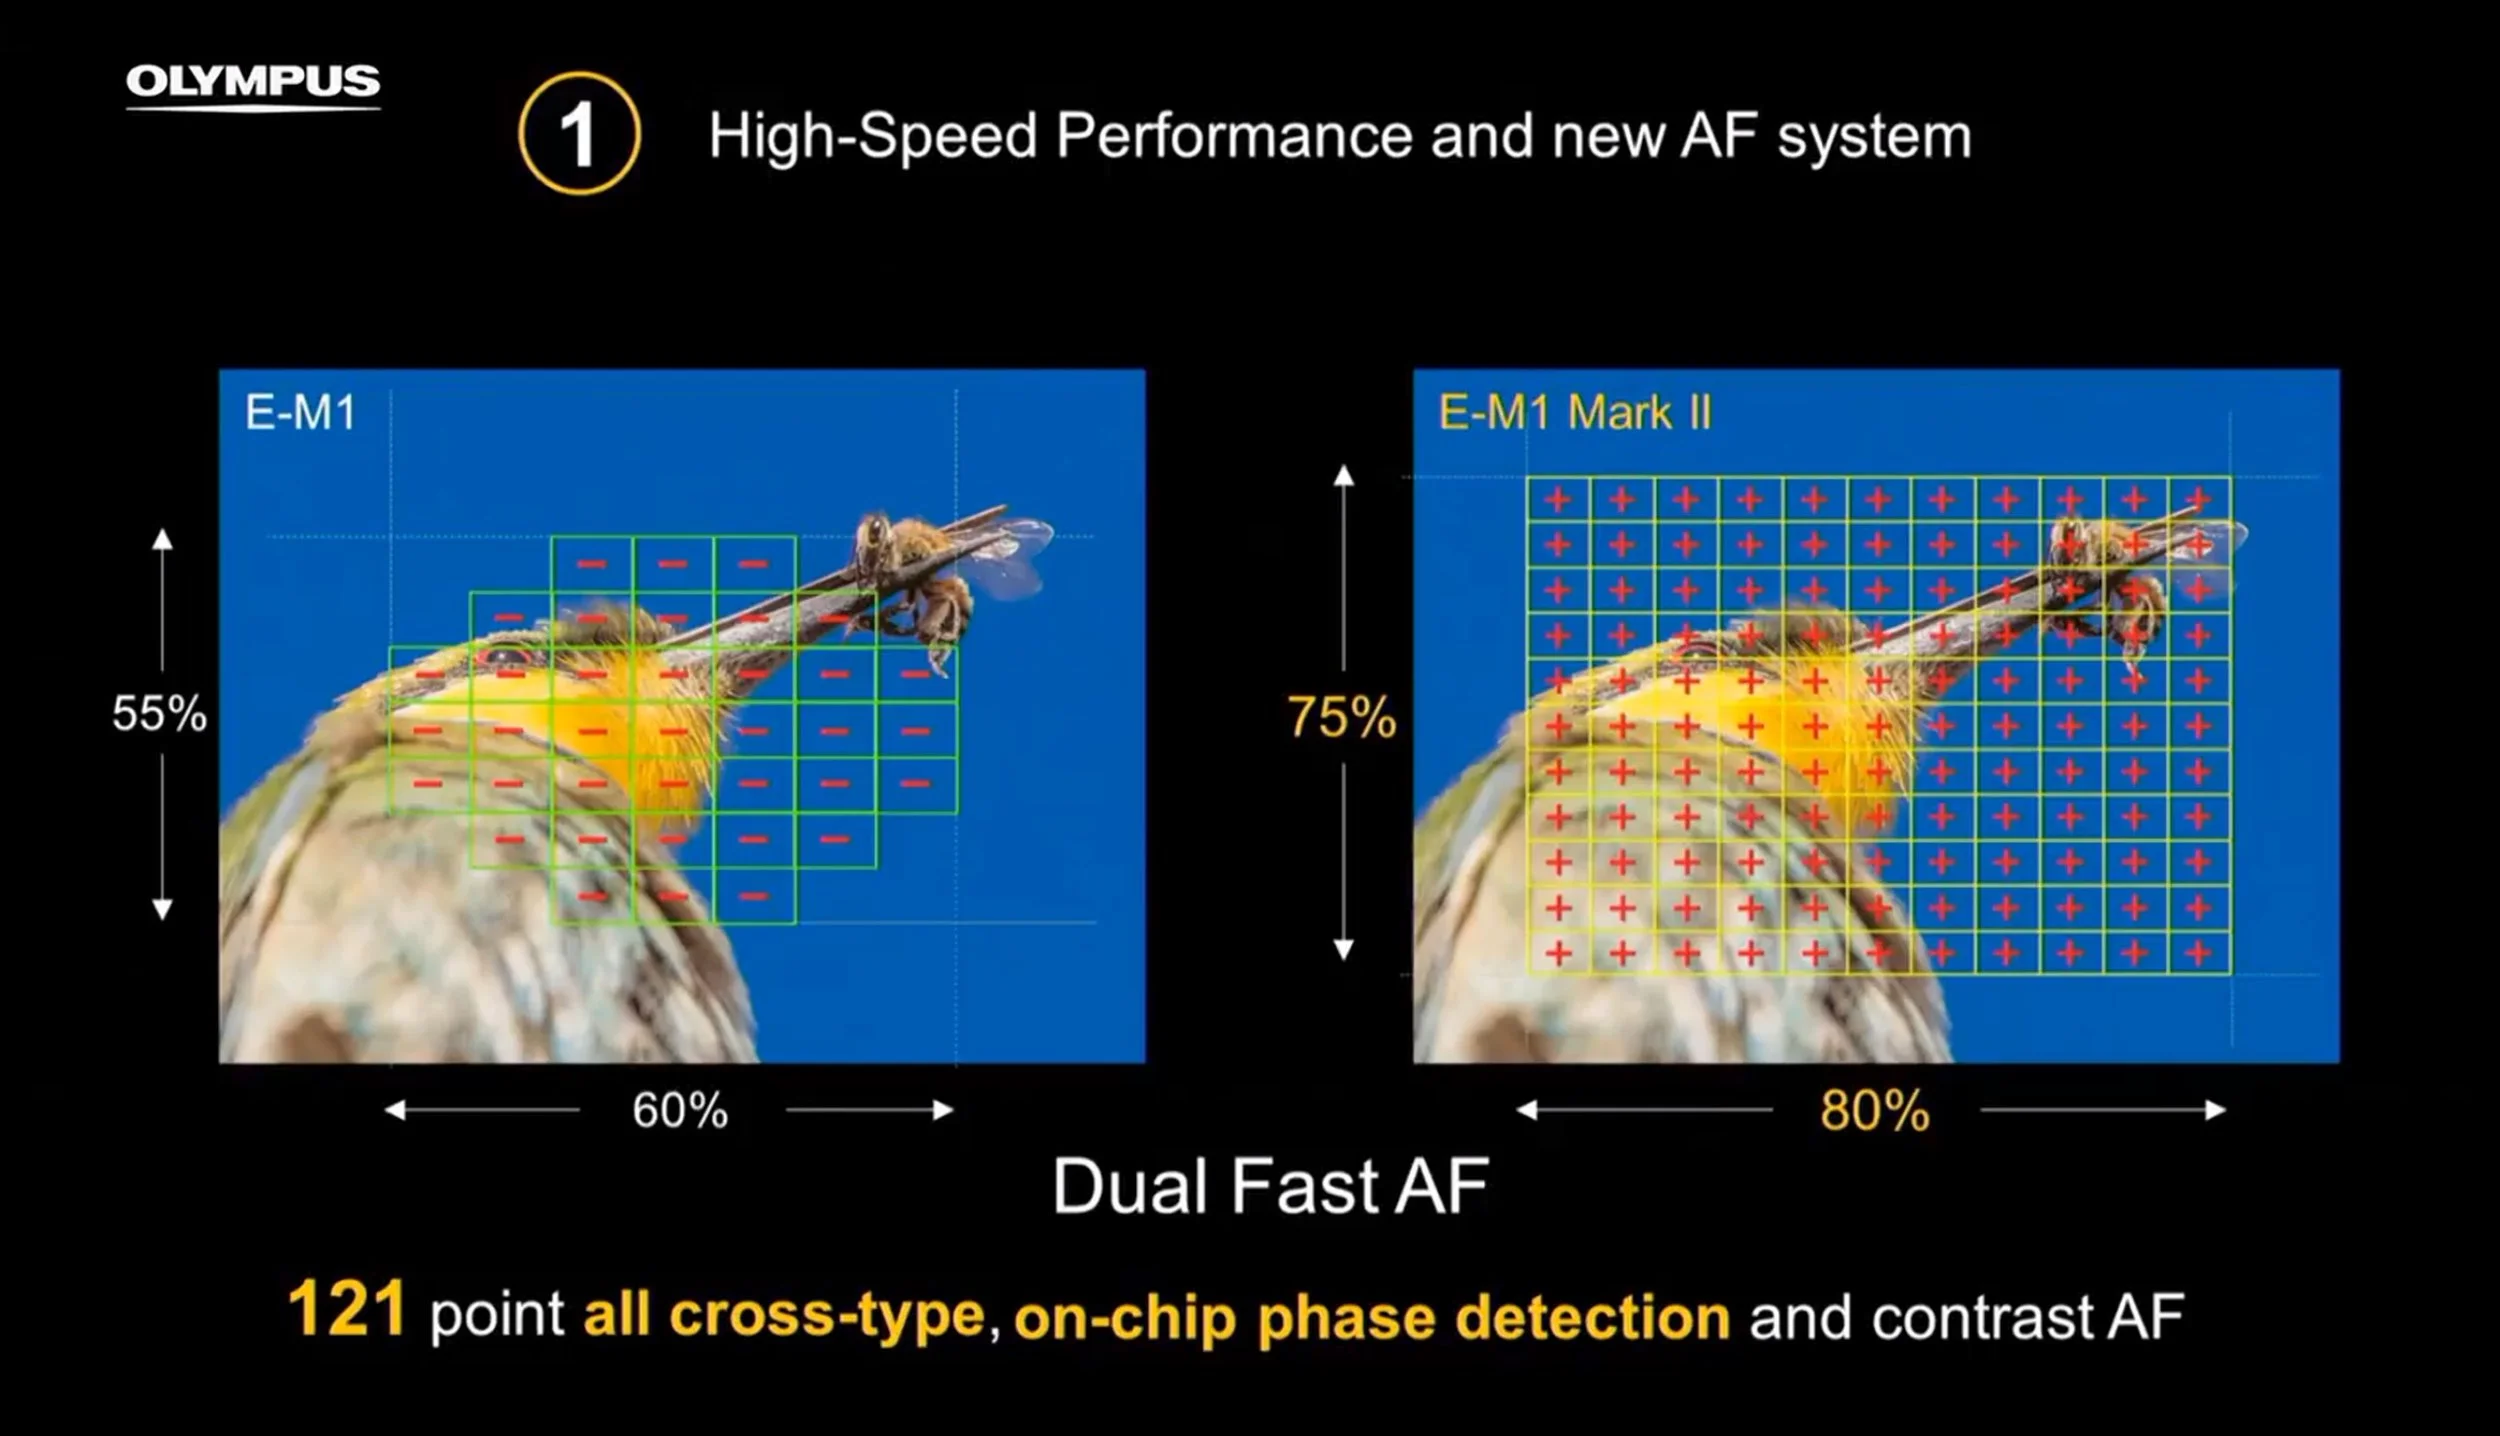
A slide showing the layout of the new auto focussing system. Impressive!
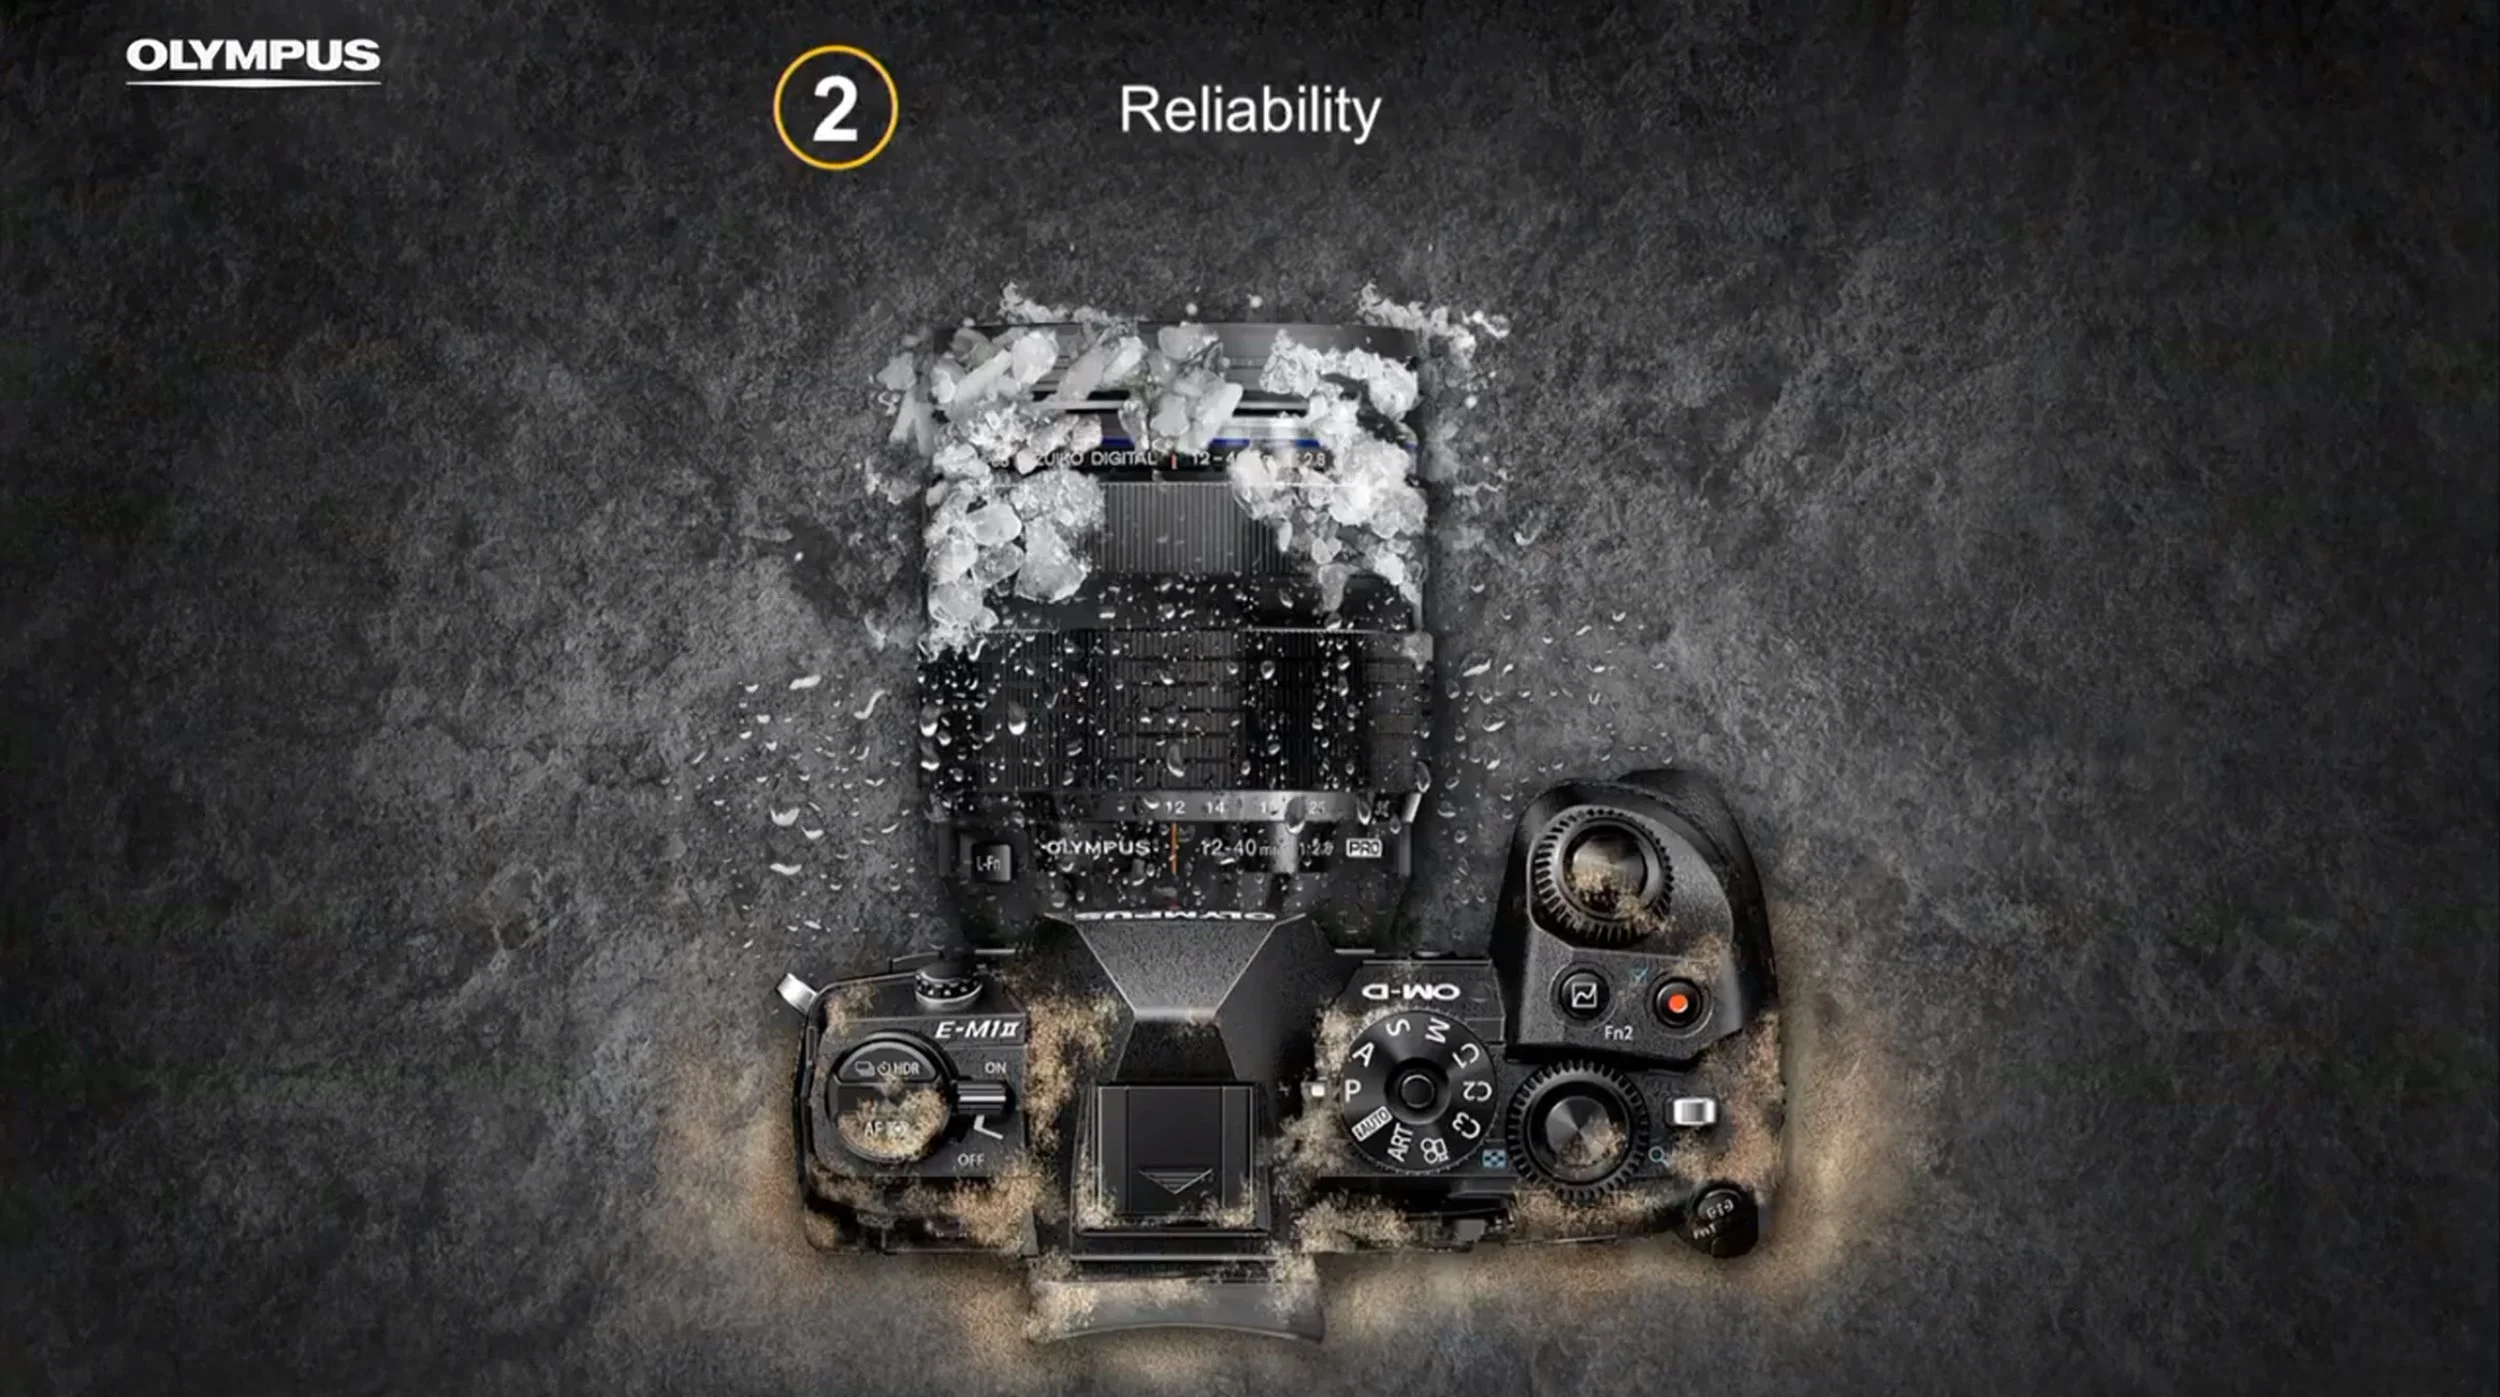
The E-M1 was ever-reliable. Olympus have recognised this and only seek to build upon that reliability. It was a staple of the success of the E-M1.
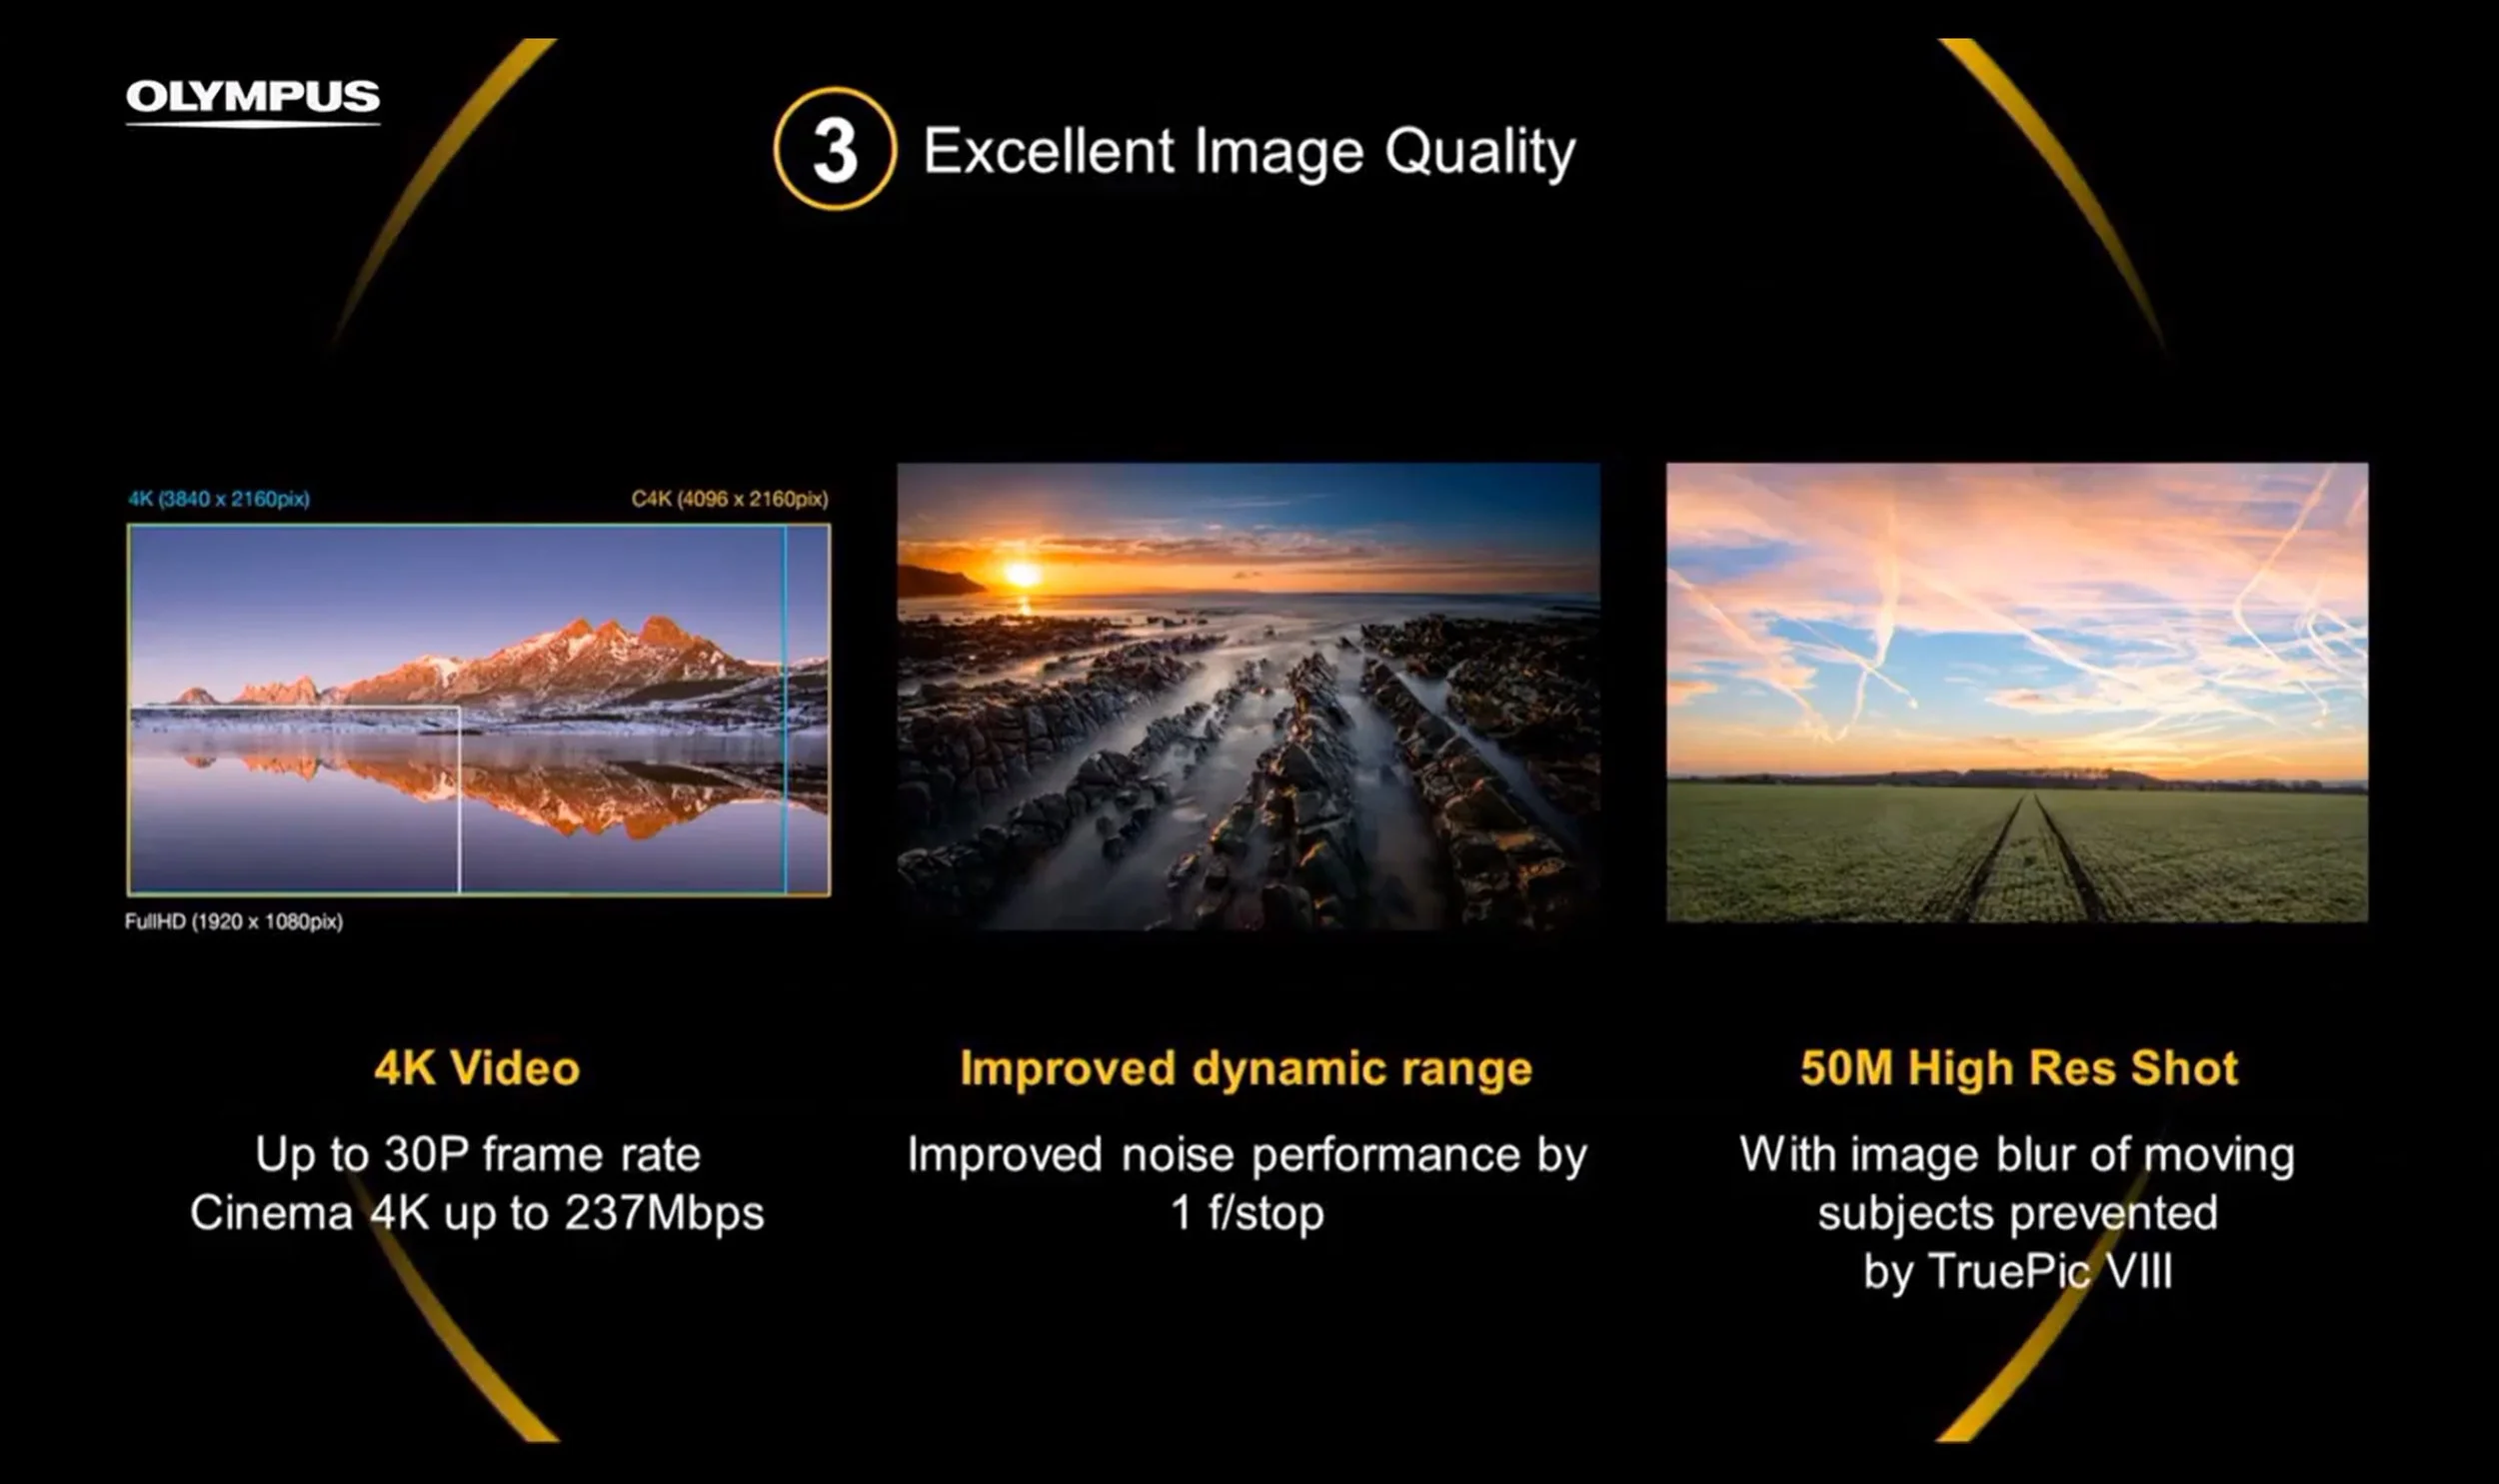
4K Video, 1 stop of noise improvement, higher dynamic range and the 50 megapixel hi res shot are all features in the E-M1ii.
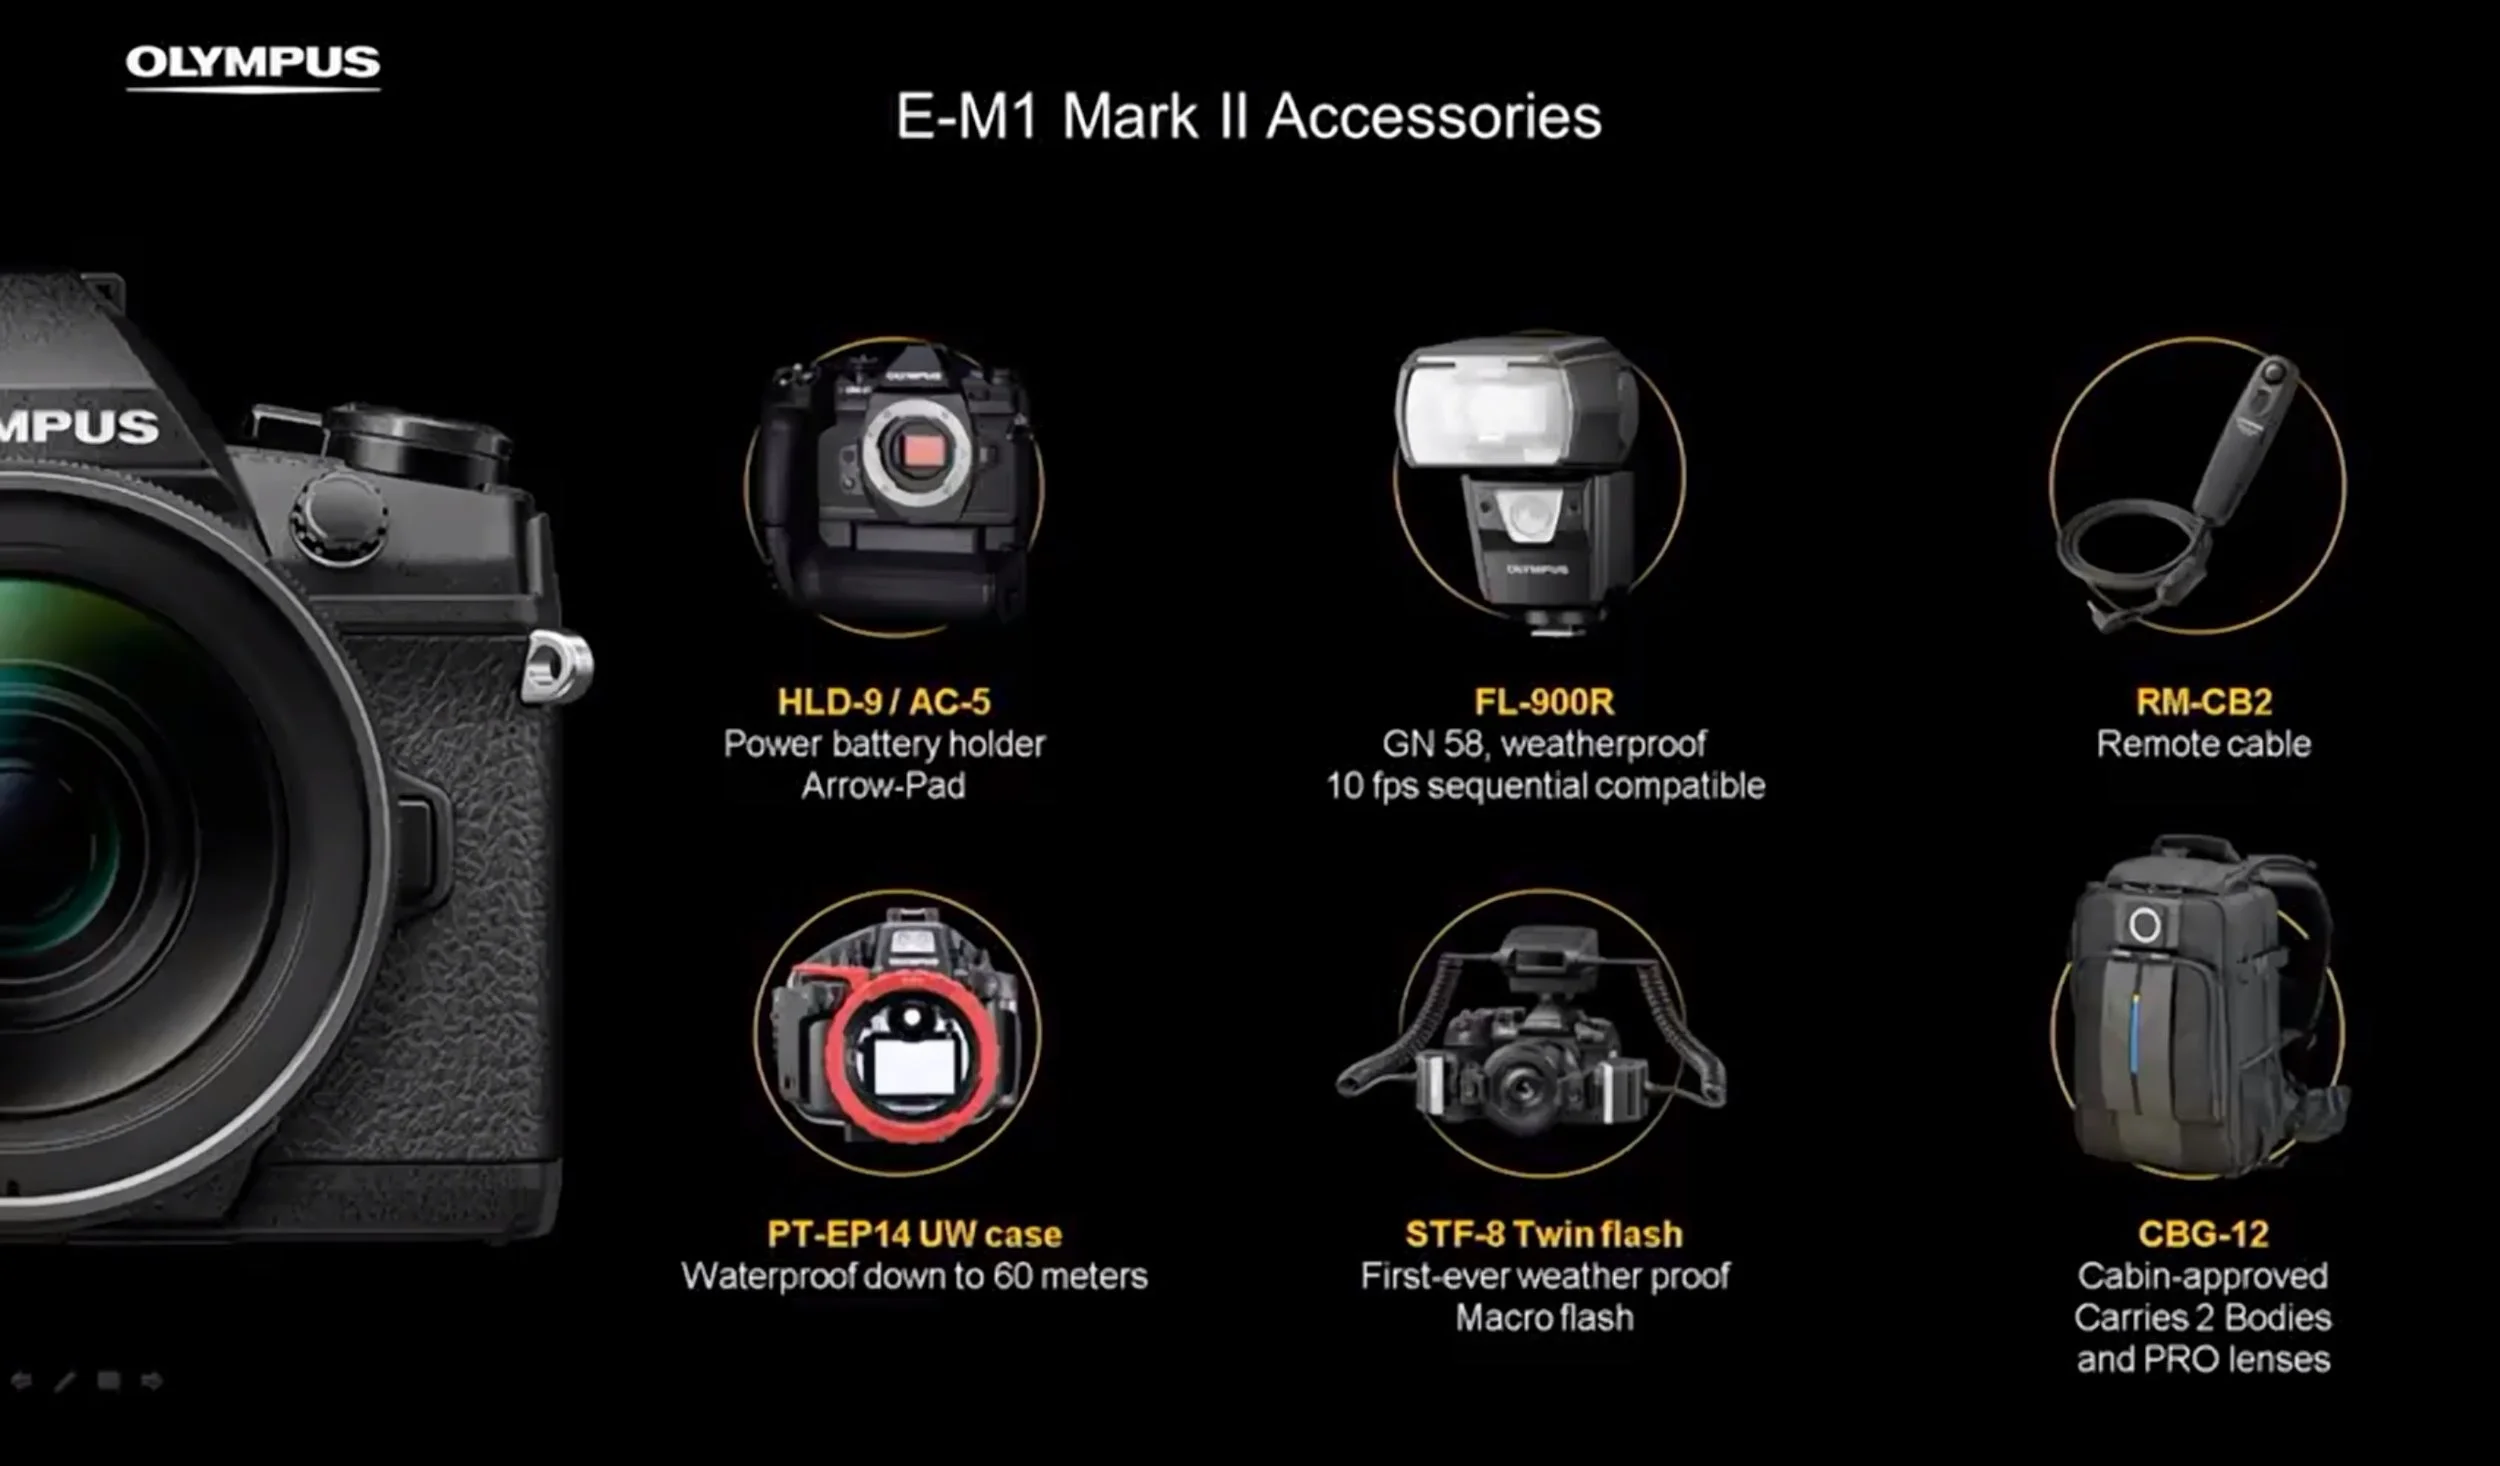
New accessories include a new vertical grip, which features a directional button pad all of it's own to mirror the same pad you would find on the camera body, making portrait-oriented shooting even easier than ever. Those who use flash will also be pleased to see news of a new FL-900R speed light as well!
Thanks for stopping by! Don't forget to subscribe!