


Richmond Park Free Wallpapers
Let's be honest, there is only so much you can do to be creative when shooting a subject such as a Deer. In particular, Red Stag Deer at Richmond Park.
Of course you can play with the light, hope the stags rut and do something interesting, but mostly everything you would expect to see has been photographed time and time again and is all readily available to view online with on quick Google search returning many of the same photographs.
So, how to be different?
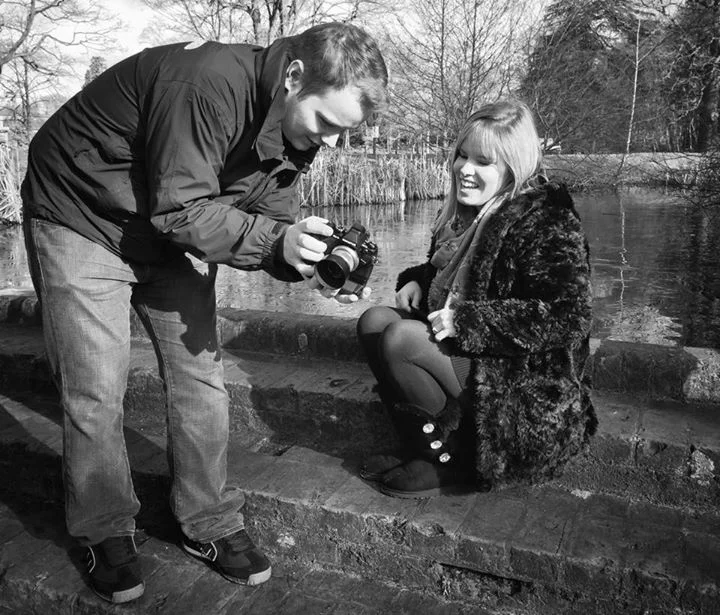
I've been to Richmond numerous times now, mostly with Neil Graham and each time I've come away with what I would consider to be safe shots. The sort of photographs you'd see in the results of the Google search I mention above. So today I intentionally looked for different things to photograph and also had in mind other compositions. Thanks to the EVF in my beloved Olympus OM-D E-M1 I could also better judge exposures and can, as a result, more easily experiment when shooting in to the light, as you'll see below in a few shots.
Now I'm not suggesting that these photographs of mine are revolutionary and brand new or that i'm the first to produce photographs like this (of course I'm not!), but for me as a photographer they're certainly a departure from the standard type of shots I've made before on previous visits to Richmond Park and as a result, to me at least, they're something a little fresh and dare I say interesting. But that's down to you, the viewer to decide.
Whatever the case may be I've processed, cropped and exported these so that they will be ideal desktop wallpapers / backgrounds and they're all available for you to download for free
You can download all of the Hi-Res files in a Zip file right here (13.3Mb), or you can view each photograph in full size by clicking each photograph below. (Just click the download link beneath each picture to download them individually). Alternatively, you can click to enlarge, right click on the image and then choose 'Save As' if you're using a Windows computer
All of these photographs are 2560 pixels on the longest edge (suitable for most Macs and widescreen laptops and monitors).
All of these photographs were made using an Olympus OM-D E-M1 Micro Four Thirds Mirrorless Camera and the Olympus M.Zuiko 40-150mm f/2.8 PRO with the MC-1.4 1.4x Tele Converter fitted. As a result my effective focal length on the day was 112-420mm. The maximum aperture of this combination is f/4. This was constant throughout the entire zoom range.
1. Golden Mist
2.2Mb - Download Here
2. Morning Dew Drops
2.9Mb - Download Here
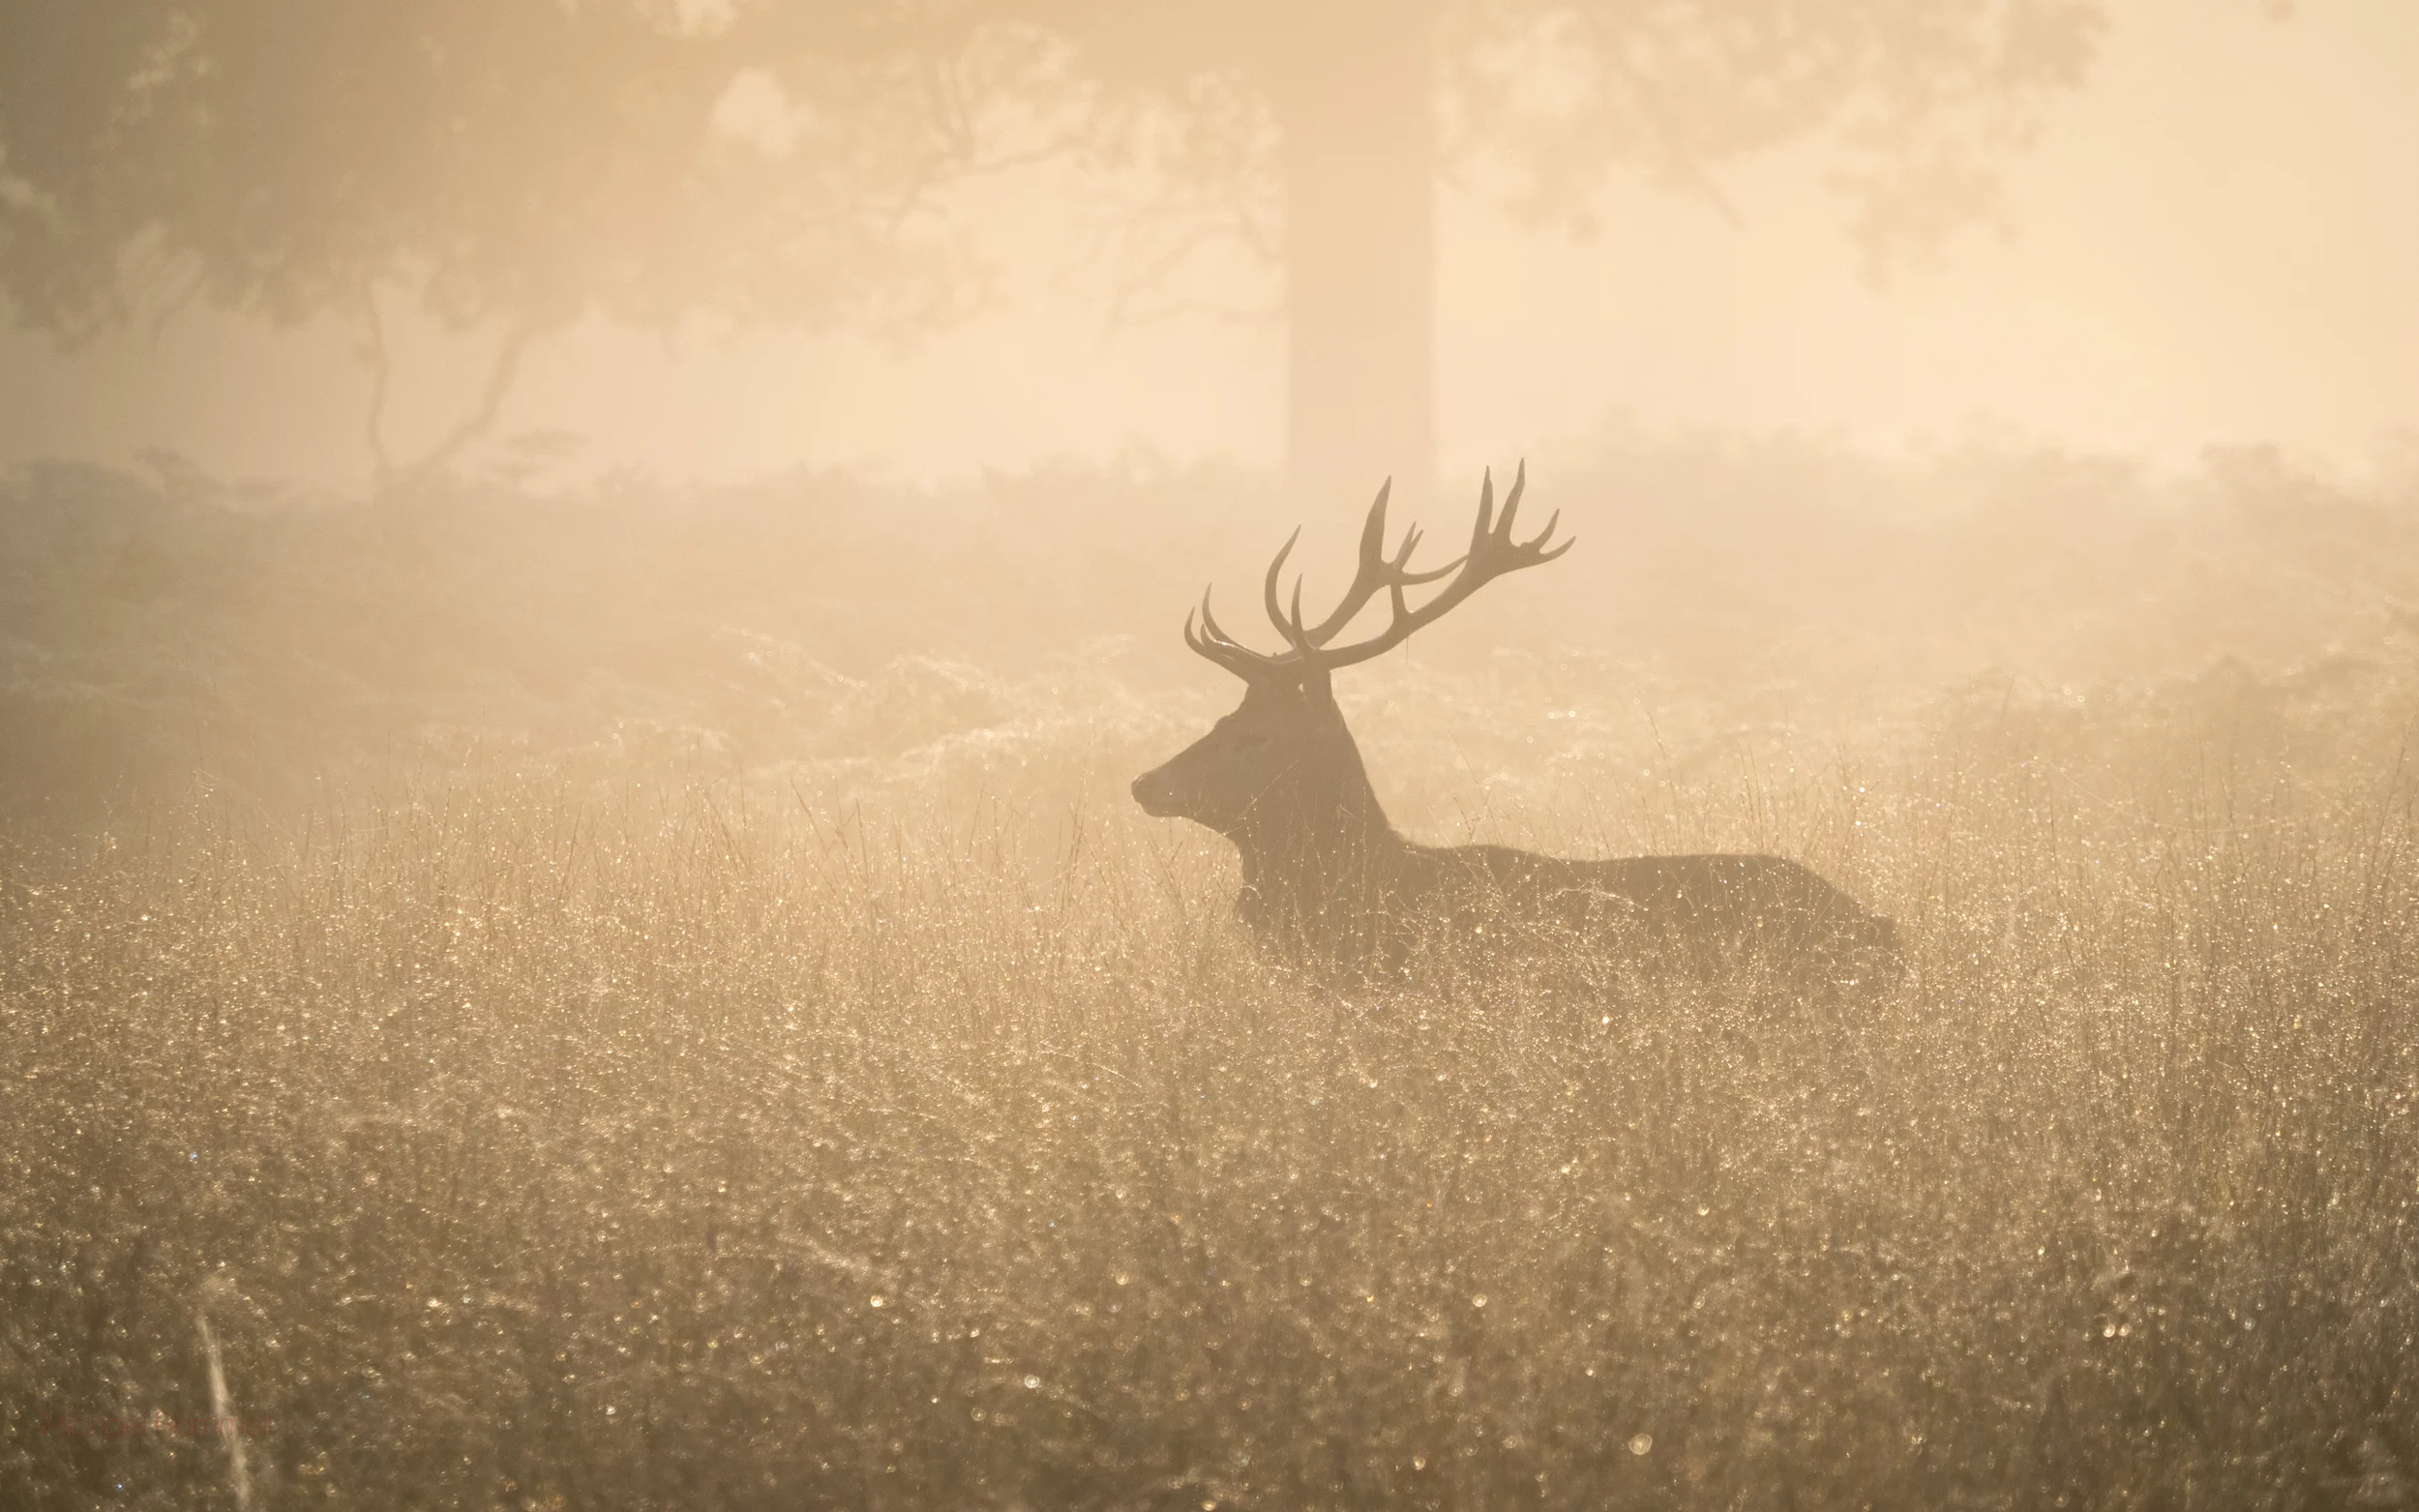
3. Stag in the Mist
2.8Mb - Download Here
4. Basking
2.5Mb - Download Here
5. Hot Breath
3Mb - Download Here
Copyright Notice
Please enjoy these photographs. But be kind: Do not edit these photographs and claim them as your own. Don't sell them without my permission. Do not use commercially without contacting me @ michael@rammellphotography.com - a license for photographs made at Richmond Park must first be obtained. Whilst I own the copyright to these images, I would need to first obtain a license to sell them.
All works are Creative Commons Licensed:

Richmond Park at Golden Hour by Michael Rammell is licensed under a Creative Commons Attribution-NonCommercial-NoDerivatives 4.0 International License.
Based on a work at www.michaelrammell.com.
Scottish Highland Wallpapers
On September 5th I was standing atop the peak of the highest mountain in the UK - Ben Nevis! The charity climb was in aid of Sound Sense, but it was also a personal challenge I had set myself last year.
Now, as a photographer, I obviously considered the photographic opportunities that climbing Ben Nevis would present me. However, the peak of Ben Nevis was very cloudy which somewhat ruined those photographic opportunities (how inconsiderate of the clouds to descend to 1,400 meters to block my view!)
Alas, as a result I've got a few great shots of me standing at the summit, but they weren't quite what I wanted, or imagined I'd achieve.
Having said all that though, I actually achieved more! The drive home on the Sunday morning took me through the beautiful, stunning and simply breathtaking Scottish Highlands, including the likes of Glencoe. Photographic opportunities were aplenty!
Today I want to share 5 of my Highland photographs with you, making them available completely free of charge to use as Desktop Wallpapers / Backgrounds.
You can download all of the Hi-Res files in a Zip file right here (13.6Mb), or you can view each photograph in full size by clicking each photograph below. (Just click the download link beneath each picture to download them individually). Alternatively, you can click to enlarge, right click on the image and then choose 'Save As' if you're using a Windows computer
All of these photographs are 2560 pixels on the longest edge (suitable for most Macs and widescreen laptops and monitors).
All of these photographs were made using an Olympus OM-D E-M1 Micro Four Thirds Mirrorless Camera and the Olympus M.Zuiko 12-40mm f/2.8 PRO
Ben Nevis - Half Way Up!
2.7Mb - Download Here
This photograph was taken about half way up Ben Nevis, somewhere around 700 metres up! The ground was steadier here and the sun came out to really light up the scene, injecting some incredible vibrance in to the grass and rock.
Glencoe Stream
3.6Mb - Download Here
On the drive home my route took me through Glencoe. Each side of the road has plenty of places to pull over and simply take in the views you can see. Fortunately for us photographers these pull over spots seem to be superbly positioned to make the most of the views that quite simply surround you! Here, I pulled over and positioned the camera on a stone wall that separates the road from the stream.
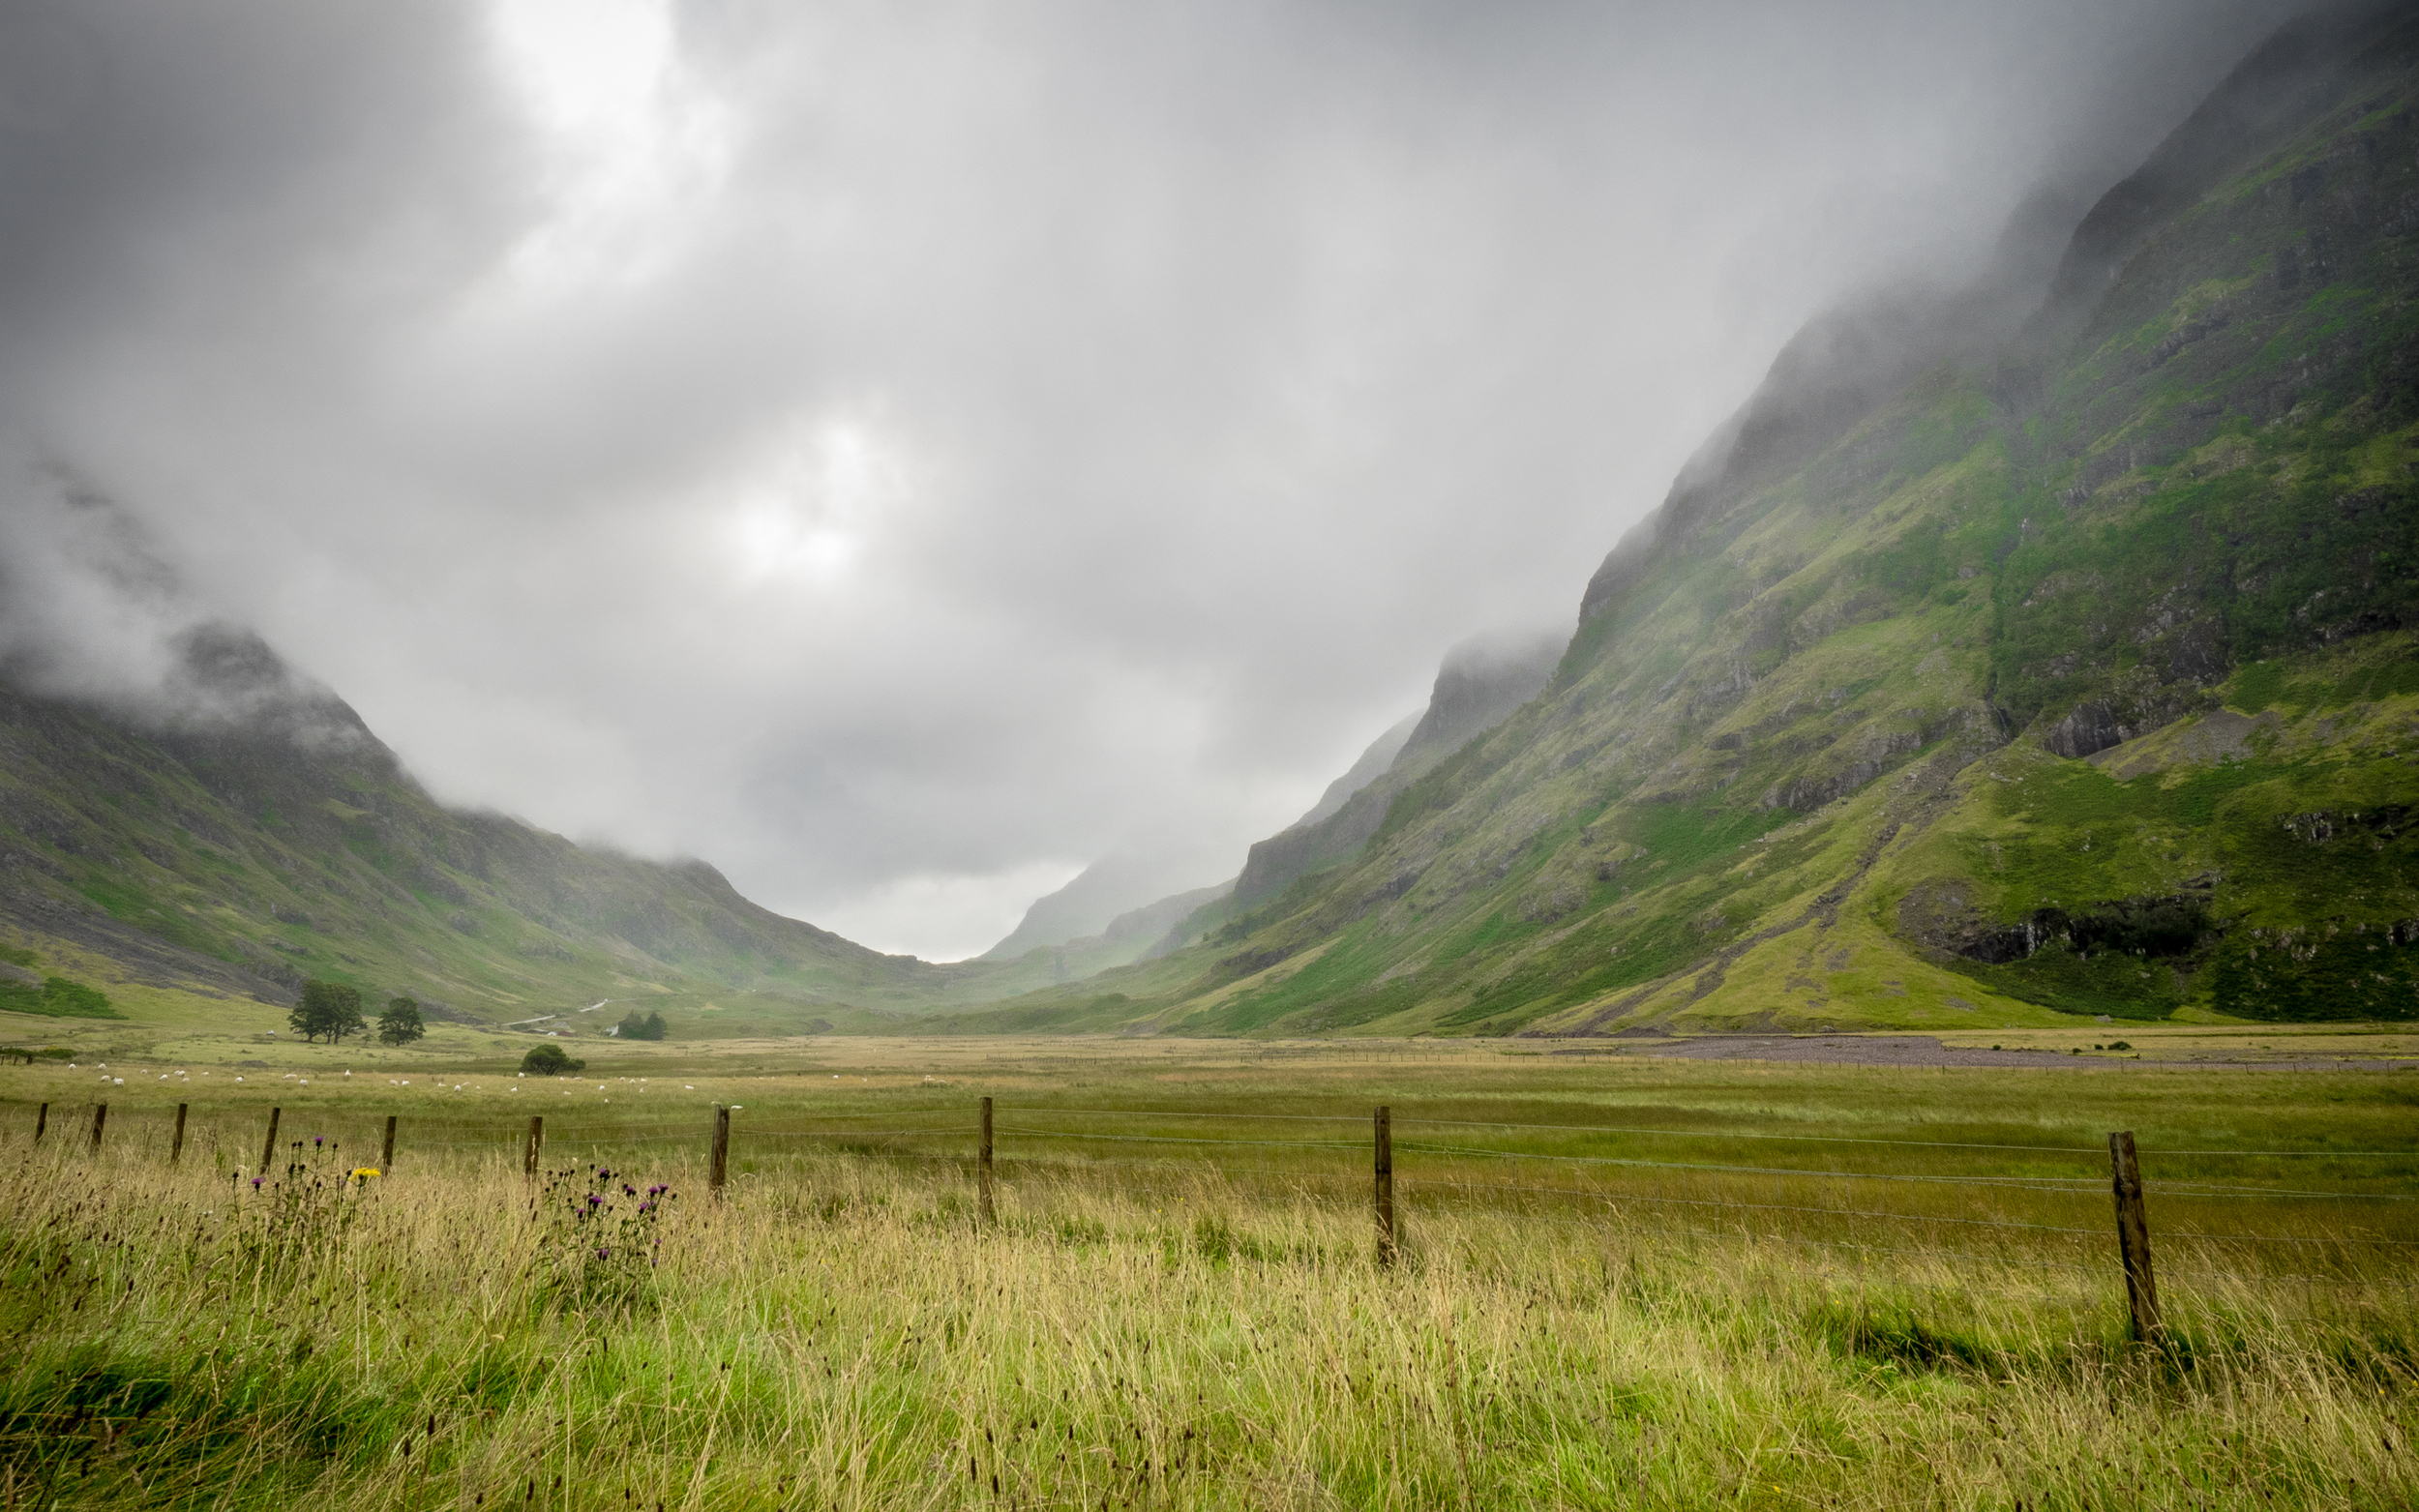
Clouds Descending
3Mb - Download Here
Not too much further from the photograph above featuring the stream there was another chance to pull the car over to take in this incredibly sheer mountain! I tried a few different positions when making this photograph, even standing the other side of the road and including the road itself in the frame to give a sense of scale. But this one, showing just a small amount of the fence in the foreground was my favourite.
Skyfall
2.3Mb - Download Here
I'm led to understand that this part of the Highlands was used in the James Bond movie 'Skyfall'. I was reliably informed that the scene was changed for the movie to feature a road, where in fact there isn't one! Silver Efex Pro 2 was used here to pull some of the drama out of the clouds that otherwise wasn't quite clear
Shrouded Mountain Range
2.2Mb - Download Here
One of the last photographs I made before figuring out I'd never get home if I kept stopping at every opportunity was this one. I parked the car and crossed the road to climb a small bank (which was a challenge as I was aching from the climb and descent of Ben Nevis the day before!) I saw the clouds coming in low and got very wet from the rain to make this photograph. The clouds once again were dark and dense covering the tops of the mountains
Copyright Notice
Please enjoy these photographs. But be kind: Do not edit these photographs and claim them as your own. Don't sell them without my permission. Do not use commercially without contacting me @ michael@rammellphotography.com
All works are Creative Commons Licensed:
Scottish Highland Digital Wallpapers by Michael Rammell is licensed under a Creative Commons Attribution-NonCommercial-NoDerivatives 4.0 International License.
Based on a work at www.michaelrammell.com.
Event: London Street Photography - October 24th
Come and join me in London on October 24th for another great, FREE event!
On Saturday 24th October I'll be joined by a group of photographers from the Ready Steady Pro and Guild of Photographers community as we host the next annual Free Annual London Photo Walk, capturing the sights and sounds of one of the worlds most multi-cultural and colourful cities.
This walk is open to absolutely everyone, it's a public event and you're all welcome to join. I would however ask that you simply register so that we don't set off without you on the day and so that we can exchange contact information should anyone get separated from the group, which does happen. (registration details at the bottom)
In what will be the 3rd year in a row that we've hosted this photo walk in October we are making a few slight changes to the format and the locations we take in as part of our route.
Those wanting lunch may want to get something to eat from Camden before the walk begins. The Worlds End Pub, where we are meeting seems to serve food and is open from 11:00am. You can of course arrange with others in the Facebook Group to meet up early among yourselves, if you'd like?
The Details
Meeting Place: The World's End Pub - Camden
Meeting Time: 12:00
Walk Start Time: 12:30
Coffee Break: Circa 4:30pm
Dinner: 6:30pm - 7:30pm
The Route:
1. Camden Market and Camden Lock
Starting at (ironically) The World's End Pub in the vibrant & busy Camden area we'll start with a drink and a meet and greet. I'm sure we'll do the "Ooh what are you shooting with" conversation before moving on outside to Camden Market, heading slowly north towards Camden Lock. We'll go at a very steady pace with those wanting to speed on ahead welcome to do so. Camden will give us a great opportunity to get some shots right off the bat in the busy area. It's renowned for it's alternative culture and so should prove to be something slightly different, particularly for those not familiar with that area of London.
After an hour or so at Camden we'll back up again at The World's End Pub to get the group back together before jumping on the tube (which is right outside) before making our way south to Leicester Square using the Northern Line of the Tube:
2. Leicester Square & China Town
Just 6 stops away from Camden we'll find ourselves back on the surface at Leicester Square, heading towards China Town; a bustling and compact area of London that is always sure to provide a photograph or two. Being nearly all on one street, China Town is likely to give around 30 minutes or so of photo opportunities before we're itching to move on. That is of course unless there are some real 'fisherman' among us: those who prefer to sit and wait for that all elusive storytelling moment.
3. Soho
When we get through China Town we'll be heading towards Soho, specifically Berwick Street, which hosts a market every day except Sunday Market: and giving us yet another great chance to photograph people as they buzz around the market unaware of us as we photograph them. Market's always provide a great opportunity and a market in Soho is even better!
4. Carnaby Street (Coffee Stop Circa 4:30pm)
Conveniently, after an hour so in Soho we'll be close to Carnaby Street , which is not only another good spot for photographs, but also, as previous attendees of this walk will attest is an ideal place for our next coffee stop as we take up residence in the basement of 'The Deparment of Coffee and Social Affairs'. These guys sell some amazing coffee and their cakes aren't too bad either. The basement of this little coffee shop offers us a chance to all pull chairs around a table (or rather to pull tables together and completely re-arrange everything!) and take stock of the day so far, talk again about cameras and what else it is we do with our photography.
The length of our stop will be totally determined by the conversation, weather and what the group wants to do.
5. Piccadilly Circus
For those wanting to continue on we'll then head south towards Piccadilly Circus - an area popular among tourists. There will no doubt be selfie sticks aplenty here as visitors to the Capital try to get a photograph of themselves with the famous Picadilliy Lights (or, 'The Curve' as it's now being referred to).
6. Options: Covent Garden, Embankment, South Bank
Our ultimate end destination will be The South Bank, south of The River Thames. If at this point the group would prefer to make a bee-line and head directly to that point we can. Alternatively, we can make our way eastwards towards Covent Garden before heading to Embankment and then over the bridge to South Bank.
7. Food
At this point in the day, which will be somewhere in the region of 6pm - 7pm you are invited to join us for a meal on the South Bank. We'll put it to a vote to decide where to eat.
Interested? Register your place:
You can register your place many ways:
Those who are a member of the Guild of Photographers can confirm their place using the event in the Guild Facebook Group. (The Guild of Photographers is a member organisation requiring registration)
If you'd prefer you can join Ready Steady Pro on Facebook, completely free of charge of course and register your place using that event page
Alternatively, if you're not on Facebook or would prefer not to join either group you can simply complete the form below:
Olympus OM-D E-M1 and Motorsport
Hi All,
Only me! I haven't written for a about a month now due to wedding season being in full flow: Shooting, ordering and designing products, post processing and life in between has been keeping me away from this blog more than I'd have liked, but whilst I was away on a short family holiday I had an email from someone who tried their hand at shooting motor sports with the Olympus OM-D E-M1 and wasn't totally pleased with the results.
Gavin Hall subsequently found my post on the subject, right here and got in touch with me via email to ask a few questions. I thought it would be a good idea to reply to Gavin's email here on the blog so you can see my thoughts on this and also for you to add your own comments below as well.
So, this blog post is for everyone, but written in response to Gavin:
In Gavin's email, he wrote:
Hi Michael,
Excellent blog - very well written. Just a quick question; Having come from a Nikon D90 (which bear in mind came out in 2008) I have to say that so far I’ve been rather frustrated with the EM-1’s auto focus when it comes to motor sport and airshows.
I’ve read all the advice I can find and am using what seems to be the recommended technique: Latest firmware, C-AF, 9 point block focus, continuous low speed continuous shooting etc. but the keeper rate is still very low. In many instances I’m getting better results with manual focus and focus peaking.
I’m more than happy to admit that this may be operator error but given a history of success with my old Nikon gear, I’d like to establish a couple of things. The lens I’ve been using for this type of thing is the Olympus 75-300 F4.8-6.7 II. (I have the 12-40 F2.8 Pro but haven’t tried it for action) Do you have any experience with this lens - is it known for being unsuited to fast moving subjects?
I know that you rave about the 40-150 F2.8 Pro - is this significantly better for AF tracking - and also initial lock on speed than other MFT lenses you’ve used? It is a very tempting piece of glass, but as my Dad pointed out the other day, for the same money as that lens alone, you could get a Canon EOS 70D and a 70-200 F4 L which would definitely track Motorsport well.
Another problem I had is whilst trying to focus on a distant aircraft, the lens hunted backwards and forwards, refusing to lock onto anything at all, including the clouds which were effectively at infinity.
I love many aspects of the E-M1 and in other respects have been entirely pleased with it. However, this is a hobby for me so I’m loathe to spend money on the 40-150, only to find that actually the problem lay elsewhere all along.
Any thoughts you could share would be greatly appreciated.
Many thanks
Kind regards
Gavin
Thanks Gavin for getting in touch with your questions. Today I want to try and touch on everything you mention in your email if I can and so I've broken it down to 4 main points:
- Settings
- Lens Choice and Investment
- Intended use with the photographs
- Comparisons to a DSLR and other cameras: In your email you talk about being able to pick up a 70D and a 70-200L f/4 for a cheaper price and that it would likely perform better, so I'm going to touch on some other reasonably priced alternatives too that would handle sports and action shooting.
Unfortunately I can't make any comparison's with Nikon cameras as I've only used a Nikon on two occasions and neither for motor sports. So for the sake of this article I'll write about my experience vs my old Canon equipment where needed.
1. Settings
Having the correct settings dialed in will only get you so far. You of course have to have a good technique as well. It's evident from your website that you've photographed motor sports before with some pretty successful panning photographs in your motor sports gallery. I would say that the images you have in your gallery don't have that critical sharpness that I would look for and that I have been able to achieve with my E-M1, so perhaps consider spending a day at the track panning and consider your shutter speed to perfect your technique. Working out what works for you as well as what doesn't is key. For example friends of mine are able to shoot down at 1/50th and still get sharp motor sports photographs! Mine are best at about 1/125th - 1/160th. I'm sure with some more practise though I'd be able to improve and shoot at 1/80th and maintain sharp photographs.
1/125th - f/10 - ISO100
My settings were simple but also differ from what you have said in your email:
- High Speed Continuous Shooting at 9fps
- Single, Center Focus Point manually selected
- Continuous Auto Focus mode
- Shutter Speed between 1/80th and 1/160th
- Aperture F/10 - f/13
- ISO was as low as I could possibly go with the given light (100 - 200)
- Image Stabilisation set for Horizontal panning
As I mention in my post 'A Day At The Race Track With The Olympus OM-D E-M1' my keeper rate was lower than I would have perhaps achieved with my sports-oriented and much-loved Canon 7D. I'm happy to acknowledge this. The 7D would have perhaps offered me 4 keepers out of a burst of 6 or 7, with the E-M1 only leaving me with 1 or 2 to choose from. But with motor sports (Particularly endurance racing!) The cars will be going around the track many, many times - You'll have plenty of chances to photograph them again. Besides, you only really need 1 keeper of each car, right?
Most importantly for me (and I'll talk about this further in below) is that I am still able to get tac-sharp, crisp, clean images using the E-M1. The keeper rate may matter more if I were a professional motor sports photographer.
The idea of using the center focus point only is not an Olympus-specific technique. This is something I did with my Canon 7D as well. By manually choosing the focus point and instead trying to keep the focus point on the car you're asking the camera to do less. I've found I've had better results with this technique.
One thing that was specific to the Olympus though was a change I had to make to my panning: I now found I could not pan when the car was further away giving me a reduced panning arc. The Olympus Micro Four Thirds System obviously, as I've shown, is able to track subjects moving parallel to you with little change in the distance between you and the subject, however I would agree that tracking subjects' who's distance to the camera changes suddenly is much harder. Football and field & team sports could possibly offer too much of a challenge for the current range of mirrorless cameras available and this is why you'll see any photographer in that arena only using the top DSLR camera bodies and lenses available. Unlike motor sports these other sports aren't as repetitive and so moments will only happen once. Margins are fine and so you need to be ready to capture everything. Rarely, if ever, do you get a second chance.
I've not photographed any aviation with the OM-D E-M1 and my 40-150mm f/2.8 PRO as yet, but I'm relatively confident they'd be fine. I may have to add the 1.4 teleconverter for a little more range, but the 40-150 performs superbly throughout it's entire focal range, as I'll mention in just a moment.
100% cropped screen grab from Lightroom - this is a little soft for me (see the edges of the numbers and decals on the car)
1/80th - f/13 - ISO100
One thing I have certainly learnt over the years though is that if there is that if there is a photographic niche where the margin between a successful photograph and an average photograph - it's sports and wildlife (moving subjects)
Perhaps this is where some of your frustration begins? Having said that however for the best results and to give yourself every chance of success you have to use the best glass on your camera...
2. Lens Choice and Investment
This part could easily warrant a blog post all of it's own...
I learned a long time ago that if you don't buy the top of the range lenses your photographs will only suffer for it (of course there are exceptions to this). Often, I believe that you can get by with a lesser-camera and better glass, but not necessarily the other way round.
I remember purchasing a handful or pre-owned EF-S Canon Lenses (for crop sensor bodies) with variable aperture and inevitably, after much frustration, went out and bought the lenses I should have bought in the first place anyway meaning I bought twice! Now I'm not suggesting that without the 40-150mm f/2.8 PRO you won't be able to get good photographs at all, but it will certainly help your cause, your keeper rate and in the long-run and your finances.
The Olympus 40-150mm f/2.8 PRO is a marvel of a lens when it comes to it's ability to resolve detail, even at it's longest focal length of 150mm.
Not since my very early Canon days (during my first foray in to photography) have I used anything less than top end glass and so it's hard for me to honestly quantify and compare how much better the 40-150mm f/2.8 PRO is than the lens you used, the Olympus 75-300 F4.8-6.7 II. My guess though is that the 40-150mm f/2.8 PRO is much, much better. From past experience low and middle-range lenses have issues with softness at the extreme ends of their focus (75 and 300 in this case) and they're also prone to hunting and tracking back and forth trying to achieve that focus. This is because the motors inside those lower-end lenses are constantly trying to arrange and manage the groups of glass (elements) inside the lens to maintain and achieve focus. Logic would dictate that a cheaper lens would use cheaper components and therefore it wouldn't be able to perform to the same standard as higher quality, pro-grade lens.
1/160th - f/11 - ISO100
In addition, the variable aperture nature of the 75-300mm 4.8 - 6.7 - for me at least - is such a hindrance when it comes to shooting sports. I remember that the Canon 24-70mm f/2.8 for example was sharper at f/4 than it was at f/2.8, so knowing that the aperture also affects the sharpness and then not being in full control of the aperture as the lens zooms simply doesn't sit well with me.
It used to be (particularly with Canon kit lenses) that they just weren't as sharp as the pro grade lenses. Whilst that isn't' the case necessarily with Olympus Lenses (they're all pretty sharp!) the difference is still that the pro grade lenses are high-performance tools that are sharper and work faster.
I've seen nothing but rave reviews about the 40-150mm f/2.8 PRO elsewhere and in my experience it just doesn't have an issue with keeping up with what the E-M1 asks it to focus on. It is after all a Professional grade lens. Perhaps see if you can get one from Olympus on loan using the 'Test & WOW' service and take it to a track?
Put it this way though - the 40-150mm f/2.8 PRO from Olympus was, in my mind, every bit as good as my old Canon 70-200mm f/2.8 L IS USM ii - a lens considered by many to be the best in class of lenses in that category available today for a DSLR. I owned them side by side for only a month before i decided to commit and I sold up the Canon gear and moved to Olympus. Not because I'm a fan boy, but because of the performance and experience.
Another thing to mention though, rather than me just saying 'Buy the best lens you can' is that you do have to take into account that a great lens will nearly always out-last any camera body you own.
Look at any sports photographer - they're likely to have a massive prime (such as the Canon 400mm f/2.8 or a 600mm f/4) that they've had for 5 years or more, whereas in that time they've probably had a handful of camera bodies. The same can be said of the Olympus 40-150mm f/2.8 PRO: yes it's a relatively expensive lens, but as long as I shoot with Olympus camera's it's a lens I'll own and use owing to it's versatility and it's quality. If you look at the cost of the lens in the same way you view the cost of a body, then often the costs won't stack up or be justifiable; Firstly - a good lens will hold it's value when you come to sell it, whereas a the value of a camera body simply plummets from the moment you own it. Secondly, A lens is easily worth twice as much as you'll often have a good one twice as long, not to mention it will do your images justice. It is after all the glass that makes the difference.
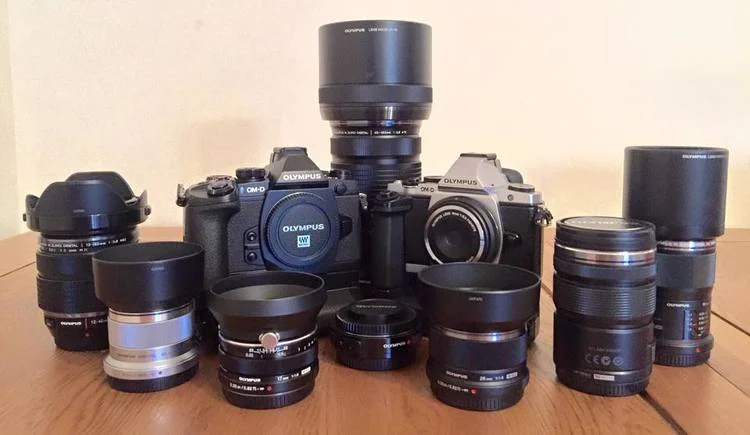
My tools and toys - The Olympus OM-D E-M5 and E-M1 surrounded by my favourite primes and pro zooms.
It is worth noting though that for me I also photograph weddings and portraits too, so my lenses are tools as much as they are toys and therefore I take this in to account when making my purchases. Which neatly leads to the next point from your email:
3. Intended use with the photographs
I make money from my photography and as a result my gear does, in my opinion, have to be of a professional standard. But because I have those requirements I can justify buying the PRO lenses.

If however, I wasn't making any income at all from photography I know that my wife would certainly not be as relaxed as she is about me spending what is (let's be honest) vast amounts of money on a camera for a hobby. If you're photographing motor sports as an enthusiast and for your own personal enjoyment and pleasure then this does put an entirely different light on this subject. Now, the only thing pushing you and motivating you to look at better lenses and equipment is you and your own desire for better photographs - not a client or customer requirement or need.
Be cautious - the internet and all the big name photographers will tell you that every new camera is a great investment and will make your photography infinitely better. My move to Olympus was, on paper at least, a downgrade in performance. Or at least that what's people told me: smaller sensor, not-professional, can't do big prints, can't shoot low light, doesn't track very well blah, blah, blah - that list went on. Which is why I wrote a post called 'Why Olympus'. If I am able to produce the same (or as I like to believe) a better standard of work with an apparently lesser camera, then surely that means I'm a better photographer than I was before, right?
Maybe that is true. But I also believe that the Olympus OM-D E-M1 is a better camera than many realise and it certainly performs well, well above the specs on the adverts.
My move was justified because I proved that the camera could perform in all of the circumstances I needed it too. I acknowledge it's differences and limitations vs my old Canon DLSR (note that keeper rate I mentioned at the start for example) and accepted that. But if you're a professional sports photographer and need a higher keeper rate - perhaps this isn't the camera for you.
For me, it was good enough at everything I did for pleasure and better at what made me money. As such - my requirement for a professional camera was met by the Olympus OM-D E-M1 and so it was a feasible and justifiable move. For you, as a motor sports photographer, this may not be the case.
Don't force yourself to use a camera just because you like it, or want to like it. What matters at the end of the day is the photographs, right? if you're making better images on the Nikon then stick with that. It's whatever works for you, in the same way that the Olympus just works for me.
4. Alternative Camera / Lens Setups
Invariably photographers shoot many things and so my desire for one system of cameras and lenses was neatly fulfilled by the OM-D E-M1 and the M.Zuiko lenses. I can now shoot everything from landscapes, portraits, motor sports, wildlife, weddings, engagement shoots and the kids around the house. I have a lens for all situations. But if you're looking for a setup as a motor sports thoroughbred then you have plenty of options. In fact, I'd probably still point you back towards a DSLR for motor sports:
- Pre-owned Canon 7D - circa £400
- Canon 70D - circa £7,00
- Pre-owned Canon 70-200 f/2.8 (mark 1) - circa £1,000
- Canon 70-200 f/4 - circa £1,000
(Please note that I have no affiliation with MBP Photographic, whose website I have linked to above for the reference pricing, it's just that they sell both new and pre-owned equipment).
For as little as £1,400 you could pick up a Canon Camera and Lens combo that is arguably more suited to motor sports, as per above. I would argue though that for the best images you should look for the best lens. Perhaps a New Canon 70-200mm f/2.8 L IS USM ii at around £1,500.
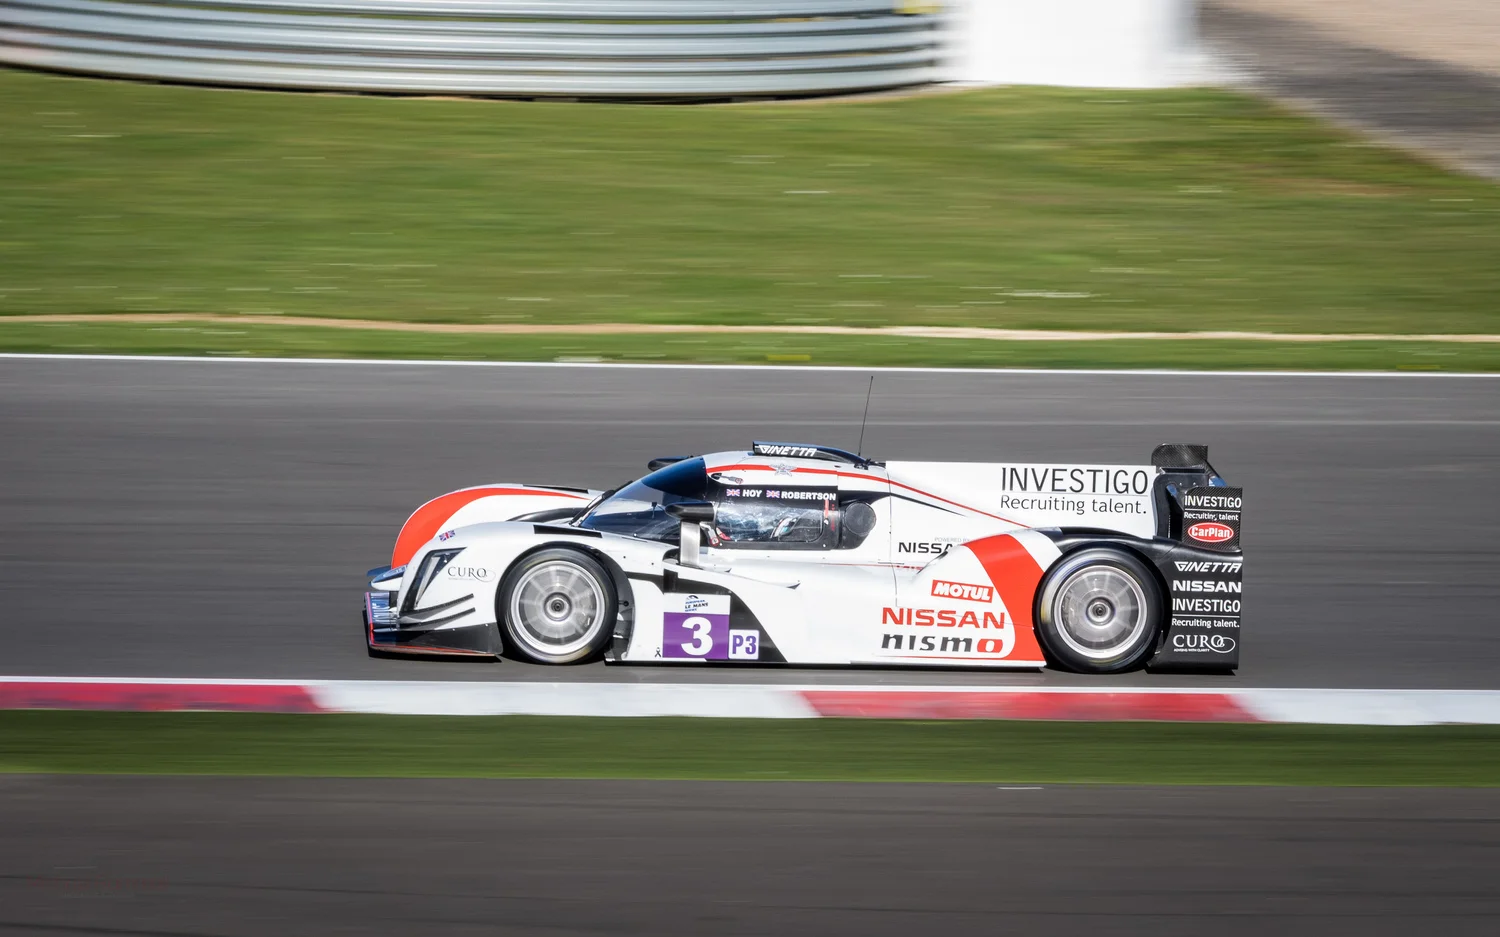
I'm sold on Olympus and know what it can do for me. But if you want the best motor sports bang for your buck I won't tell anyone that you absolutely have to go the Olympus route and that it's the best for motor sports. Because it's not. But I prefer it and I enjoy using it more. Yes, there is a huge element of preference involved here - we've not even mentioned Nikon! - but the fact is the Olympus is more than capable of being able to shoot great motor sports photographs; hopefully as I've demonstrated at Silverstone and Le Mans 2015.
But as a rule (not specific to Olympus) go for the best glass possible.
Other Photographers shooting great motor sports photography:
For years a good photographer friend of mine of mine, Neil Graham, shot 'only' on a Canon 60D (a crop-sensor Canon DSLR sporting only 9 focus points and shooting at up to 5 frames per second! The work that Neil was able to produce with that camera absolutely astounded me time after time. (check out Neil's work over at his website). For me Neil is a great example of a photographer who is able to get the most out of a camera through a practiced technique, despite any apparent lack of ability of the camera.
You may also want to check out John Rourke's Work - The Director and Photographer of Adrenal Media - The Official Photographic Agency for the FIA WEC (Le Mans Series Governing Body). John shoots with a number of cameras, but frequently talks about and shares some absolutely amazing photographs made with his Fuji mirrorless cameras! John is proving that these cameras are capable of performing in the professional arena. It's worth noting also that on paper (and it's somewhat acknowledged too) that the Fuji isn't quite as capable as the Olympus when it comes to Auto Focus