


MeFoto Backpacker Tripod Review
Christmas isn't far away now at all. If you're still thinking of what it is you would like for Christmas then this could well be a perfectly timed post for you. Today I want to tell you about the MeFoto Backpacker Tripod.
I have something of a disclaimer before I continue though...
I am not endorsed or sponsored by any company or product. Everything I ever review, good or bad, is a product I've purchased with my own money. As I have said before I would change brands at the drop of the hat if I genuinely felt that a different product made my work noticeably better and the change was financially sensible. I am well aware that I can often seem to be an Olympus fan-boy, but if I believe a product is a bad product I'll say so.
Don't get me wrong, If Olympus want to come and sponsor me I will welcome it because I believe that Olympus cameras and lenses have elevated and unlocked my creativity. But even if I were sponsored, I don't see that it would change the way I review or talk about products
So, with all that said let's get into the subject of this post: The MeFoto Backpacker Tripod!
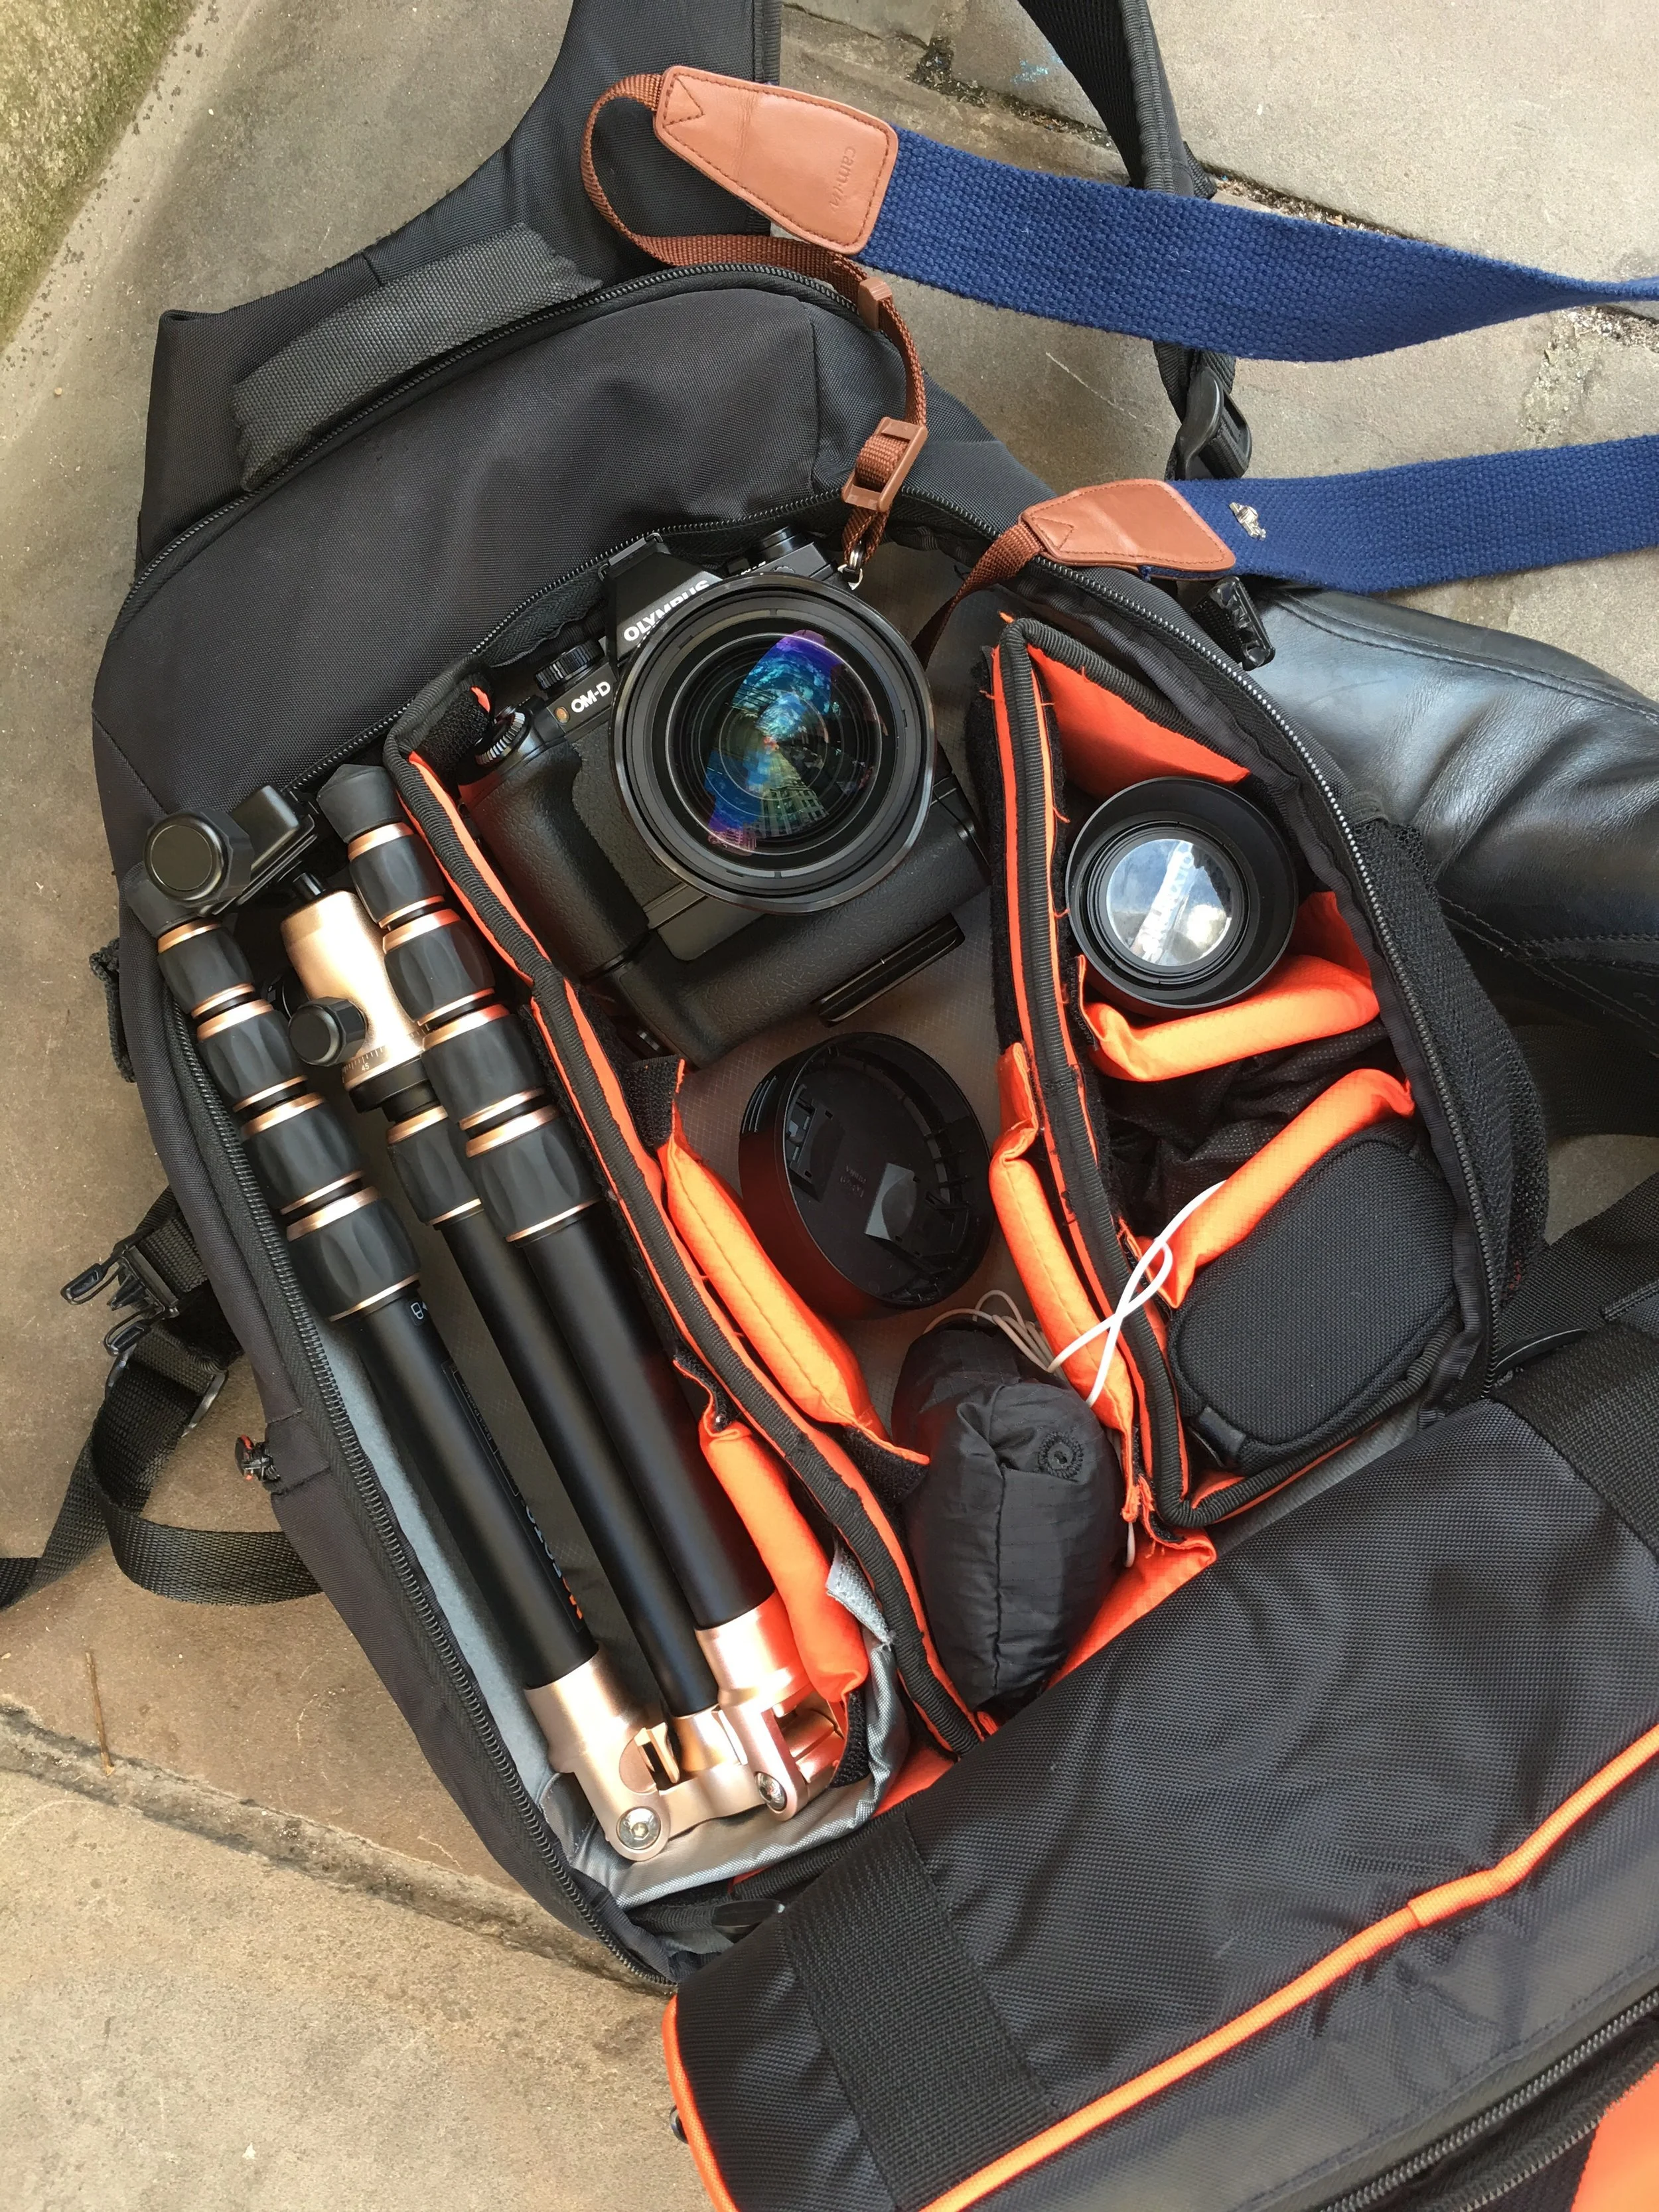
The diminutive MeFOTO folded away to it's smallest size. Fits snug inside my small Caselogic backpack
Small Camera allows for smaller accessories
Since moving to an all-Olympus setup back in January 2015, most of my other gear and accessories have also shrunk in size too: smaller flashes and smaller bags for example. But one thing that I hadn't downsized until recently was my Tripod.
For the longest time I've relied on my trusty Manfrotto Tripod; a heavy-ish and not-so-compact tripod by any means, but it was certainly sturdy most of the time and able to support the weight of my old Canon DSLR's combined with battery grips, a 580EX II Flash and my old favourite Canon 70-200 f/2.8 L II lens (that was possibly the heaviest setup I would ever have had on it back then at about 4Kg's).
I had that tripod for around 4 or 5 years and used it for everything from landscapes to wildlife and sports to weddings. It traveled all over the UK and Europe and the Middle East with me and even went along with me to two Le Mans races where it took a bit of a battering. In addition to being a tripod I've used it as a light stand, a climbing pole and a stick to beat down fern bushes as I waded through forests to photograph Deer and the like. It's been in sand, mud and seawater and still to this day works pretty well. Every now and then when I extend the legs you can hear the 'crunch' of sand between the extending leg sections. Also, those latch-type / lever leg locks become a little loose over time too.
But, 'Ol' reliable' was getting exactly that; Old.
So, naturally when it came time to seek out a replacement I looked for something smaller, lighter and more in-keeping with the size and weight of the Olympus gear I choose to use these days. I made a list of the things I was looking for in a tripod, and this is what I came up with:
- Small & Compact when folded away (ideally could fit in to my bag)
- Lightweight
- Sturdy enough to support my Olympus OM-D E-M1 with a battery grip and my Olympus 40-150 f/2.8 PRO lens
- Twisting leg mechanisms to lock them in place (instead of levers) both to ave weight and to ensure that sand can't get into those parts and ruin the way it works
- Arca Swiss style plate* (reasoning explained later)
- £200 Budget
The MeFOTO Backpacker ticks all the boxes
I did a lot of research and tried out a few tripods at The Photography Show back in March here in the UK and the result was that the MeFOTO BackPacker just seemed to be the best of the bunch. And as a bonus it also came in at the lower end of my budget too which was a pleasant and welcome surprise.
The MeFOTO BackPacker has those twisting locking mechanisms on the legs, it's the smallest of all of the options and is one of the lightest too. At the same time it is able to support the required weight of my Olympus Gear. The included Ball Head is simply something to behold as well (especially at this price point!). In design terms it is relatively similar to the premium products on offer from Really Right Stuff.
One of my favourite things about it though is that the dials and knobs used to adjust the tension and movement are big and chunky, meaning even with gloves on I can make the most of this tripod!
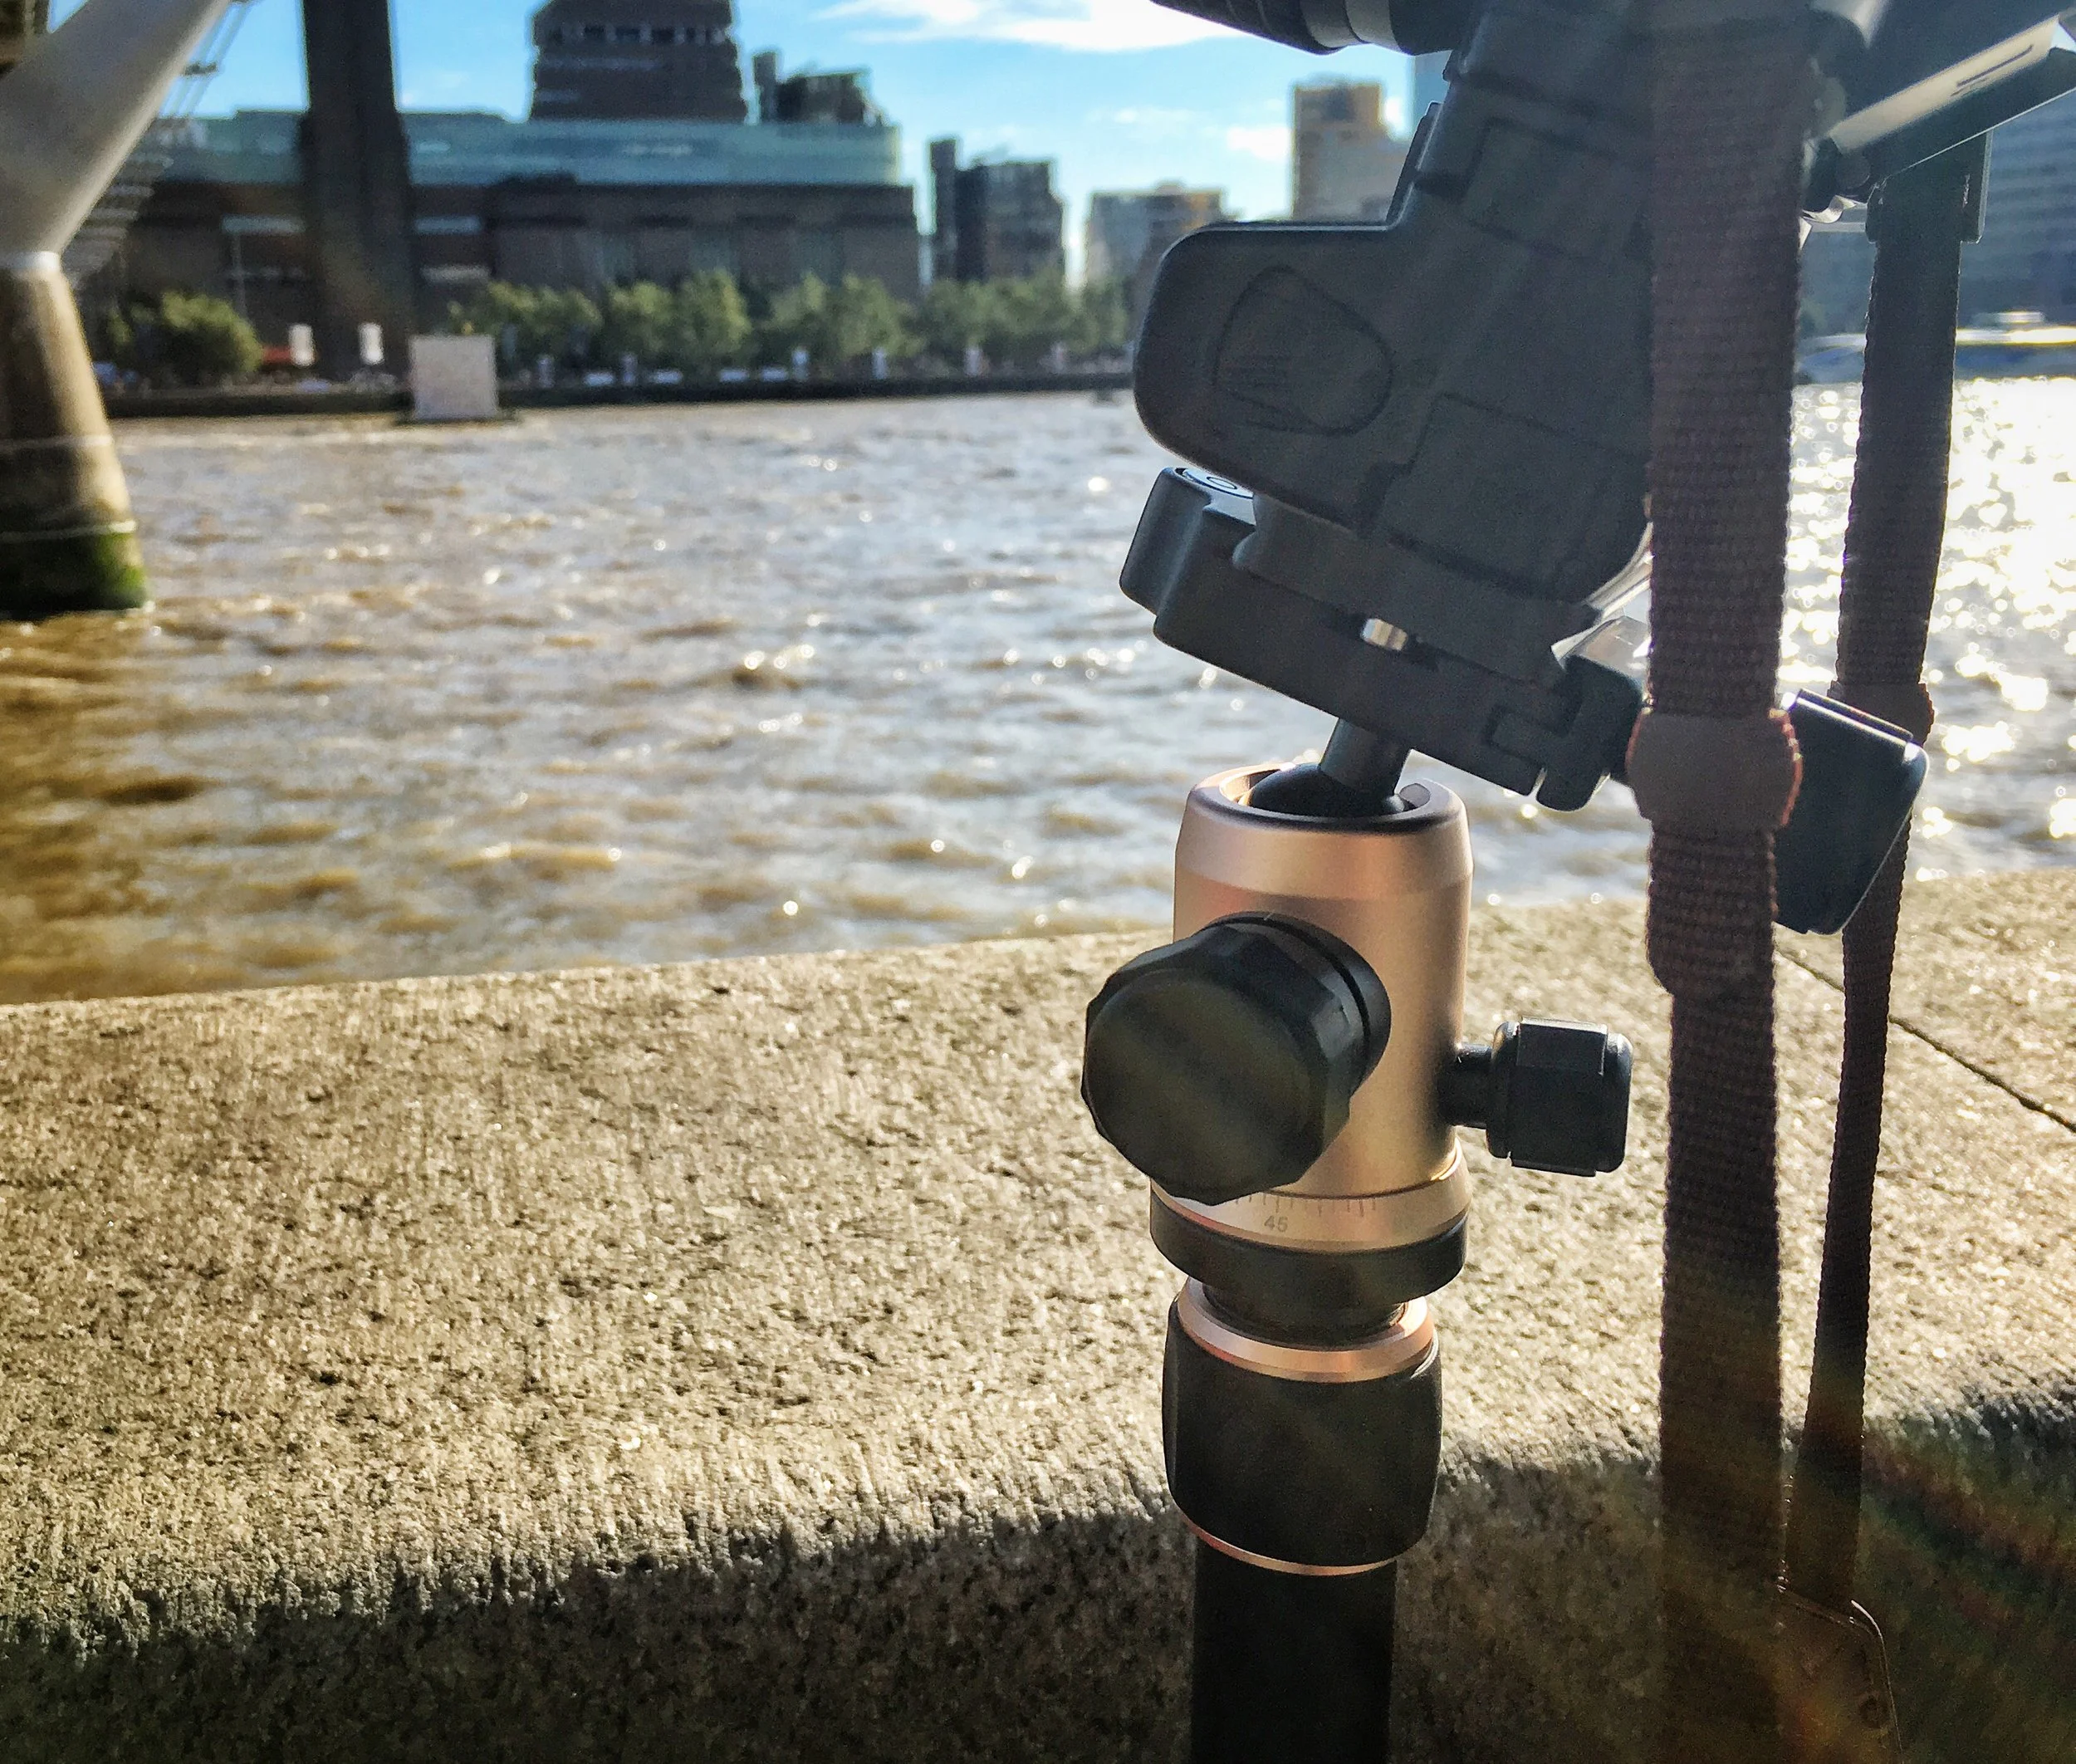
Chunky Dials on the ball head. Finished in gold to match my iPad and iPhone :)
Why The Need for Arca Swiss?
So, it was light, small and within the budget, but why was it I wanted that Arca Swiss plate so much you ask? Here's why: An Arca Swiss style plate offers more options in terms of compatibility with cameras and mounts. All tripods and monopods I know of work in the same way; that being a plate that screws in to your camera (or lens) and then a system of some description on the tripod head will latch onto said plate. Some monopod's so will screw directly into a lens, sure, but if you want to use a ball head you'll need some sort of plate to fix your camera or lens to it. Most manufacturers, such as Manfrotto, have come up with their own unique shaped plate that will then fit only their tripod (or tripod heads).
This is where Arca Swiss is different: You still have a plate, sure, but this particular plate mounts to whichever ball head is also Arca Swiss compatible, which you can find on offer from a wide variety of manufacturers. Arca Swiss style plates and tripod heads attach to one another using a dovetail approach with (usually) a screw mechanism to then tighten the grip of that dovetail.
Furthermore, because the Arca Swiss is considered a more widely adopted mounting system the plates themselves are usually a little more adjustable in terms of their positioning so that they can work and be better suited to the size and shape of the various cameras they may be used on.
This was really only apparent to me when I saw this video from David Thorpe over YouTube with his review of the Olympus PEN-F.
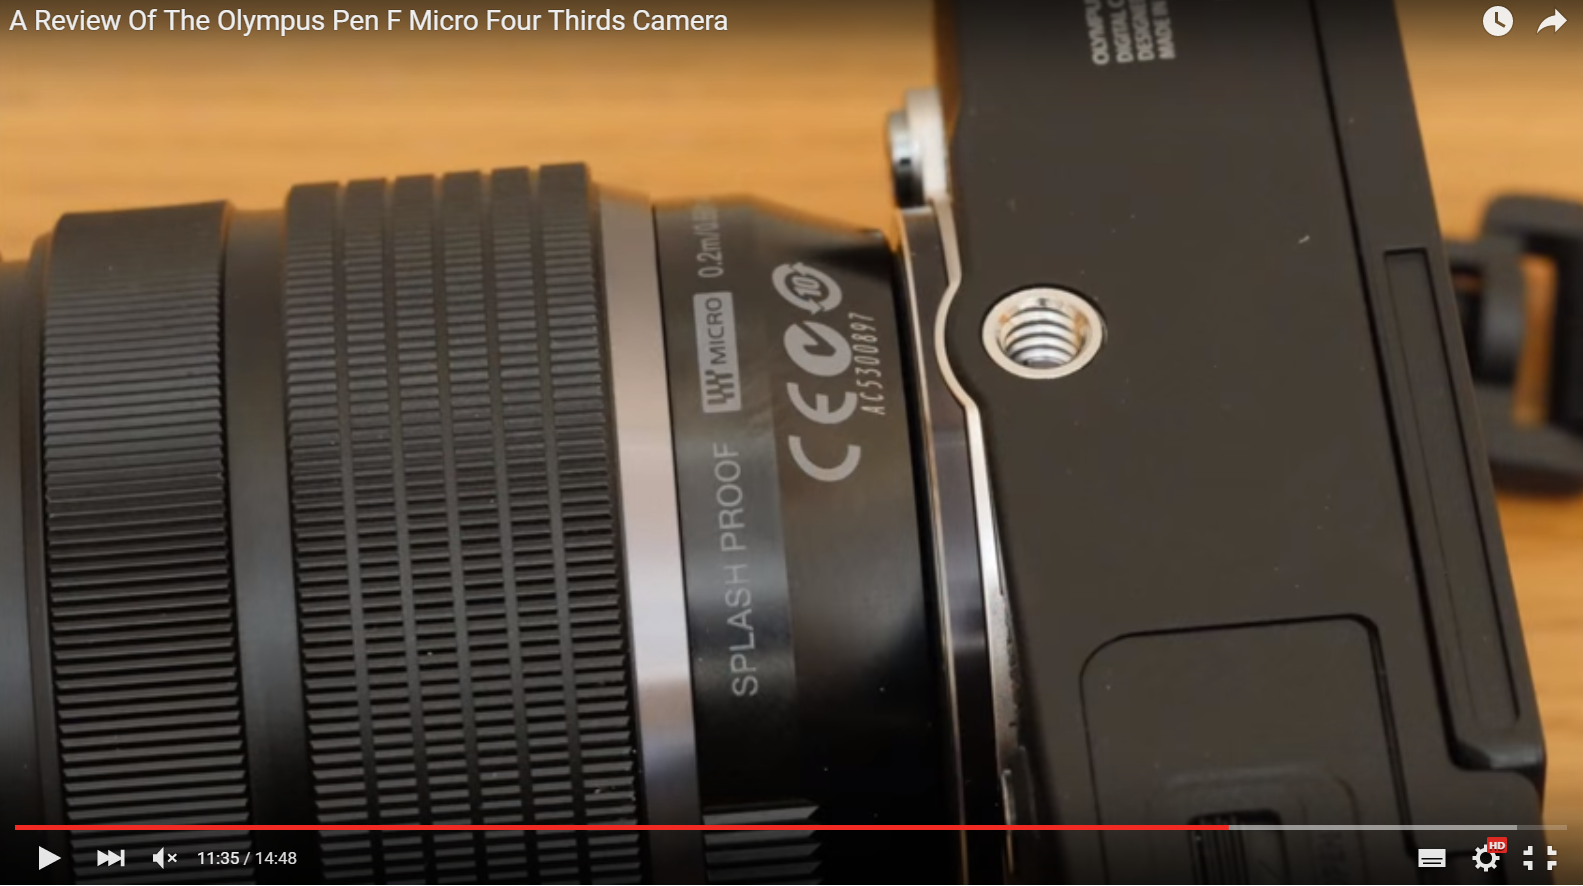
In his review David highlights the point that the awkwardness of the threads' position on the PEN-F, which is relatively forward on the camera, affects the possible compatibility of certain plates: When you mount one of the PRO lenses, such as the M.Zuiko 12-40mm f/2.8 or the M.Zuiko 40-150mm f/2.8 you may find that mounting a plate and therefore tripod of your choosing is a tight fit (or worse, not possible at all). It's for this reason that I wanted the Arca Swiss plate: they offer a little adjustment and movement and being something of a standardized type of plate, as opposed to a brand-specific plate like Manfrotto's, should mean that if the new Olympus OM-D E-M1 mark 2 (which I will be sure to get when it is released) features the same issue as the PEN-F, I should be able to continue to use the MeFOTO backpacker, or at least find a plate that works from a company such as Really Right Stuff (thanks Martin Bailey).
Now, typically I use a battery grip, so it would give me plenty of clearance no matter which one of my lenses I'm using. But, when investing in a new tripod I just wanted to be sure I wasn't going to encounter any issues at all. After all, as I've found out my Tripod should out-last my camera and so giving thought to this should mean I am future proofing myself (I hope)
So, that said, I've had the MeFOTO Backpacker tripod for a few months now and have had some to get out and use it and am thoroughly enjoying it. As you can see from the sample images here I've gone for the gold option. It may be a bit 'flashy' for some people's tastes, but my Wedding Photography branding is golden & yellow and thought that this matched quite neatly indeed. It also neatly matches my iPad Pro and iPhone too :)
There are also a series of other quite colours available, but I felt the yellow and the red were perhaps too loud and could even possibly get in the way when photographing Deer at Richmond Park and wildlife in general, where subtlety is your friend!
All in all the MeFoto is sturdy, folds up to a wonderfully compact size and comes with a generously high quality ball head with chunky, solid dials and mechanisms. It's build quality gets top marks too.
I've not been this excited and impressed with a tripod...well...ever!
Alternative Tripods to the MeFOTO & what I found
So now let's talk about the competition and why it is I felt the MeFOTO won out over them.
I stumbled across this comparison of lightweight travel tripods from Digital Camera World and found quite quickly that it was down to one of three tripods (and this was generally the consensus from many other comparisons too): The Manfrotto BeFree Aluminium, the Nest Traveller or the MeFoto Backpacker. Each of these most closely met my requirements and often came in among the best rated for travel / lightweight tripods.
Initially of course, being a previous Manfrotto tripod owner I was pleased to see the Manfrotto BeFree making the cut and being mentioned as one of the better Tripods available. Being a Manfrotto user all these years I felt compelled to remain loyal and to stick with a brand I know. But, then I realised it had the lever-type mechanisms to lock the legs in place. I wasn't a fan of that on my old tripod. It only took me about a week to lose the plastic tool that comes with the tripod to allow you to tighten those levers, due to them loosening over time. It also didn't feature the Arca Swiss head I wanted. So, the Manfrotto option was removed from the table, leaving me with the Nest Traveller and the MeFOTO BackPacker.
Nest & MeFOTO - Neck and Neck!
It really was neck and neck between the two remaining tripods. Both had everything I was looking for; they were nearly identical, even on price!
Both Tripods were available for between £120 - £140 each online. Both featured the Arca Swiss ball head, twist-to-lock legs. Both even featured a recessed hook hidden in the central column so you can hang some weight from it to keep it steady and a bonus in-built bubble to level the tripod. Each came with a padded shoulder bag too. Handy! The only remaining thing to tell them apart was their size and weight.
In terms of weight, the Nest comes in at 1.75Kg (or 3.8lbs). The MeFOTO BackPacker was lighter at 1.18Kg (or 2.6lbs). That's a pretty decent difference in weight.
The size difference when folded away was a similar story: the Nest is a neat 415mm (or 16.3 inches) whereas the MeFOTO was smaller still at 320mm (or 12.6 inches).
In fact, the only thing that the Nest won a point on was it's maximum height when extended. The nest could reach a maximum height of 1500mm or 59 inches, beating the MeFOTO, which can only go to 1300mm or 51.2 inches.
For these reasons, the MeFOTO better met my brief and it was my new tripod of choice.
Criticisms / Issues
So far, so good. The built quality is superb and the moving parts are expertly machined I have to say, but if there was one thing I would say about the MeFOTO is that when it's extended to it's absolute maximum height (the legs are out and the center column is as tall as it can go) there does seem to be a little bit of wobble going on. The legs slide into one another to hide away. It's the thinnest legs at the very end that seem to have a little bit of flex. Typically speaking when I use a tripod I am shooting with a trigger or using a 2 second delay time to ensure I've not touch the camera when the image is captured, so this isn't too much of an issue, but I would prefer if it were stiffer.
I haven't yet tried to tackle this issue by attaching a weight to the concealed in-built hook, but I'm sure that would go some way to helping reduce or prevent this behavior by centering the weight of the tripod to keep it grounded.
It could well just be me though and my expectations of a travel tripod are way off the mark. After all I am coming from a massive, heavy and rather clumsy aluminium Manfrotto.
All that said, the shake in question doesn't appear to have impacted the resulting images at all. They're sharp to me and I'm happy. The fact that it fits inside my backpack is a bonus and one that I don't think I would be willing to lose moving forward. It's a good compromise.
Conclusion
I'm not shy of spending good money on good accessories in the belief that they'll last longer, but having not looked at tripods in such a long time (not needing to) I was surprised to find that generally I was able to find far more value for money than I was 5 years ago when I picked up my Manfrotto.
I imagine, thanks in part to the growth in popularity of mirrorless cameras, that the tripod market is now far more diverse. Historically purchasing a tripod meant you spent a lot of money or your purchase would involve some sort of compromise of weight, the weight it could support or it's general quality:
- A heavy tripod could support a heavy weight and cost less.
- A light tripod that could support more weight was typically made of carbon fibre and as such the price would soar too.
- Alternatively you could pick up a cheap tripod from eBay and throw it away after just a few uses as plastic components broke and aluminium parts would buckle or dent!
These days though, with my gear weighing less I can focus more on the weight of the tripod and be less concerned about how much weight it can support. As such I've found that Tripods in the £100 - £200 region appear pretty reasonably equipped and very well reviewed indeed!
The MeFoto was my pick of the bunch for a mirrorless-ready tripod and so far I'm very happy with my choice. Time will tell. For now though, The old manfrotto comes along with me to most weddings as a stand for the video light or ends up staying in the boot of the car, with my MeFoto backpacker more often out in the field.
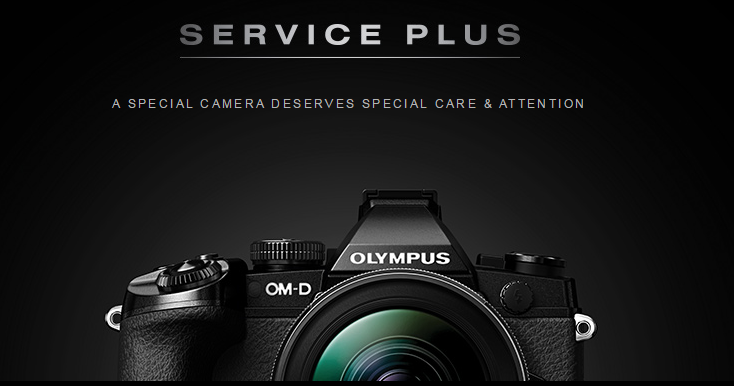
Olympus Service and Support - A Review
Back in September 2013 Olympus released the fantastic OM-D E-M1 into the world. The Micro Four Thirds camera packs features that many professional photographers desire; chunky dials, ergonomic handling, weather sealing, fast and accurate auto focus and so much more. Combine the E-M1 with almost any of the M.Zuiko lenses and you're looking at a system that will easily tackle most professional assignments.
In fact, you don't have to look too far around the internet to see that many professional wedding and portrait photographers have already moved from one of the big DSLR brands to Olympus (myself included), in search of a smaller, compact system that maintains that high level of all-round performance. Without doubt Olympus launched the E-M1 as a serious camera. A camera for the professional photographer.
However, it's one thing for a combination of a great camera and lens system to meet the demands of the pro photographer, but what about manufacturer service, repair and support and all those things that a pro will need to keep them shooting should the worst happen?
Today I want to share with you the story of what happened when I sent my E-M1 off to Olympus for repair, including how I registered the repair, the correspondence I received, timelines and of course the end result.
How did I break my E-M1?
I dropped my E-M1 the morning after my first wedding of 2016. The bride and groom put me up at the venue overnight as it was a little far from home and was an early start on the wedding day. I was loading my bags in to my car to head home. My E-M1 was inside the top of my Case Logic backpack, alongside all my lenses, when my bag slipped off my shoulder and crashed to the ground.
My E-M1 didn't have a lens attached when this happened (I never pack my gear away like that!) and the bag evidently cushioned the fall, but from a height of about 4 feet, it was enough that the impact took out some of the buttons on the shoulder of the E-M1:
It bothered me, of course, but at a glance everything seemed to be working, but when I got home I found that the touch screen wouldn't work to focus, none of the function buttons worked and neither did the directional buttons around the 'OK' button. All pretty important features and somewhat key to the way I personally operate my camera. It was a disaster!
My first thought was to see how long it took other people to have theirs repaired - I had a shoot the very next weekend and then my diary became rapidly busier every week after with wedding season truly kicking off here in the UK.
Most people were positive enough to say that the turnaround time was 5 working days, meaning it could be returned that same week if shipped on a Monday, which I found quite reasonable. So, I set about registering for the repair ASAP to get my E-M1 sent off first thing on Monday morning.
Register for Olympus Service Plus
I registered my E-M1 for Olympus Service Plus back when I purchased the camera in 2015. Doing so extends your warranty by 6 months and makes the registration process for arranging a repair much quicker. If you haven't already registered your OM-D for service plus, grab the serial number and head over to the Olympus Service Plus website now. If you bought your E-M1 from a reputable dealer and it was brand new, you should have had a leaflet inside the box to notify you about Service Plus.
(If you're from outside the UK you can click the location button at the top right corner of the page and select your own Locale)
How do I get my OM-D Repaired?
Once you have your details setup for Service Plus, head on over the the Olympus Service Portal. From here you can follow your nose to register for the repair, but effectively you will need to:
- Enter your country of residence
- Enter your serial number
- Enter the date you purchased your E-M1
- Make use of the drop downs and pre-populated options to best categorise your issue. You can upload images and there is also a comments box too
- Print off the label and affix to a box.
- Pad and protect your E-M1 well and ship it off to the address given to you as part of the process
I didn't upload any images at all and I didn't leave any comments. For this issue I simply selected 'Keypad Problems' > 'Broken' > 'Constantly' and then submitted this.
If you perhaps dropped a camera and a lens, you can also add another product at this stage too. Save paying for two shipping costs, send them off together.
I got an email with a repair registration number and a link to a tracking page. I saved this in my favorites and checked the status every day!
Where does my OM-D go to get Repaired?
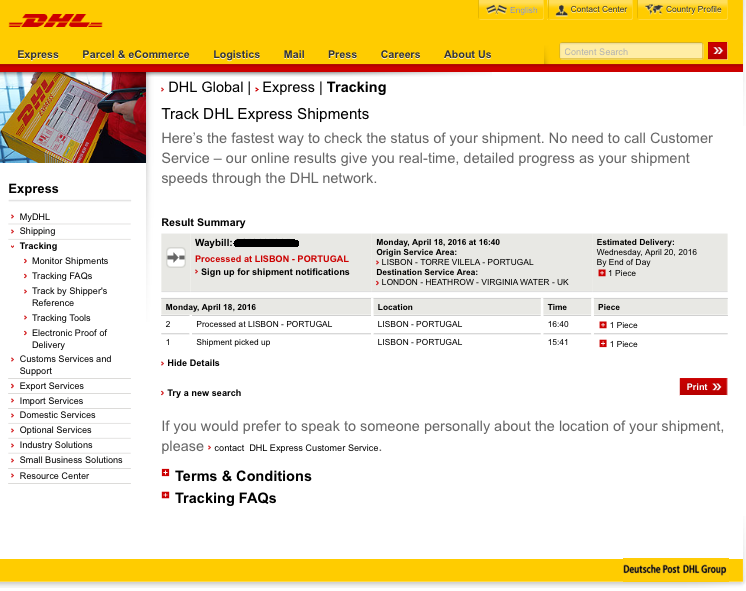
I can only speak about my own experience from the UK, but the instructions I printed were to send to an intermediary address, which then freight-forwarded to Portugal for the repair to take place. At this stage the only tracking information I had was that provided to me from Royal Mail as I chose to ship mine off Royal Mail Tracked, Signed for delivery. This was both to ensure prompt delivery, but also because I was shipping a £1,000 camera! The only reason I know the eventual end destination was Portugal was because I later received tracking information for the return of my camera. The return originated in Lisbon.
How long does an Olympus Camera Repair Take?
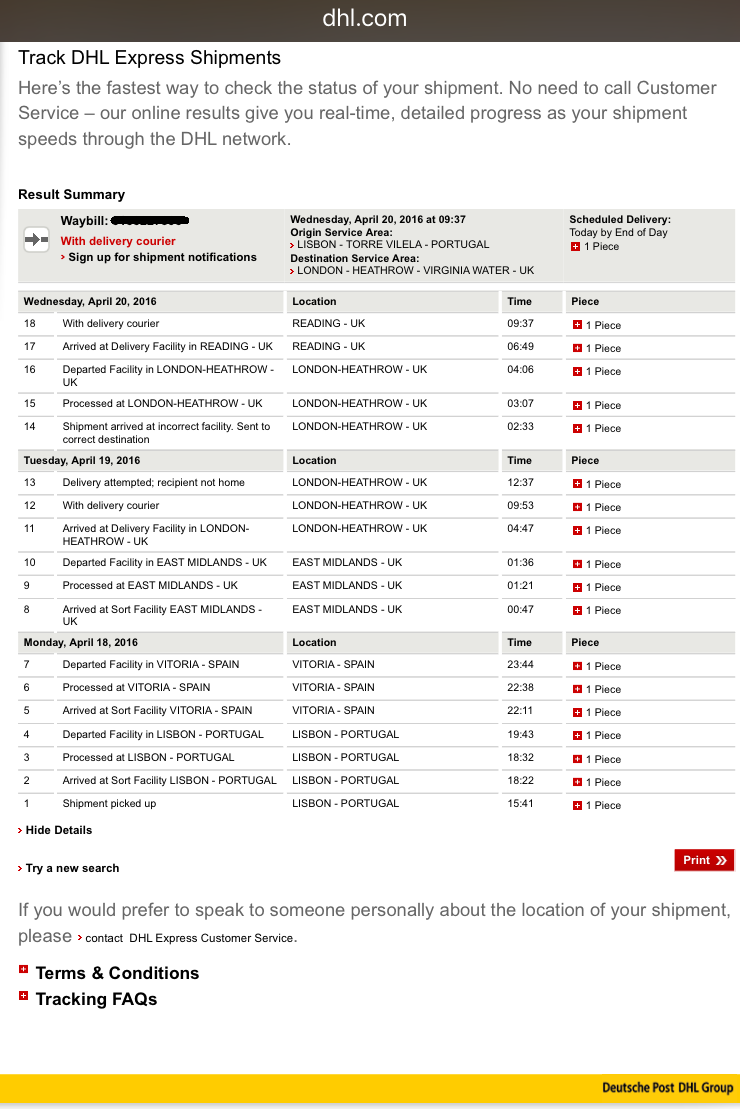
Olympus Service Plus registered repairs are said to take 3 days (not including the shipping time). It says so on the Service Plus website. I would say in my case this was about right - in fact the time it spent under the 'in progress' status (being repaired) was only about a day and a half in total. My own E-M1 arrived at Olympus' freight forwarding address on Tuesday and was then at the Olympus repair center (Lisbon) on Wednesday morning. I was able to see this because I used the repair status checker and it showed my E-M1 as 'received'. Olympus then stated that they were working on the repair on Thursday afternoon. Then on Friday morning my repair ticket was updated to say that the repair was complete and that the camera was being shipped back. Very prompt.
Given that it was now a Friday afternoon and that not much in the way of shipping happens over the weekend, I was at that point setting my own expectations to see my E-M1 again on Wednesday. (meaning it would have been 8 working days including shipping) and I was exactly right. Although, I did miss the delivery initially as they tried to deliver earlier than I had expected.
I received a text message from DHL to say that they were going to deliver on the 20th (Wednesday) and so I made plans to be at home on that day to take receipt of the delivery. But, on the 19th (Tuesday) I received a message to say that they had tried to delivery but I wasn't in. Darn. Okay, well that's my fault. If I had continued to track the delivery online I would have seen that it was out for delivery and rushed home. So, it was then re-delivered the next day and I was happy!
My E-M1 was back in my possession on Wednesday. 8 days after me leaving it at my local Post Office in the UK. But it's not fair to say 8 days as It was me that should have kept an eye on the shipment. So in total: 4 days shipping, 3 days with Olympus. 7 Days for the complete repair and return of the camera!
The return was handled by DHL. Whilst there are a few couriers that operate within Europe now that offer some great tracking services, I'm of the opinion that none of them rival what tools DHL offer recipients (and senders) to track their parcels. When I received an email from DHL to say that they had my camera, I was updated at every turn, every barcode scan and every pickup of where my parcel was. It was fantastic!
How much does it cost / Was the damage covered by warranty?
The damage, seeing as it was my fault was not covered by the warranty. This is made abundantly clear in the warranty regulations on the service website. That said, I didn't pay a penny. My Olympus was returned as good as new (more on that in a minute) free of charge. In all fairness if I had received a phone call to tell me that it was evident the camera had been dropped and there was going to be a charge for the repair work, I would have held up my hands and said 'fine' and accepted those costs. But on this occasion Olympus repaired the camera no questions asked...
I'm not suggesting that your E-M1 will be repaired for free without any questions raised if you've dropped yours too, but I get no special treatment from Olympus. I'm not sponsored or endorsed by them in anyway (although hey Olympus, if you're reading this, get in touch). This is pure, unbiased, quality customer service from them, I can assure you of that!
What was the repair work like?
As mentioned the camera feels just like new now.. All of the dials feel slightly tighter and the camera itself feels solid in a new way (i can't quite describe it). It sort of feels like all of the screws, inside and out, have had a good old tighten!
I also had a small 'scuff' between the two top dials that I make use of for shutter speed and aperture. (This was an older mark, not something that happened as part of the drop that caused the E-M1 to break). It was deep enough to get down to the aluminium. I covered this at the time with some black crayon to fill the deep scuff and then a black sharpie to conceal it (not so that I could hide it from Olympus, but because it was only superficial and I wanted my camera to look smart). When I received my E-M1 back there was no sign of this scuff. Although I did a decent job of disguising it, i knew it was there and it's visible if you know to look for it. But the camera I received back showed nothing. I can only assume therefore that plate has been replaced in it's entirety! I even had to check the serial number on the bottom of my E-M1 was the same as the one I had sent away. It was!
Furthermore, my E-M1 was spotlessly clean inside and out. I keep my cameras clean as it is, but this had clearly been given a VIP valet service! Not a spec of dust inside any of the hinged flaps, for example where the SD cards are inserted and the battery compartment.
In addition, when I shipped off my E-M1 i removed everything that was removable except the eye cup, through fear that it would come back with pieces missing. So, I removed the hot shoe covers, the flash sync port cover, and even the rubber cap that covers the bronze pins at the bottom of the E-M1 to connect it to the battery grip. When my camera was returned all of these parts had been replaced...outstanding.
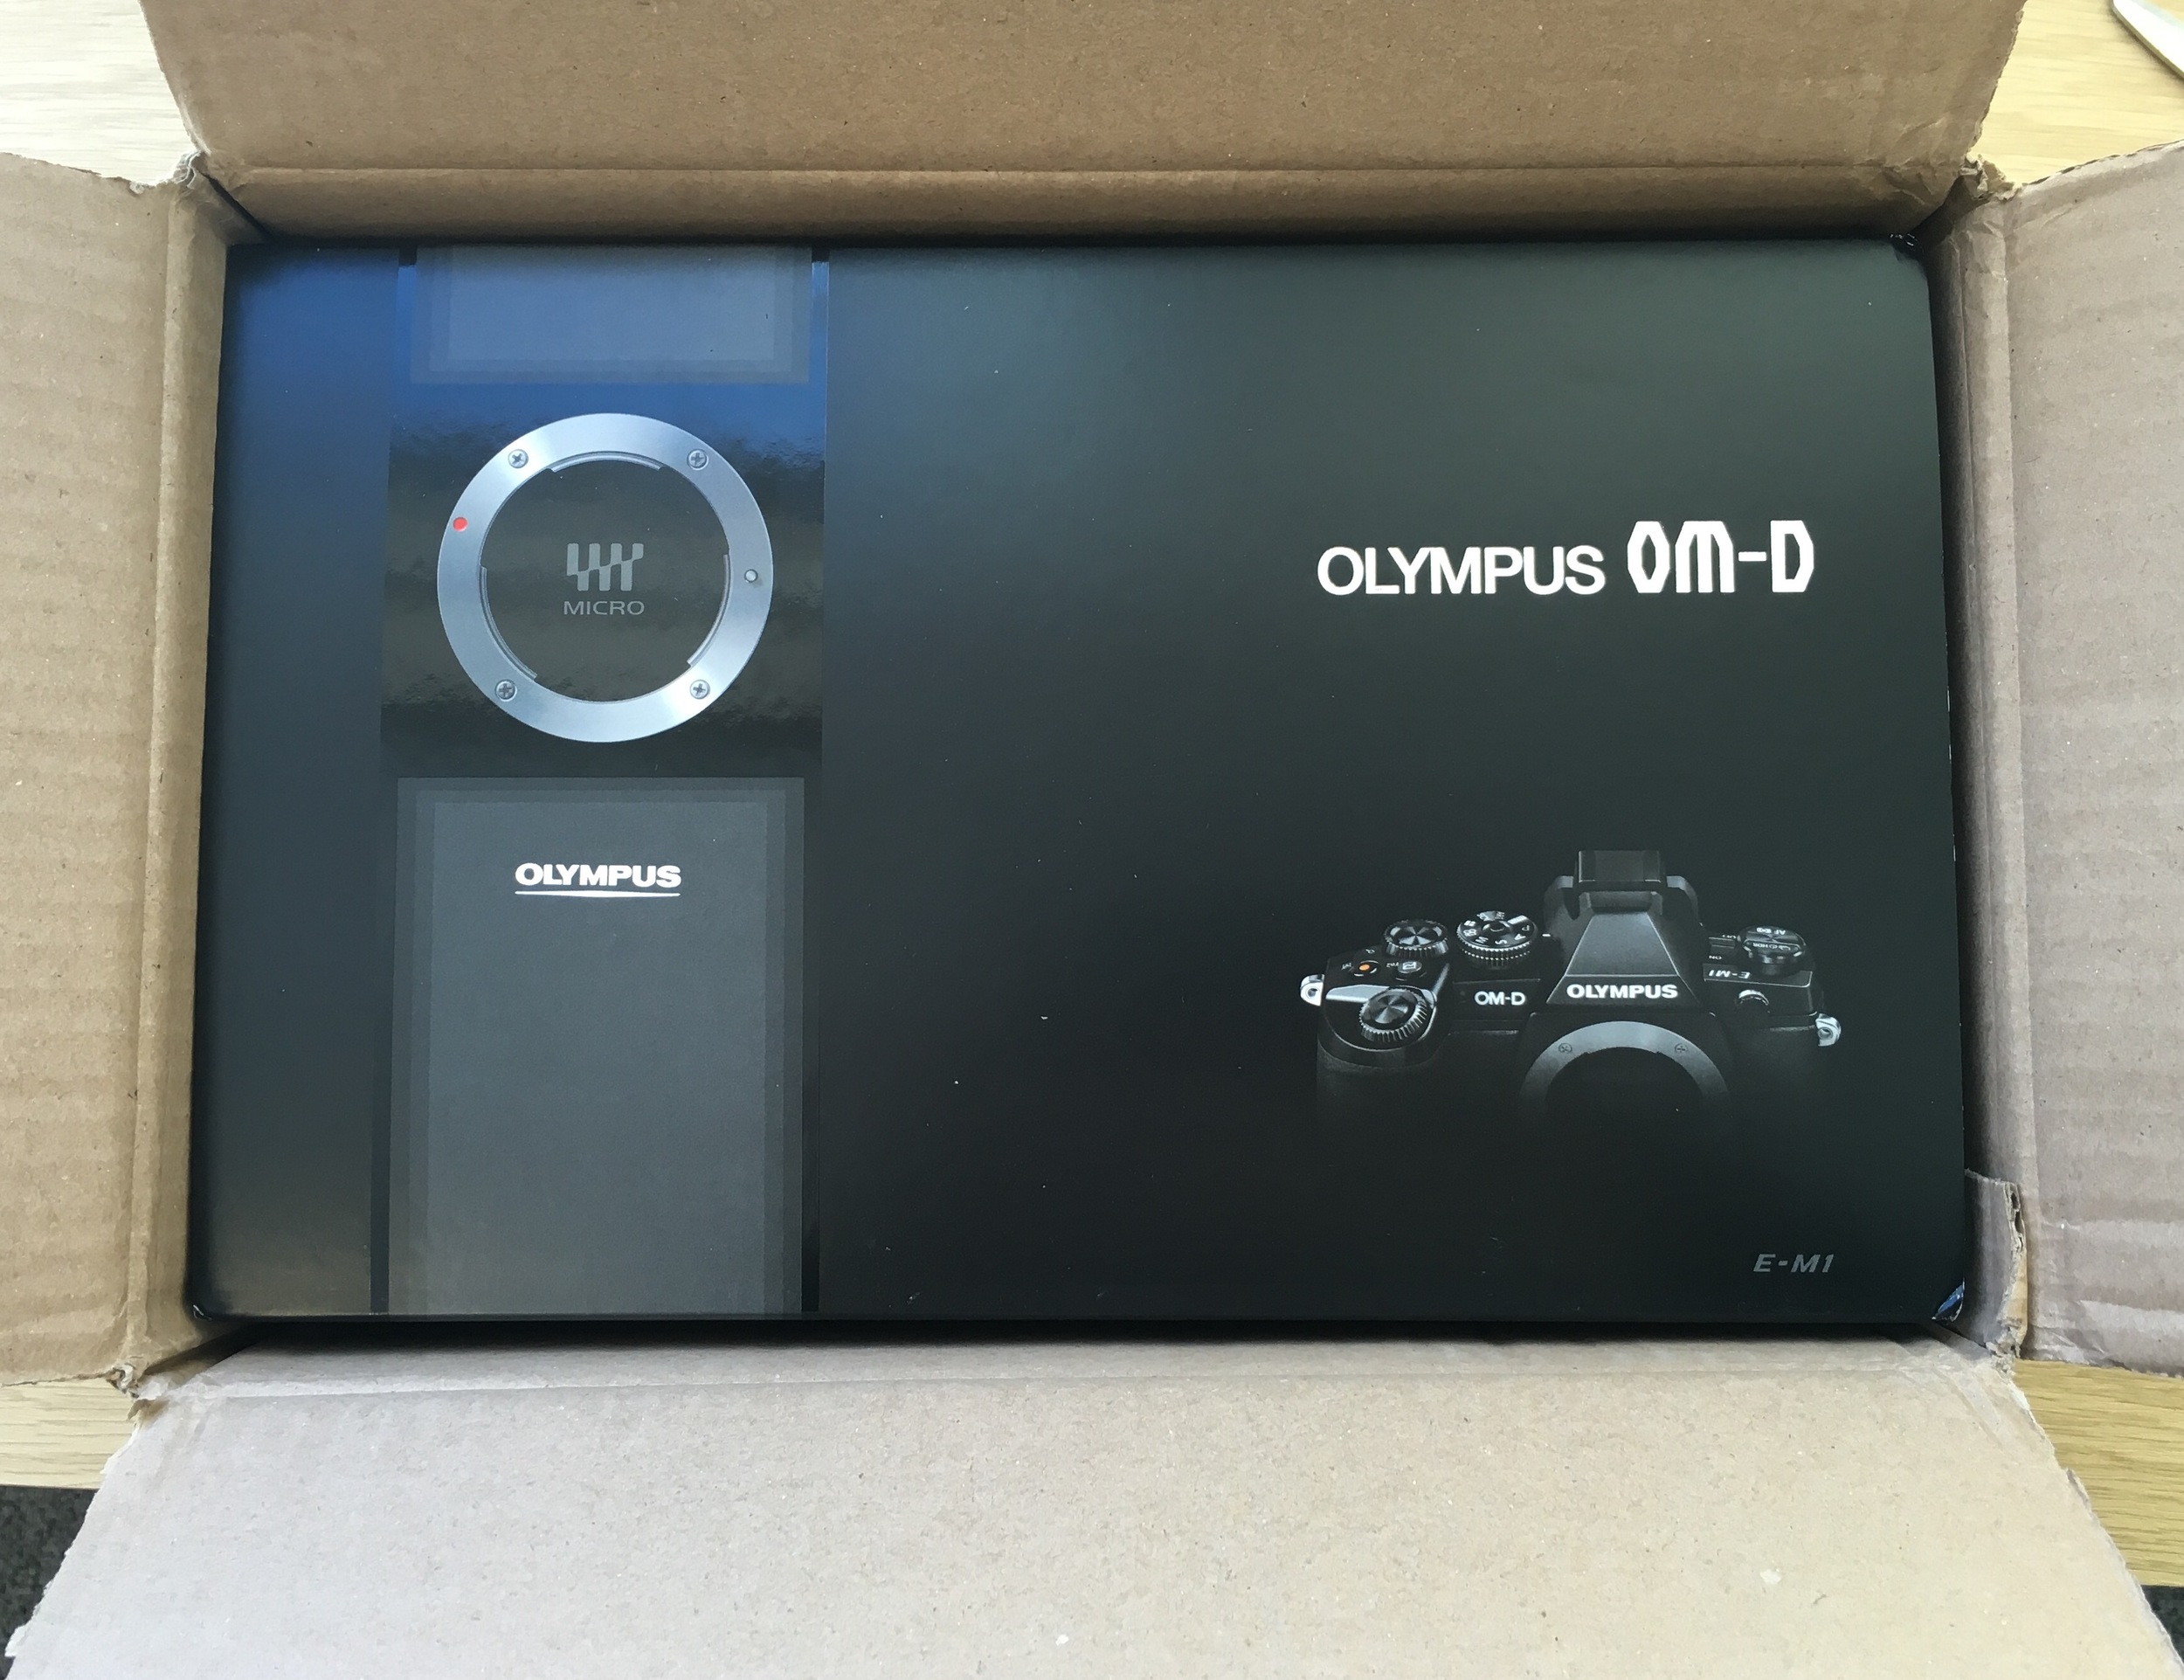
The box was returned well padded and protected. Inside my E-M1 was returned in a brand new official Olympus OM-D E-M1 branded black box, like you get when you buy one new. Inside the box was a very nice, very premium, black Olympus Lens Cloth and even a hand signed letter from the technician responsible for the repair of my beloved E-M1 (Thanks José!)
![FullSizeRender[1].jpg](https://images.squarespace-cdn.com/content/v1/52a9c726e4b020866945fd95/1461691892785-PP90WLX78QLNEHWY8O3J/FullSizeRender%5B1%5D.jpg)
![FullSizeRender[2].jpg](https://images.squarespace-cdn.com/content/v1/52a9c726e4b020866945fd95/1461691895305-HIBFUUUMCH1EGD5BP8JE/FullSizeRender%5B2%5D.jpg)
![FullSizeRender[3].jpg](https://images.squarespace-cdn.com/content/v1/52a9c726e4b020866945fd95/1461691896168-1UWX02DH7PQG04IOS4XT/FullSizeRender%5B3%5D.jpg)
In short; Olympus did everything to ensure that this camera was repaired fully and returned in as timely a fashion as possible. And, (this is always important when it comes to customer service) I remained up to date throughout the entire process by both Olympus and the courier that they chose to use, giving me peace of mind that my E-M1 wasn't somewhere in Europe in some dusty factory getting lost on a shelf among old spare parts for old cameras.
Can I get a loan camera?
As far as I can see Olympus don't, at this time at least, offer a loan camera as part of the repair service arrangement. Which is something of a shame I will admit. However, before shipping my camera off I got in touch with Olympus Ambassador and all-round nice guy Neil Buchan-Grant to see if he could put me in touch with someone at Olympus who possibly help arrange some sort of loan. I would clarify that I do have a backup body, but I wasn't keen on shooting for a client with just the one camera on me. Neil put in contact with Claire Voyle, who I also happened to follow on Facebook & Instagram, so I got in touch. There weren't any E-M1's available at the time, but I was reminded that Olympus have the 'Test & Wow' service, whereby you can get your hands on Olympus cameras and lenses for a few days at a time. As the name suggests it's sort of intended as something of a try-before-you-by arrangement, but in truth it would serve just as well as a means to fill a short term gap. I didn't make use of Test & Wow as it would have meant that I'd have to go to the London Park Camera store to collect and then again once my 3 day loan period was up to drop it off again. If however I had a wedding that weekend my E-M1 was away, I would have done this. It's only 45 minutes to Central from my home in Virginia Water and then another 15 minutes to the store.
So, with enough planning and if you're local enough to a good Olympus retailer, you could quite effectively fill a short term need with something from the Test & Wow service whilst your work horse is our for repair.
Conclusion
I've been convinced for the longest of times that if you're looking for a smaller mirrorless camera as a replacement (or even to compliment) your DSLR gear, then an Olympus OM-D is the way to go. I've said that in many posts right here in my blog. But, if one of the things holding you back and tying you to your Canon or Nikon is a concern about the level of professional support available to you as an Olympus owner that genuinely shouldn't be something you now fear losing.
Sure, they won't necessarily lend you a camera as a replacement for your own whilst your OM-D is in for repair (although as mentioned you could make use of the 'Test & Wow' service if time permits), but you could also argue that the cost of the E-M1 in comparison to a Canon or Nikon Body could mean you could afford a third body: a backup for your backup, meaning you're hopefully never in a situation where you're down to just one camera body.
In short, if you're a professional wedding or portrait photographer, or shoot a discipline that you are happy the OM-D range can tackle - you can now make the switch. Olympus will have you covered should your workhorse take too much of a beating and need to for repairs. Ultimately, you won't be left guessing when your camera is coming back and you'll have some control over the process. Olympus will do right by you so you can continue to produce stunning work for your clients.
With 3 year warranties as standard and an extra 6 months on offer to those who register their E-M1's to Service Plus (for free), the reasons to pick up an OM-D E-M1 are boundless! That sort of warranty will likely out-last the length of time you own that camera as a professional photographer. Now that's peace of mind.
Well done Olympus and thank you for returning my E-M1 as good as new! (And thanks again to José for the outstanding work!)
Happy New Year & The Best of 2015
I wanted to leave my 'Happy New Year' post until a week or so after New Year. I don't know about you but my inbox was full of offers, promotions, discounts and all sorts of other things that just added to the noise immediately after New Years. Everyone wants you to visit their site and buy their product. I felt that If I were to release this post just after Christmas, or on the 1st of January that I too would be adding your inboxes that are likely (like mine was) busting with things I just wasn't interested in.
Now that most of us are returning to some sort of normality and a sense of routine I thought it would be a good time to share with you, what I think, was some of my best work from 2015 and take a look back on those 12 months.
So, firstly I hope you had a wonderful Christmas and that you spoiled yourself with some lovely new photography-related goodies. Personally I think photography books are the best Christmas present. As great as new gear is photography books give you so much and can help you grow. If you get a new book at the beginning of a year it can really inspire and inform you for the year ahead. Whether it's business or technical, or even just a photo book filled with amazing photographs to inspire, photography books are fantastic. If you've received Amazon or book vouchers, one book I would recommend is Gregory Heisler: 50 Portraits. Wow!
Best Street Photographs of 2015
I found this to be harder than I thought this year. Usually I would just pick out 10 images and post them right here, but this year I thought instead I'd select a few more and put them in to a slide show. Some of these images are seeing the light-of-day for the first time, which surprises even me. As I looked back through my library in Adobe Lightroom there were a few images that jumped out at me - images that I had previously overlooked as good enough to share with the world. So, here are my favourite Street Photographs from 2015:
[If you're reading this email in your inbox you may need to open this in a browser to watch the video]
Best Of the Rest
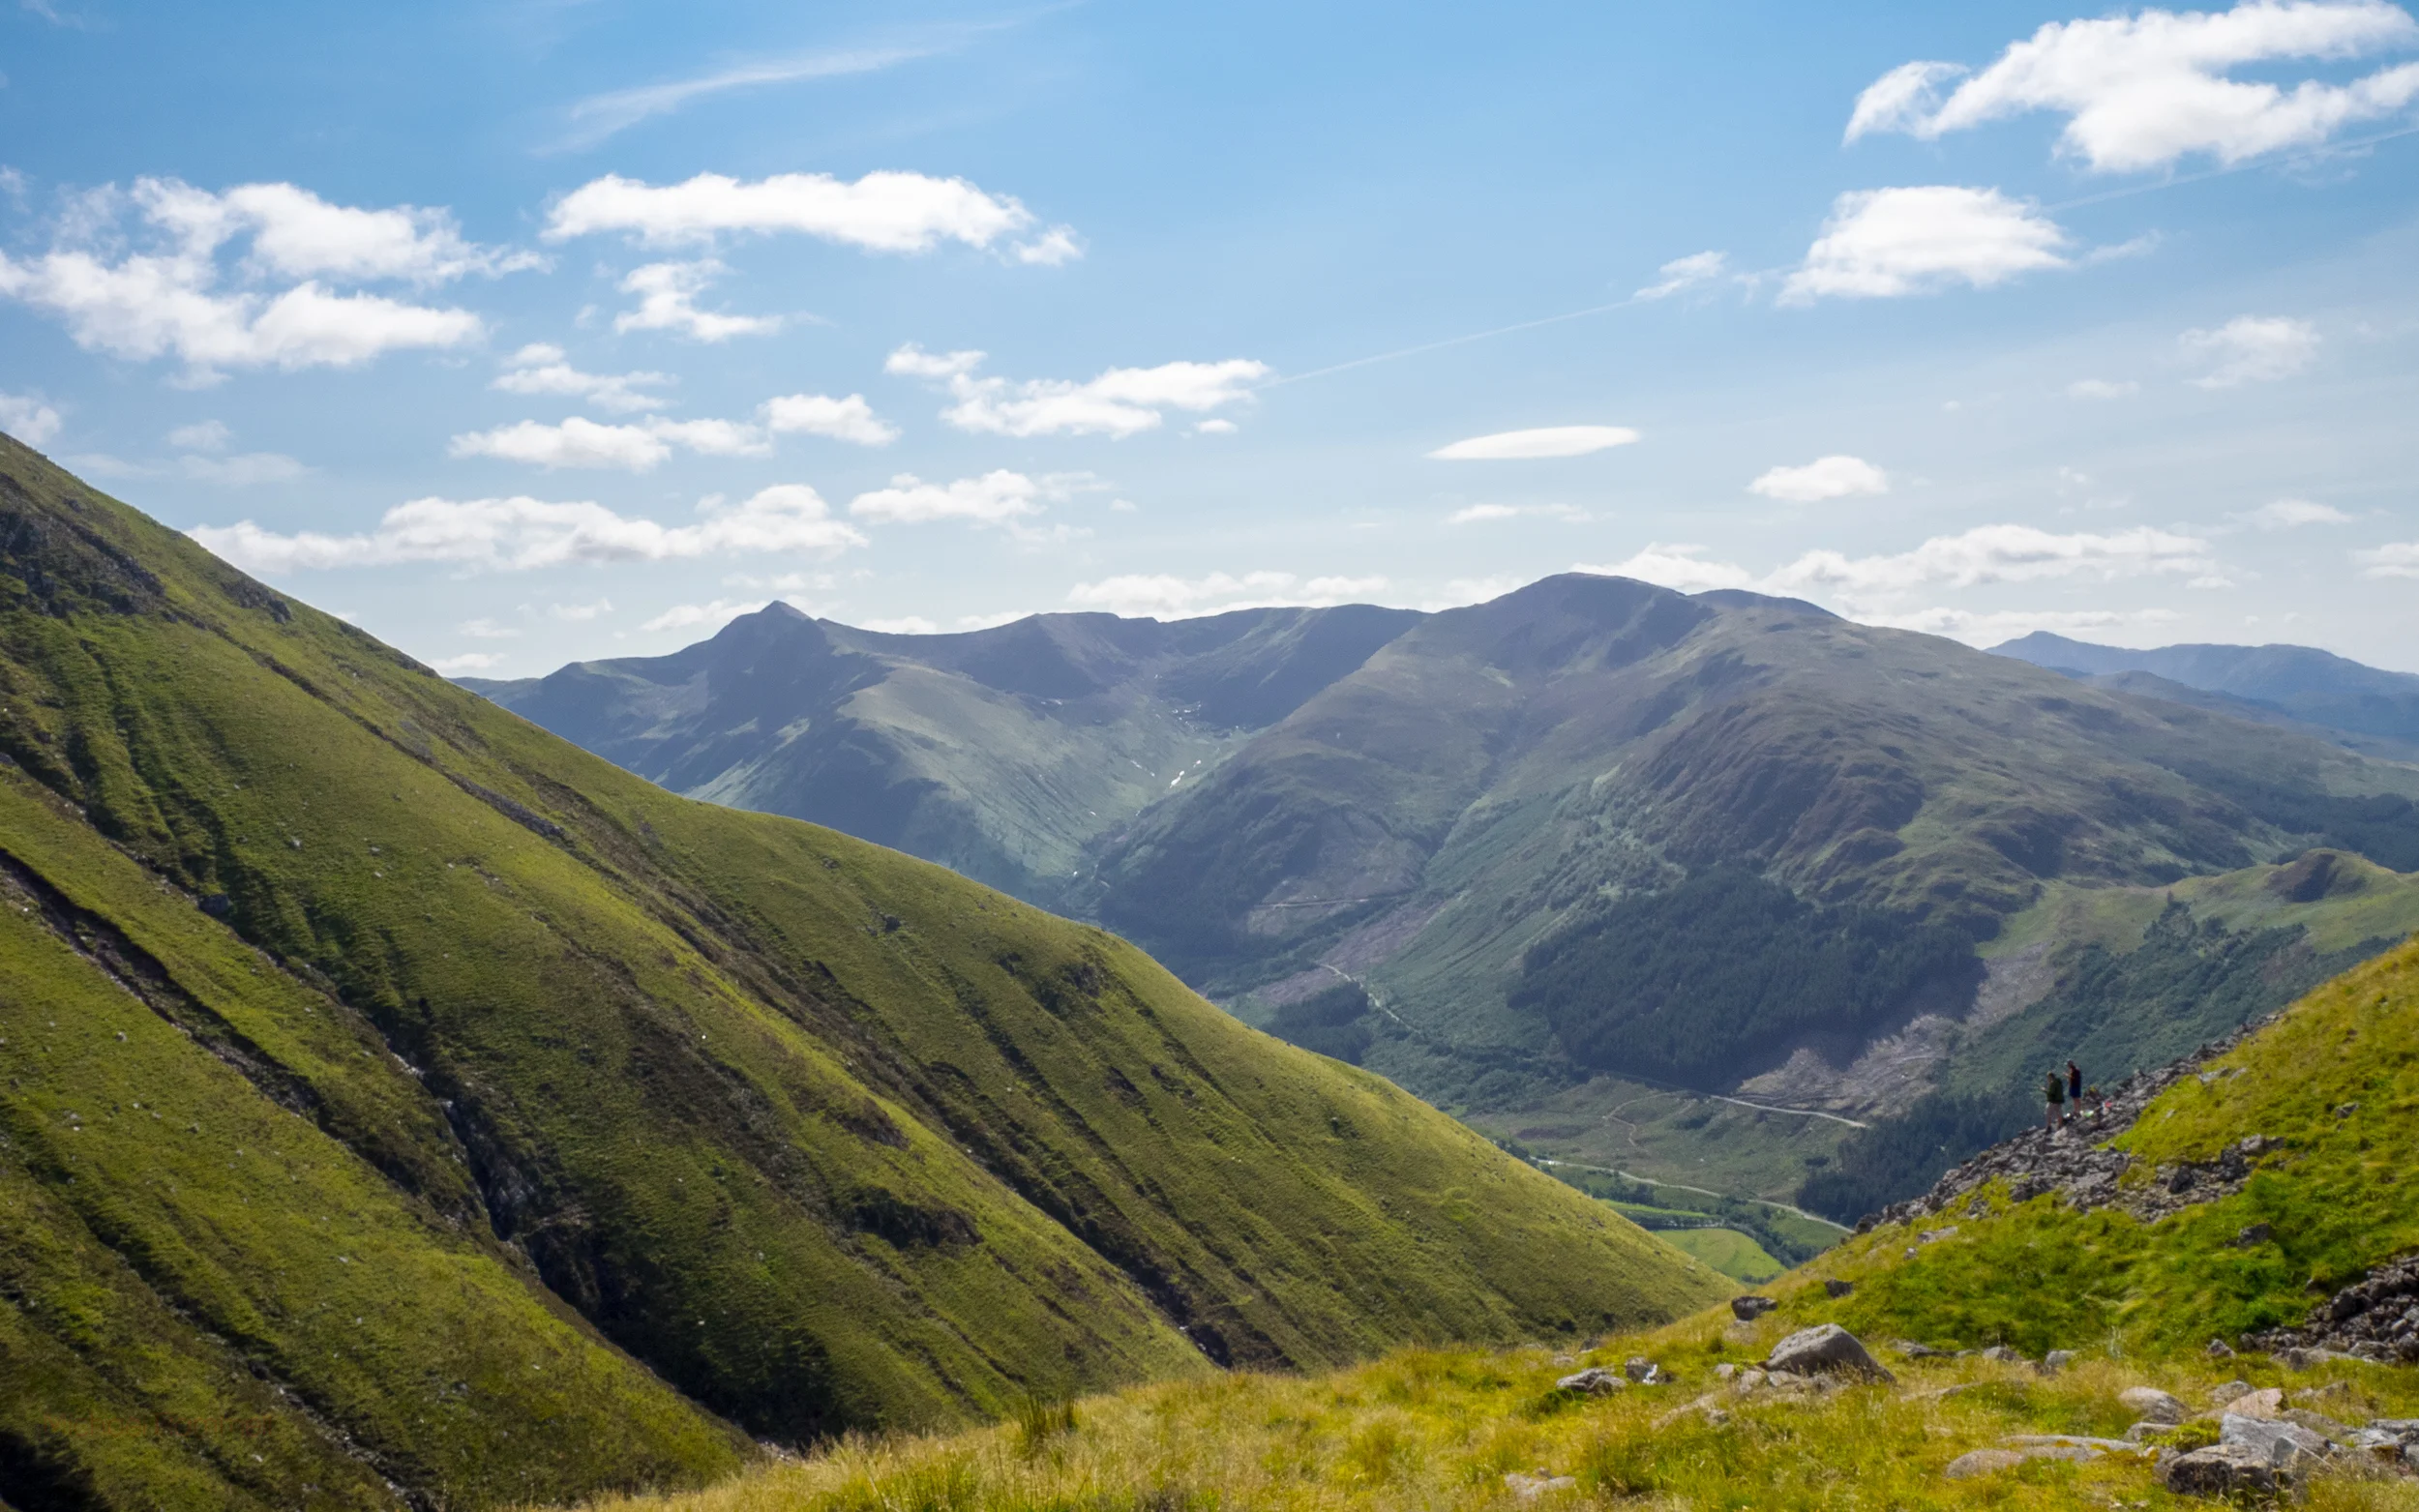
As much as I consider myself primarily a street photographer, the truth is that I photograph everything. 2015 saw me travel to Dubai, Venice, France (for the Le Mans 24hr) and Turkey. I moved to a new area here in the UK and of course I'm actually a wedding photographer 'by day' and so this year has seen me make some photographs that I just haven't made in previous years that I'm particularly proud of. I would add though that one massive change to my photography has been the move to the Olympus system. I'm not suggesting that without the Olympus I wouldn't have made any of these photographs however, there were times when I was undecided as to whether I'd take a camera with me because of the extra thing to carry. More often than not I took the camera but I do feel that If I were still shooting Canon and had to lug a DSLR body and a selection of not-so-small lenses, it would have been the other way round and I'd have been consigned to using my iPhone for moments that really called for a quality camera. Ben Nevis is a perfect example of this.
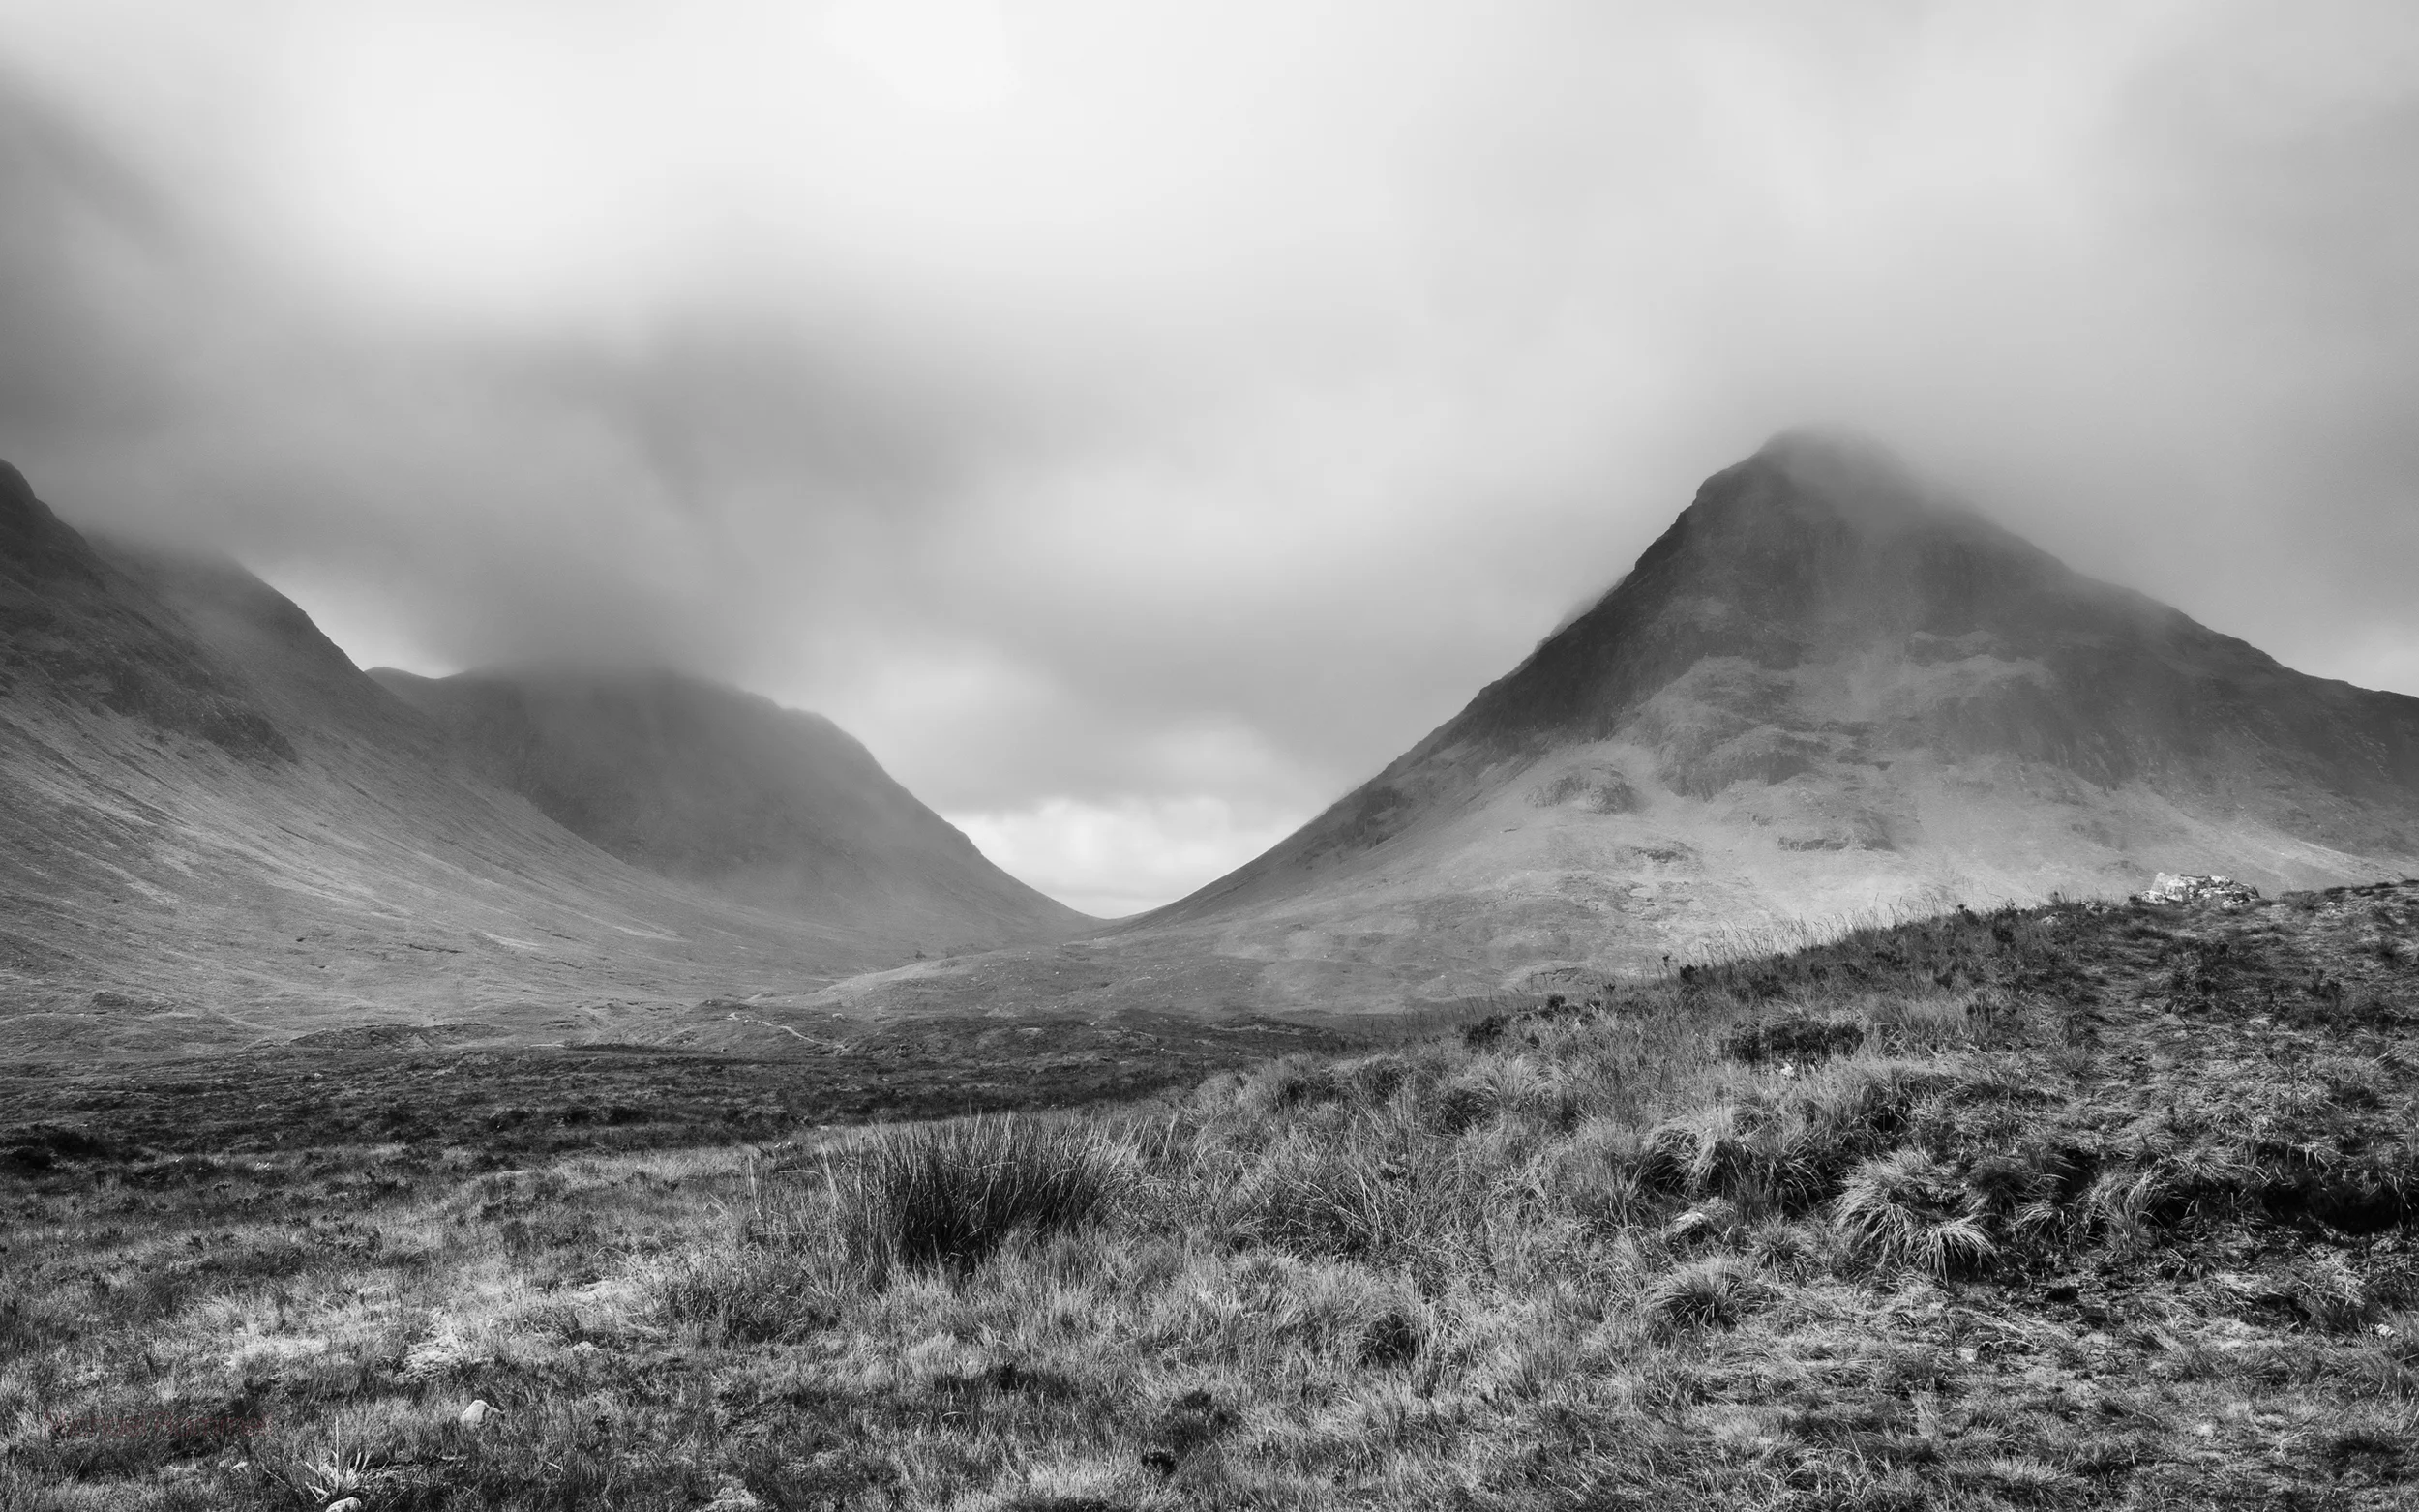
This was perhaps my favourite photograph from my trip to Scotland. This is not from Ben Nevis at all but was actually a photograph I took as I pulled over the car on the way home to jump out an make a final few photographs before leaving these beautiful landscape behind me. I was most pleased with the colours, the stream in the foreground, the rolling clouds - everything seem to come together to give me exactly what I was looking for!
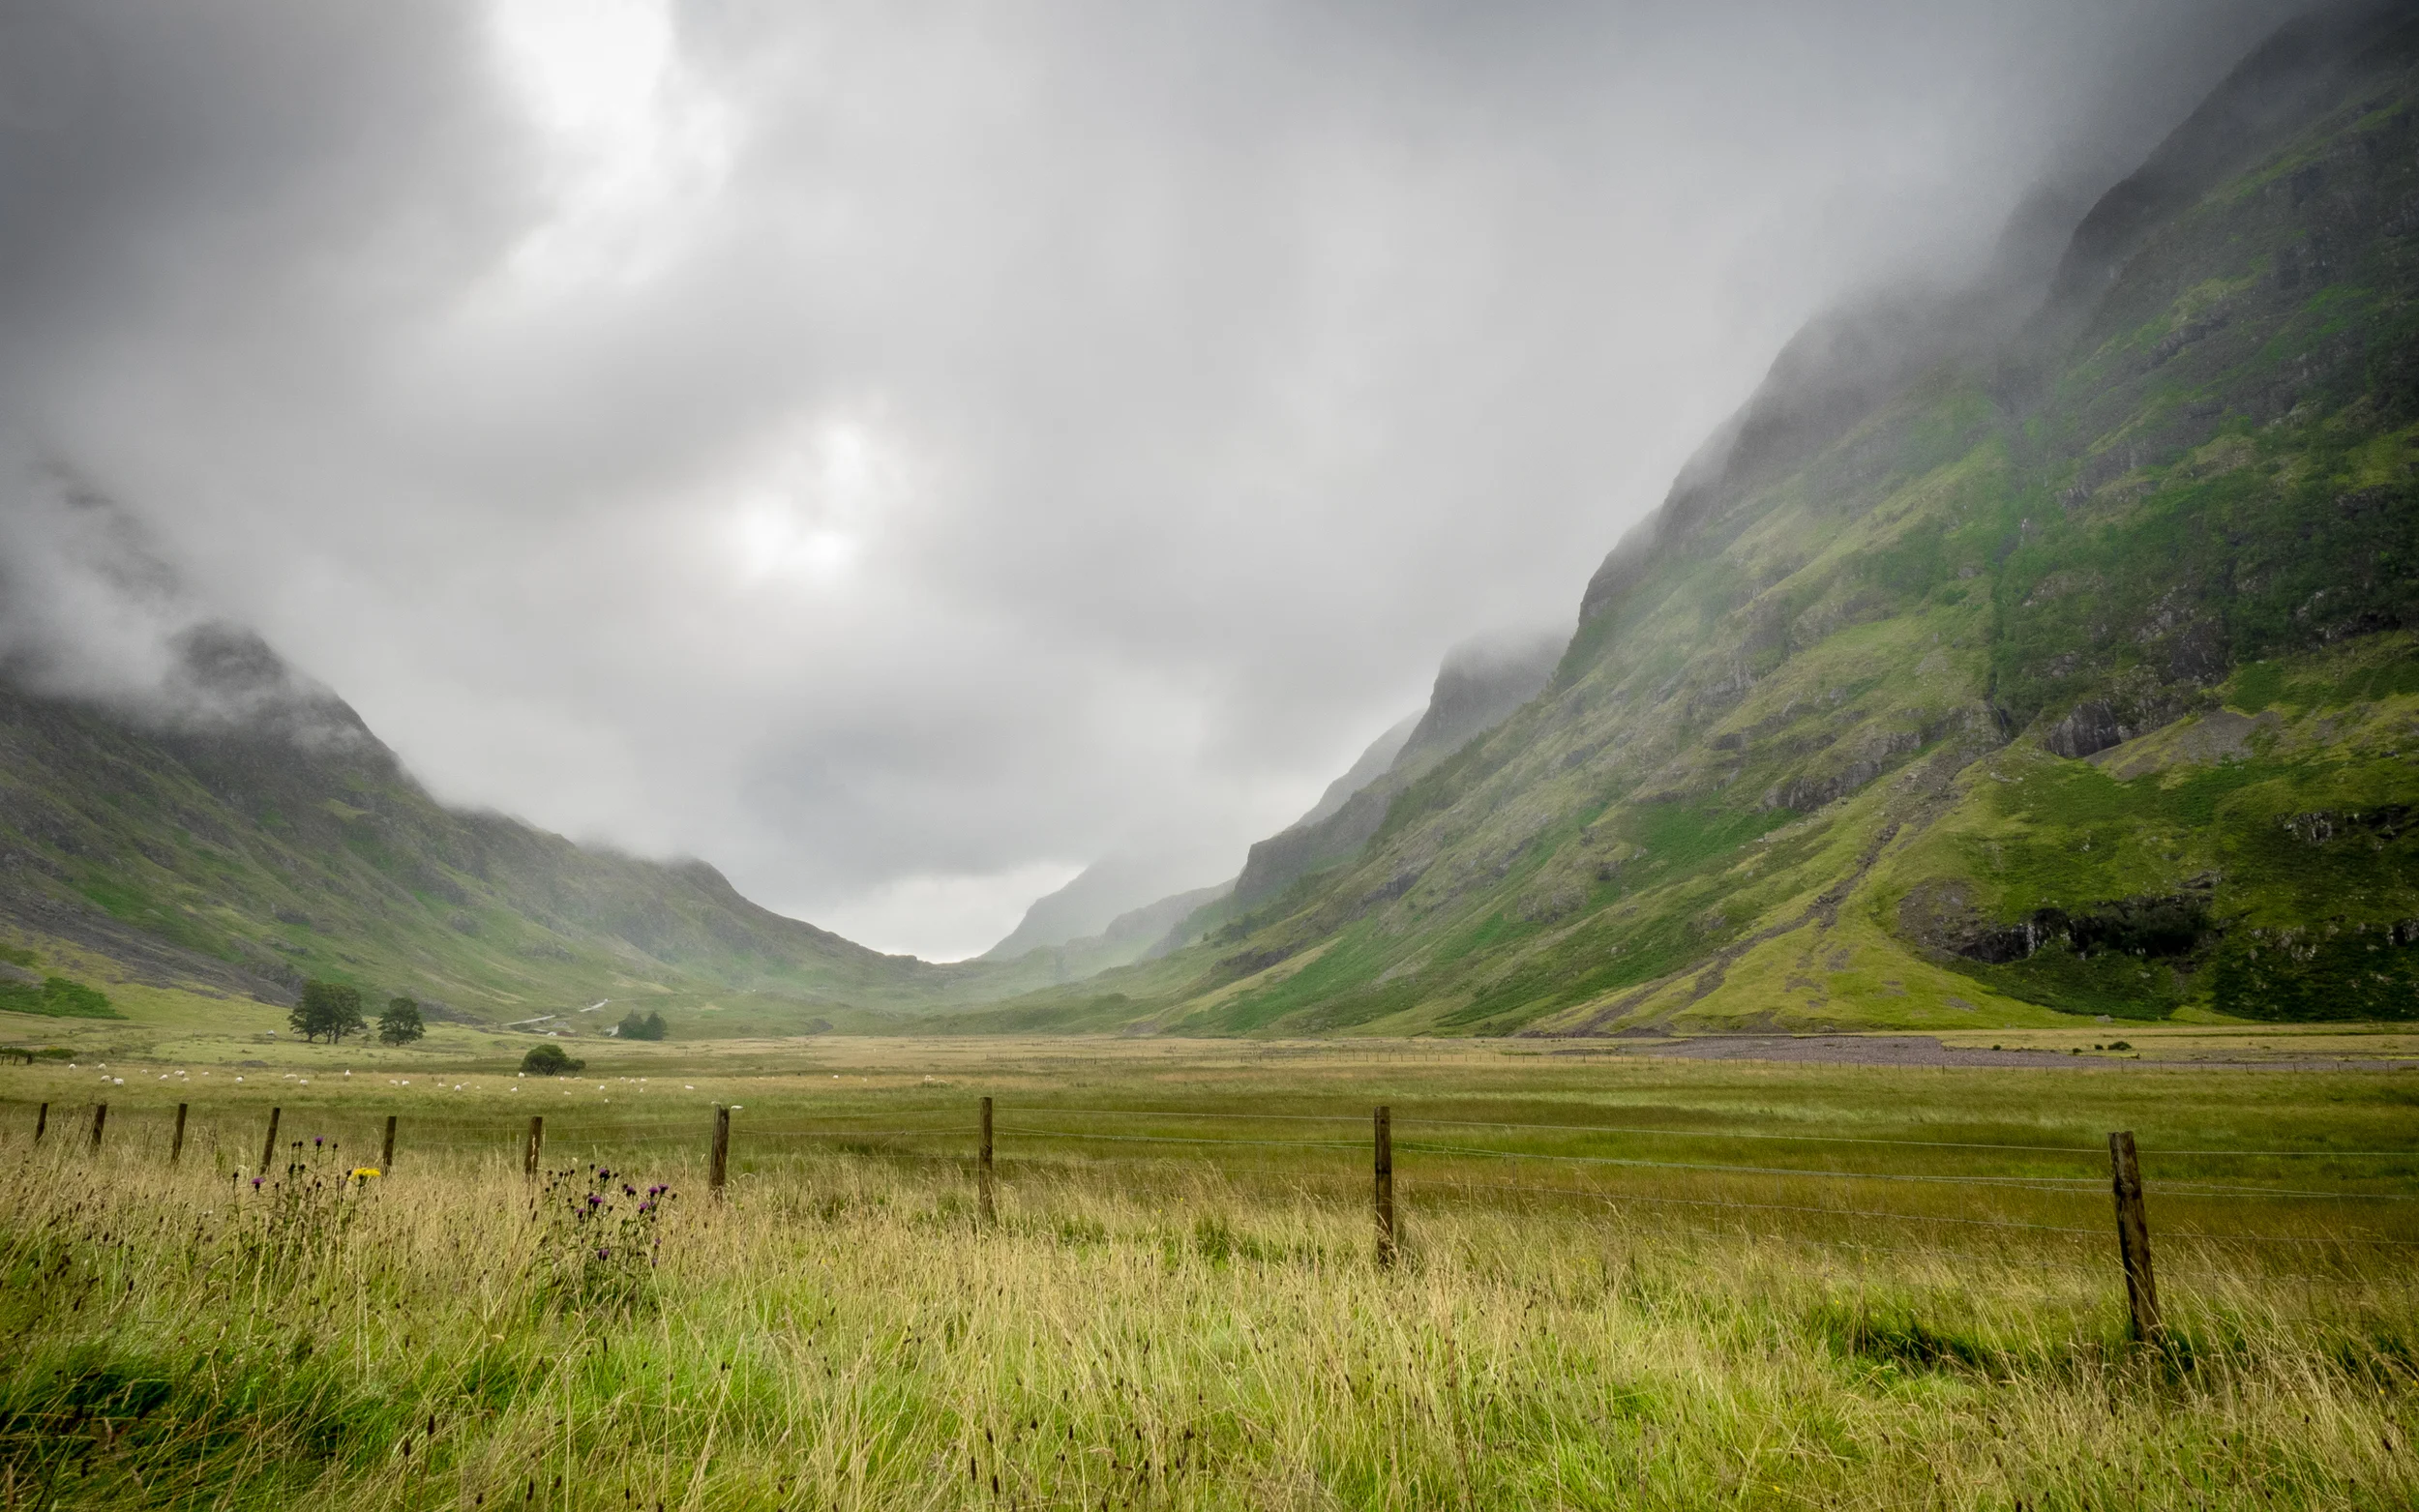
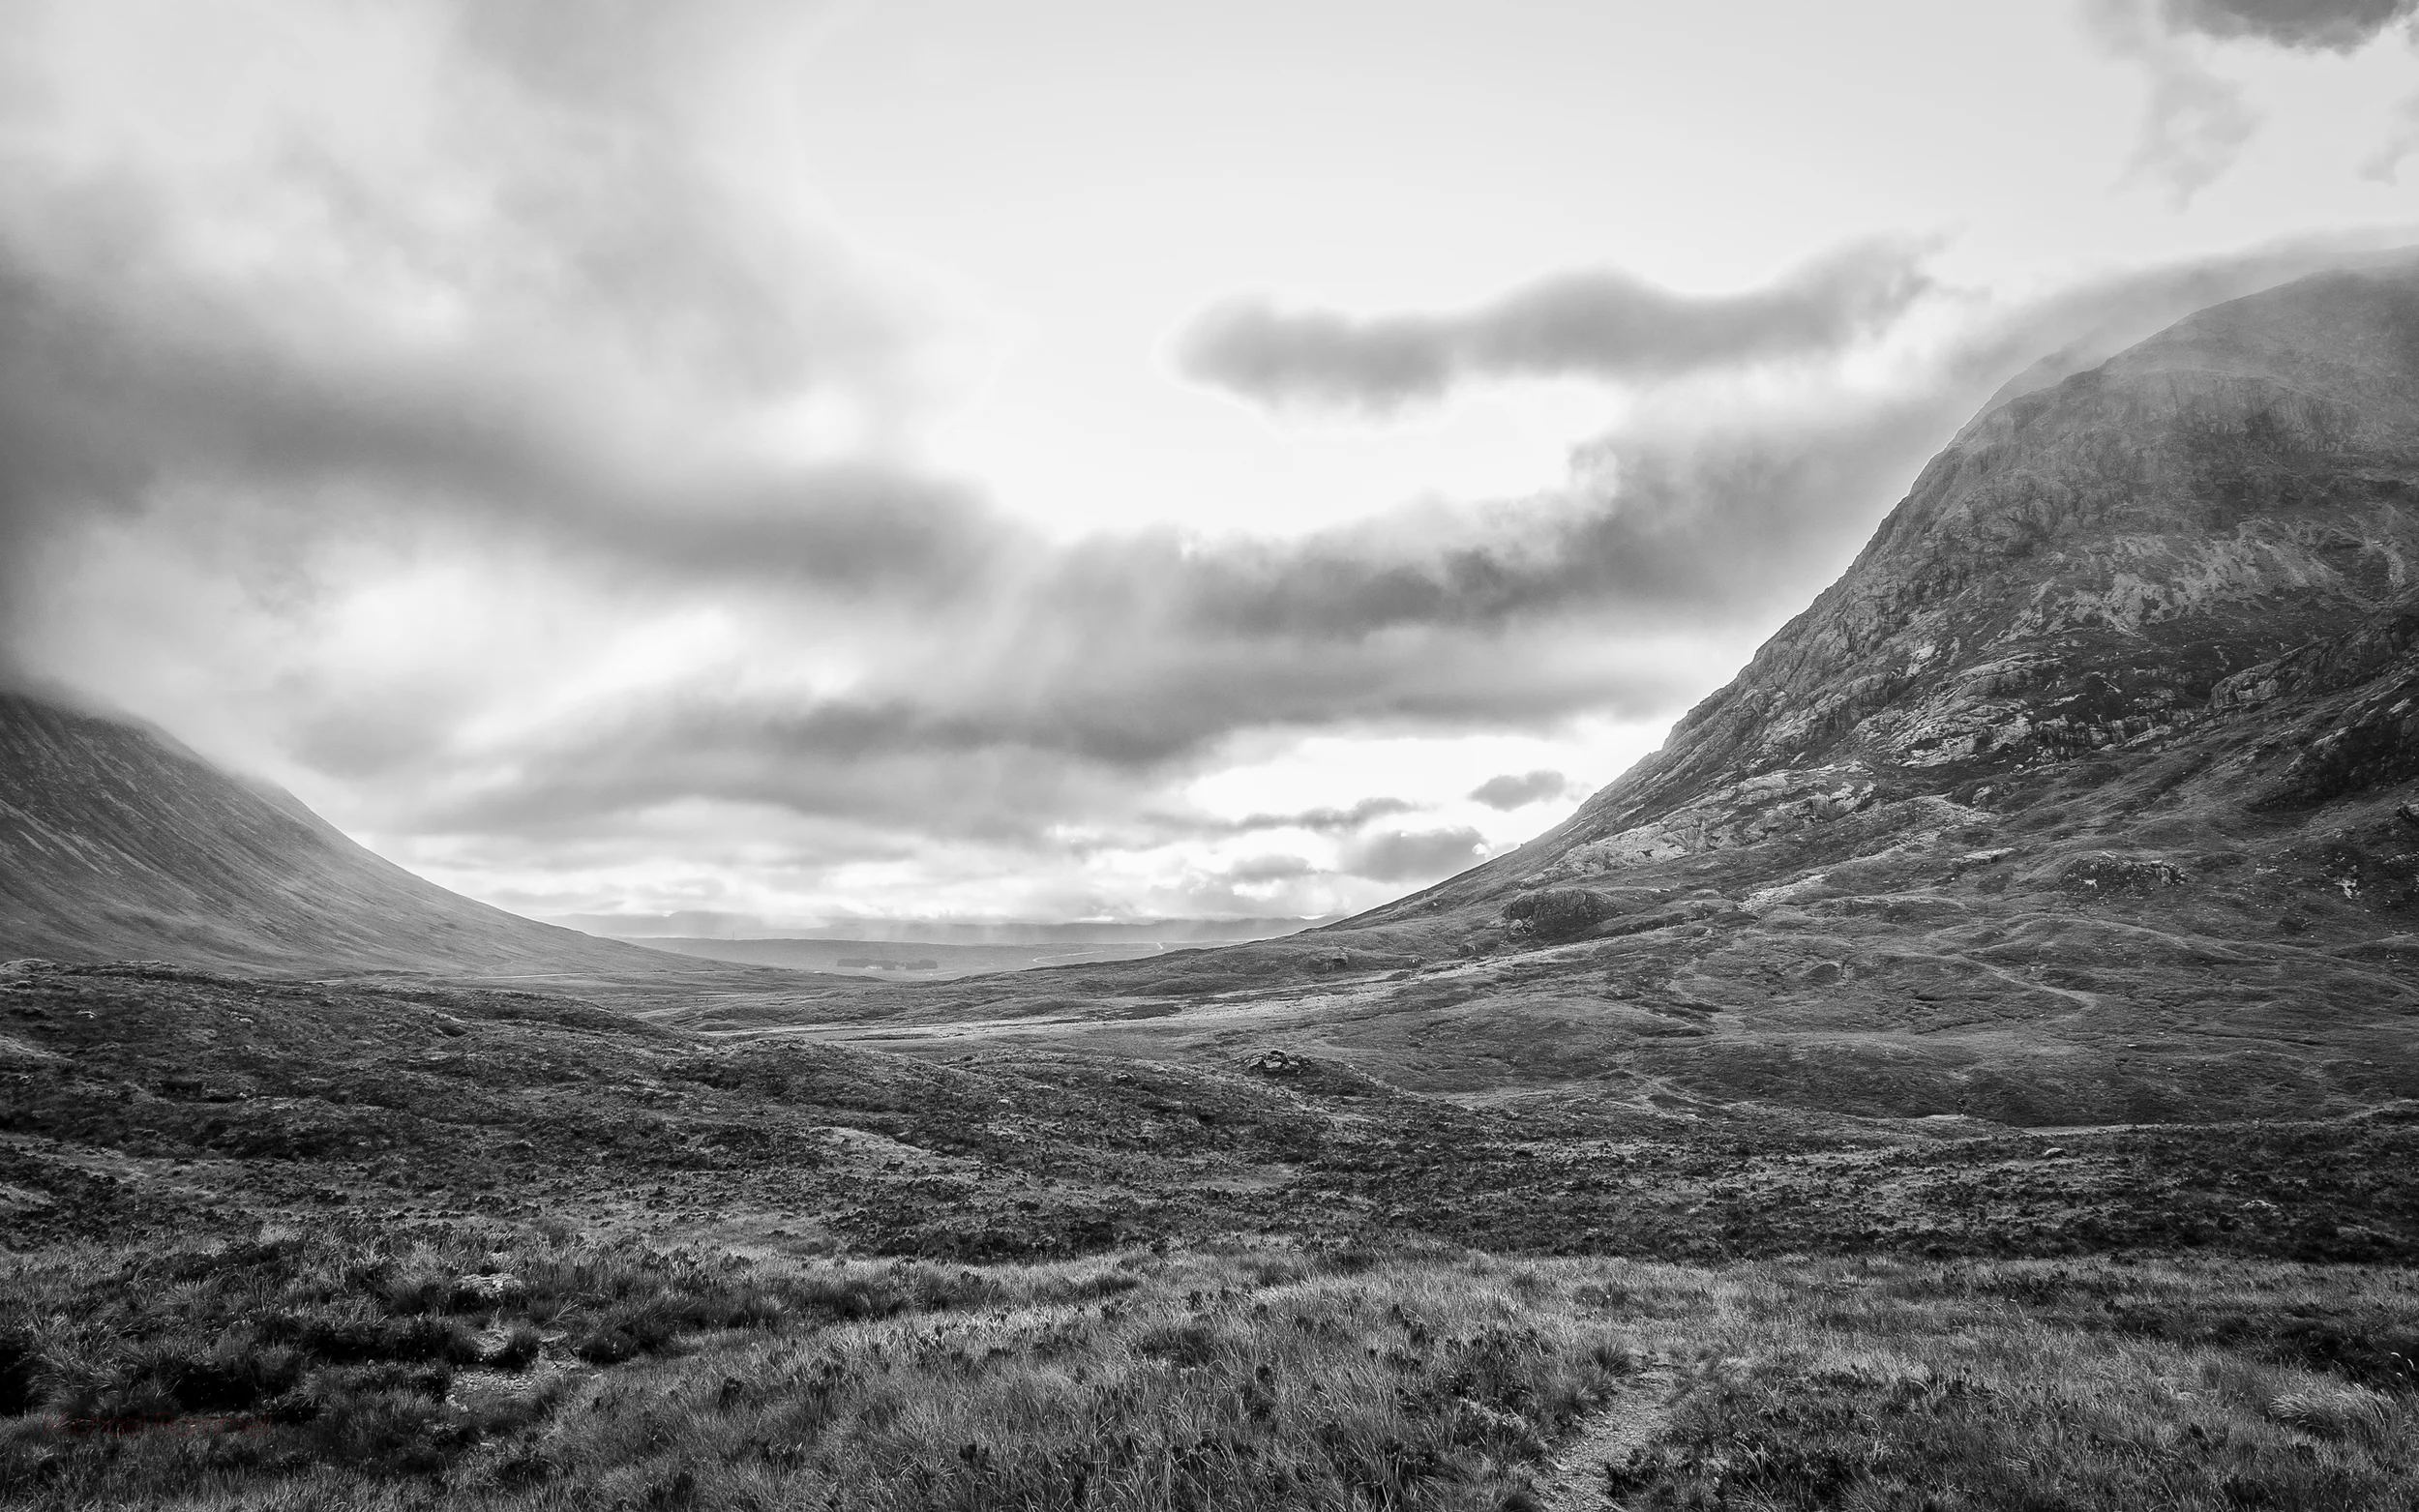
Ben Nevis & Glencoe
Here are a few more from that same trip:
Macro Dandelions
Another surprise in my library of favourites were these images of Dandelions that I made using the superb Olympus 60mm f/2.8 Macro lens. Before this lens I had only used a Canon Macro lens on hire on a few occasions for weddings. My need and desire for a Macro lens never warranted me owning one, however when making my switch to Olympus and making a sizable investment in new kit I decided that a Macro will be part of that. Before my first wedding of 2015 I took it to the lake near my house to see what i could find to photograph with it - and this was the result:
From that very same trip here are a few more Macro's of Dandelions. I find the close-up detail fascinating!


Motor Sports
If you've been following me for some time you may be aware that each June I make my way to Le Mans in France to watch / photograph the legendary 24 hour race. Although this photograph isn't from the Le Mans 24 Hour Race (it's from the 6 hours of Silverstone here in the UK (another date on the same race calendar) this was the first time I had put the Olympus OM-D E-M1 through it's paces and shot motorsport with it. It was on this day, with photographs like this, that the E-M1 proved to me that it was able to do what my Canon DSLR could and that my switch to Olympus was a justified move. I wouldn't have been overly upset had the E-M1 not been able to produce the goods, but knowing that my new favourite camera was a match for the system I had just moved from, it made me very happy indeed. The post I wrote about the E-M1 and motorsports was also one of my most popular posts in 2015 as well. This was also the first time I really got to put the astounding Olympus 40-150mm f/2.8 PRO through it's paces.
For more E-M1 motorsport photographs have a look at my post 'A Day At the Races with the Olympus OM-D E-M1'
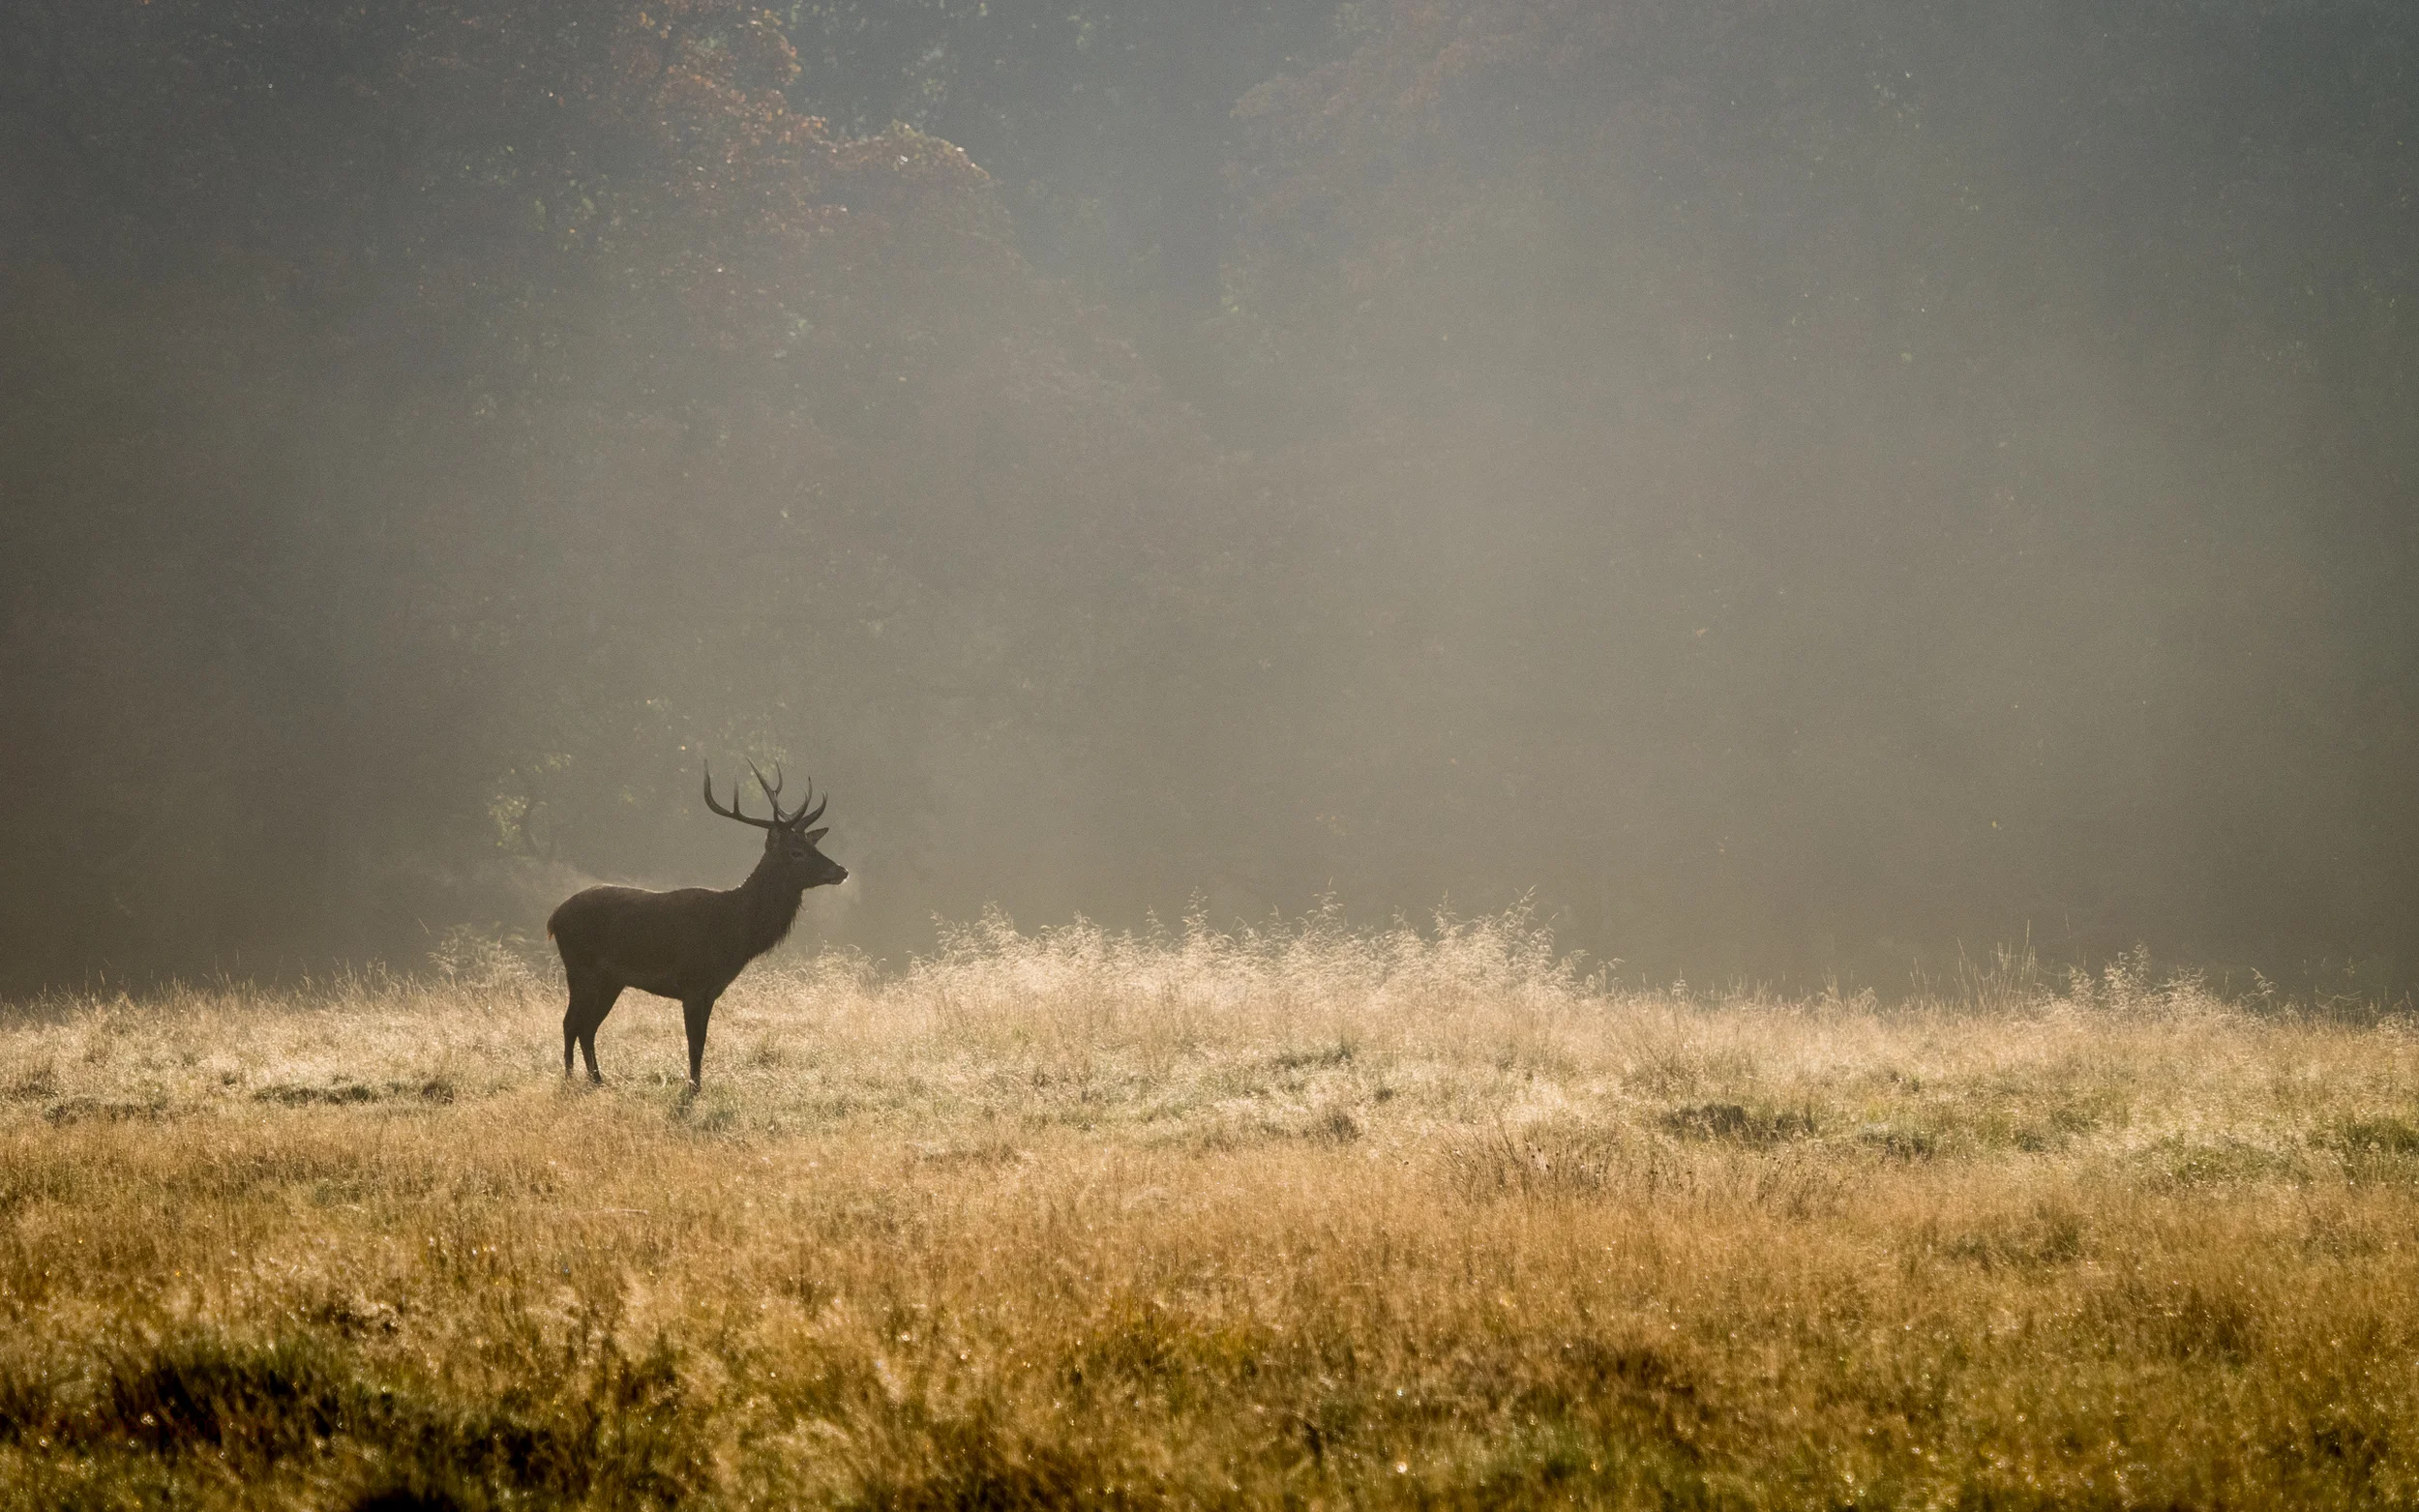
Richmond Park
This was a memorable day for me, as much for what I saw with my eyes as for what I managed to capture with the camera. This was perhaps the most golden of golden hours I have ever experienced. The light really was the colour you can see here in the photograph:
I've been to Richmond on numerous occasions to capture the stags rutting and the images I usually make are close ups of the stags with as much detail as possible. I tend to end up coming home with technically sound images; well cropped, good Depth of Field and sharpness etc. Being a park the images almost always have a dark or green feel to them as well. But this particular day I wanted to try something different than what I had before and the Golden Stag above reflects that. I was really pleased that what I had when I got home was something a little different and that, for me, was very reflective of 2015 as a whole. In part thanks to the EVF in the Olympus, more in part to my own personal development and growth as a photographer. Here are a few more from that morning in Richmond:


Summary
So my top picks for 2015 certainly differ dramatically from my look back in 2014 (which you can find here: 2014 Top 10). You'll see that back in that review I was still between systems; shooting both DSLR and Olympus (mirrorless). Whilst for many it doesn't have to be a question of one system or another, for me, I simply found that the Olympus was a very intuitive system to use and the EVF allowed me to (literally) see what it is I was about to capture. This made 2015 a year where I learnt even more about photography; with a solid technical background I found I was now able to more easily break rules and try out new things with a higher chance of success.
Throughout 2015 the only camera I have used has ben either the Olympus OM-D E-M5 or the OM-D E-M1. And I couldn't be happier.
Show me your top 10 from 2015
I'd love to see your top 10 or even just some of your favourite images from 2015. Drop a comment in the comments section below on the blog and be sure to include a link.
Olympus OM-D E-M1 Firmware Version 4.0 - Issues
I wrote earlier this week about the release of firmware version 4.0 for the diminutive Olympus OM-D E-M1 and the perks and additional features it's going to bring to our cameras. For that full list of additional features check out my post right here.

This version was announced back in September and not released until November 26th, so Olympus had us all waiting for this one. I would expect, having worked in software testing and IT for well over 10 years now, that the firmware was in development for a much longer period than many of us would have been aware of and of course during it's development it would have been tested thoroughly over and over to ensure it's stability. However it's not uncommon, even for the likes of Apple (as we all know!) that a new release has a couple of bugs here and there and we find ourselves downloading version 4.0.1 or 4.1.0 or some iteration of the update only a week later. After all it's only when it's in the hands of thousands of device users that you can really have every single little fine detail tested as we all use our cameras so differently!
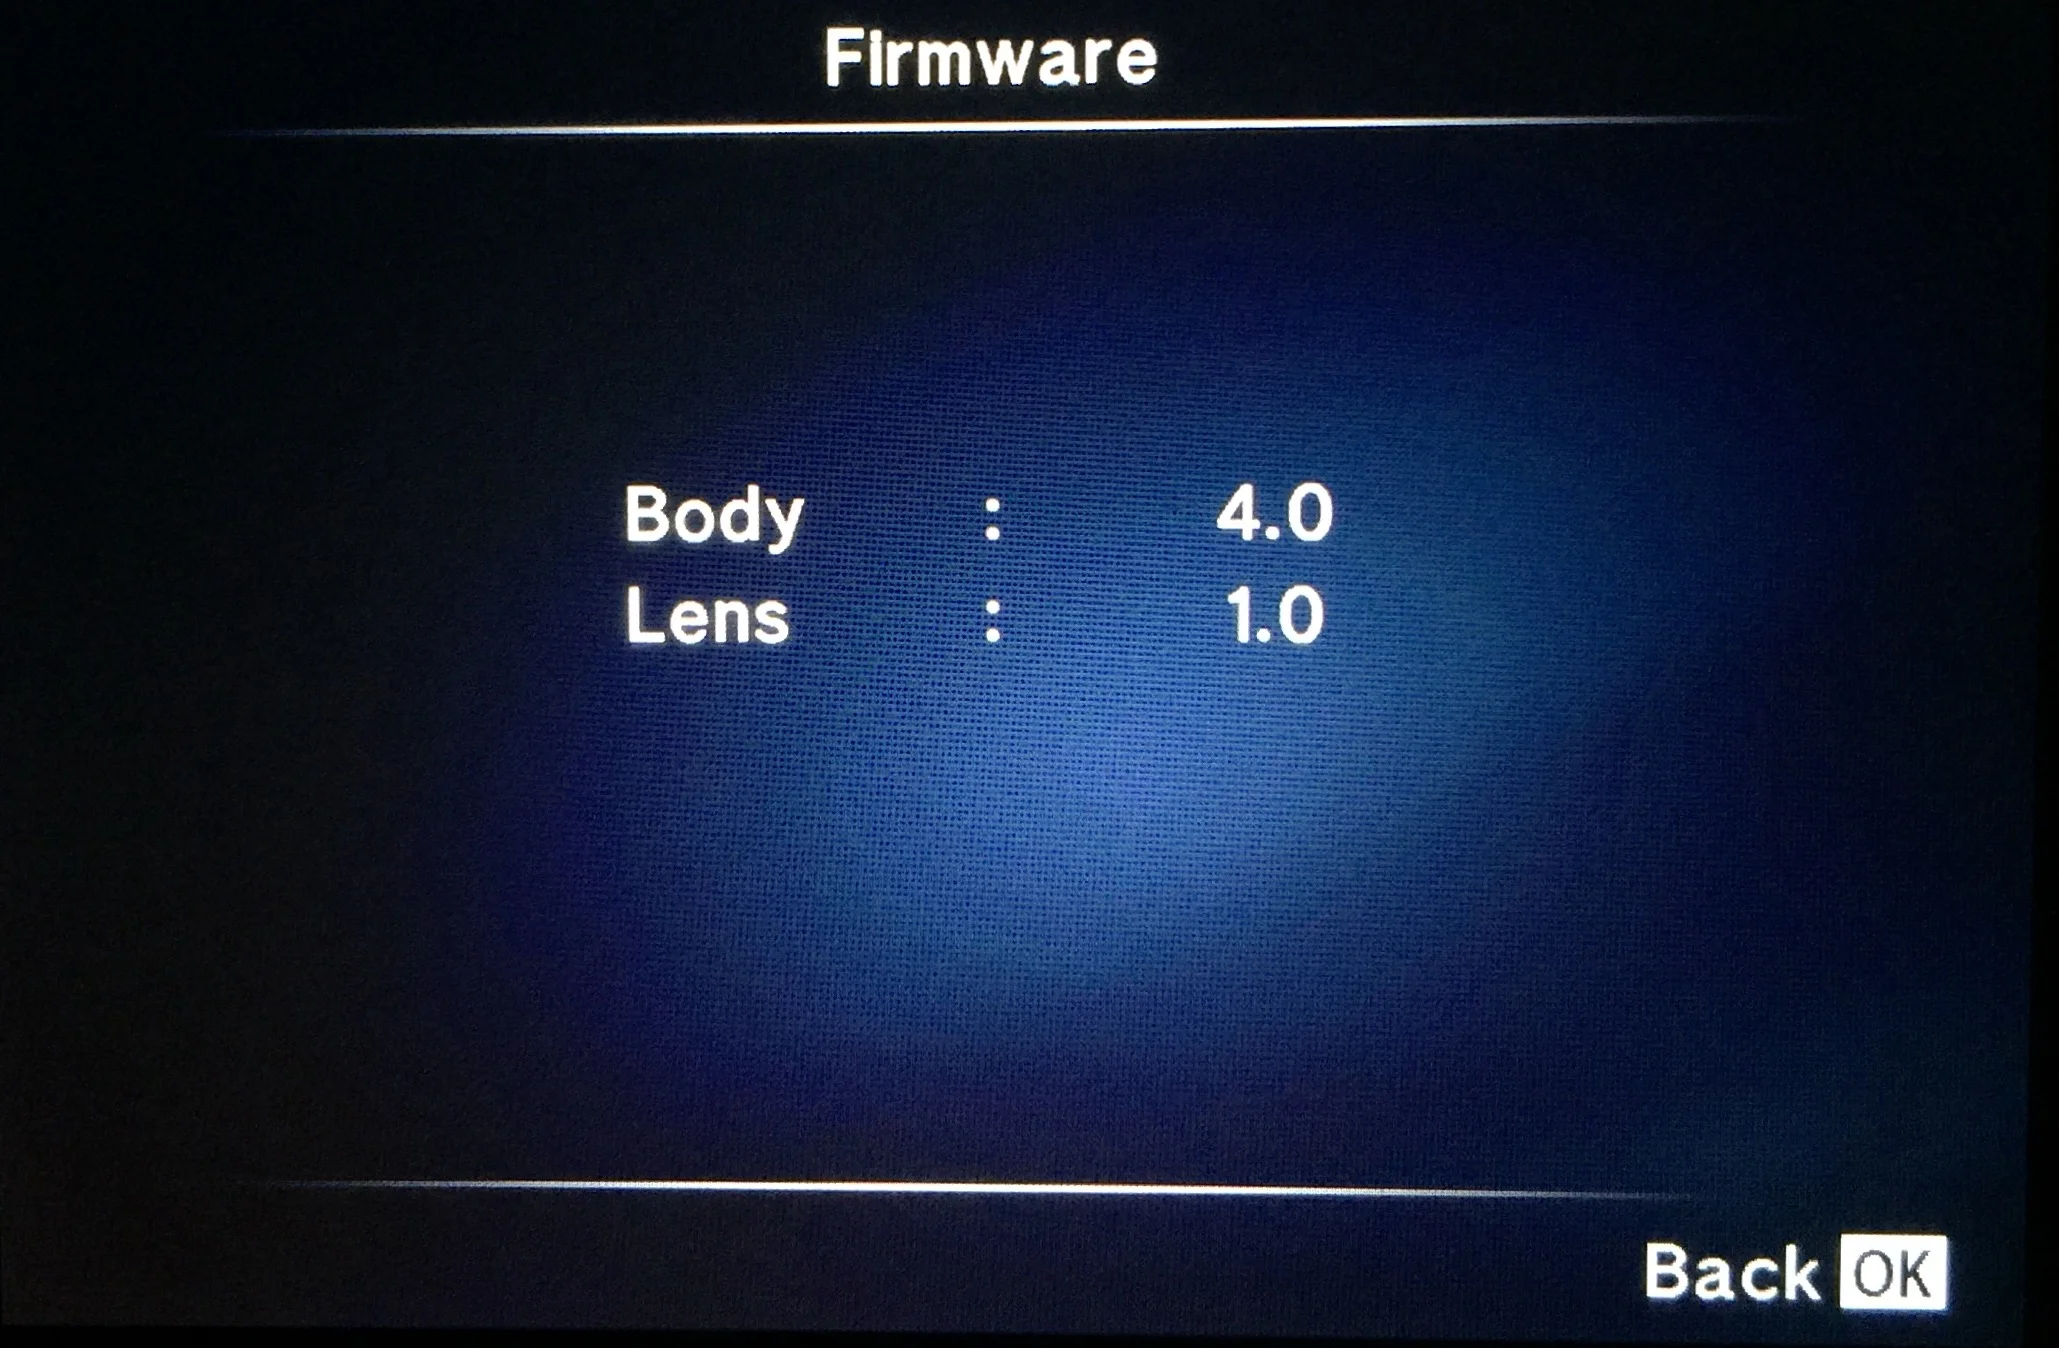
Well, I've downloaded the firmware to my E-M1 and I must say so far; no issues! Now, despite the title of this post possibly alluding to there being some issues with the software - there don't appear to be any at this point. That's not to say however that I haven't come across a few little snags with the download / upgrade process myself and in the various Olympus Facebook groups. So, I thought I'd collate some of them here for you to have a look at so that if you haven't upgraded yet and have left others to test the water for you, here's what you may need to know.
Hiccups with the update
Whilst the update wasn't hard to install, I did have to do a little extra digging to get started because when I plugged my E-M1 in to my iMac I wasn't seeing version 4.0 as an available update within the Olympus Camera Updater Platform. Odd! Reading through some of the Facebook groups I saw quite a few people saying the same and adding that they were on Windows 7, Windows 8 and Windows 10 as well as, like myself using a Mac running El Capitan. So, the good news is (hear me out here) is that the issue with the updater not seeing the new firmware wasn't specific to one operating system.
My initial thought was to check out the Camera Updater site to see if there were any issues or to see if there was a new version of the updater itself - which there was!
So, my first step was to download the latest version of the Olympus Camera Updater. This was actually included however as part of the Olympus Image Viewer update. So I had to install that first. (Here's the link to that download: http://support.olympus-imaging.com/ov3download/index/). You need to have the serial number from the bottom of your E-M1 handy to do this.
I followed the simple install instructions. It gave me The revised version of the Camera Updater and I was set! I plugged in my E-M1 and I was away.
When you connect your E-M1 to your computer you are given a few options - the camera wants to know what you intend to do. I selected the highlighted option:
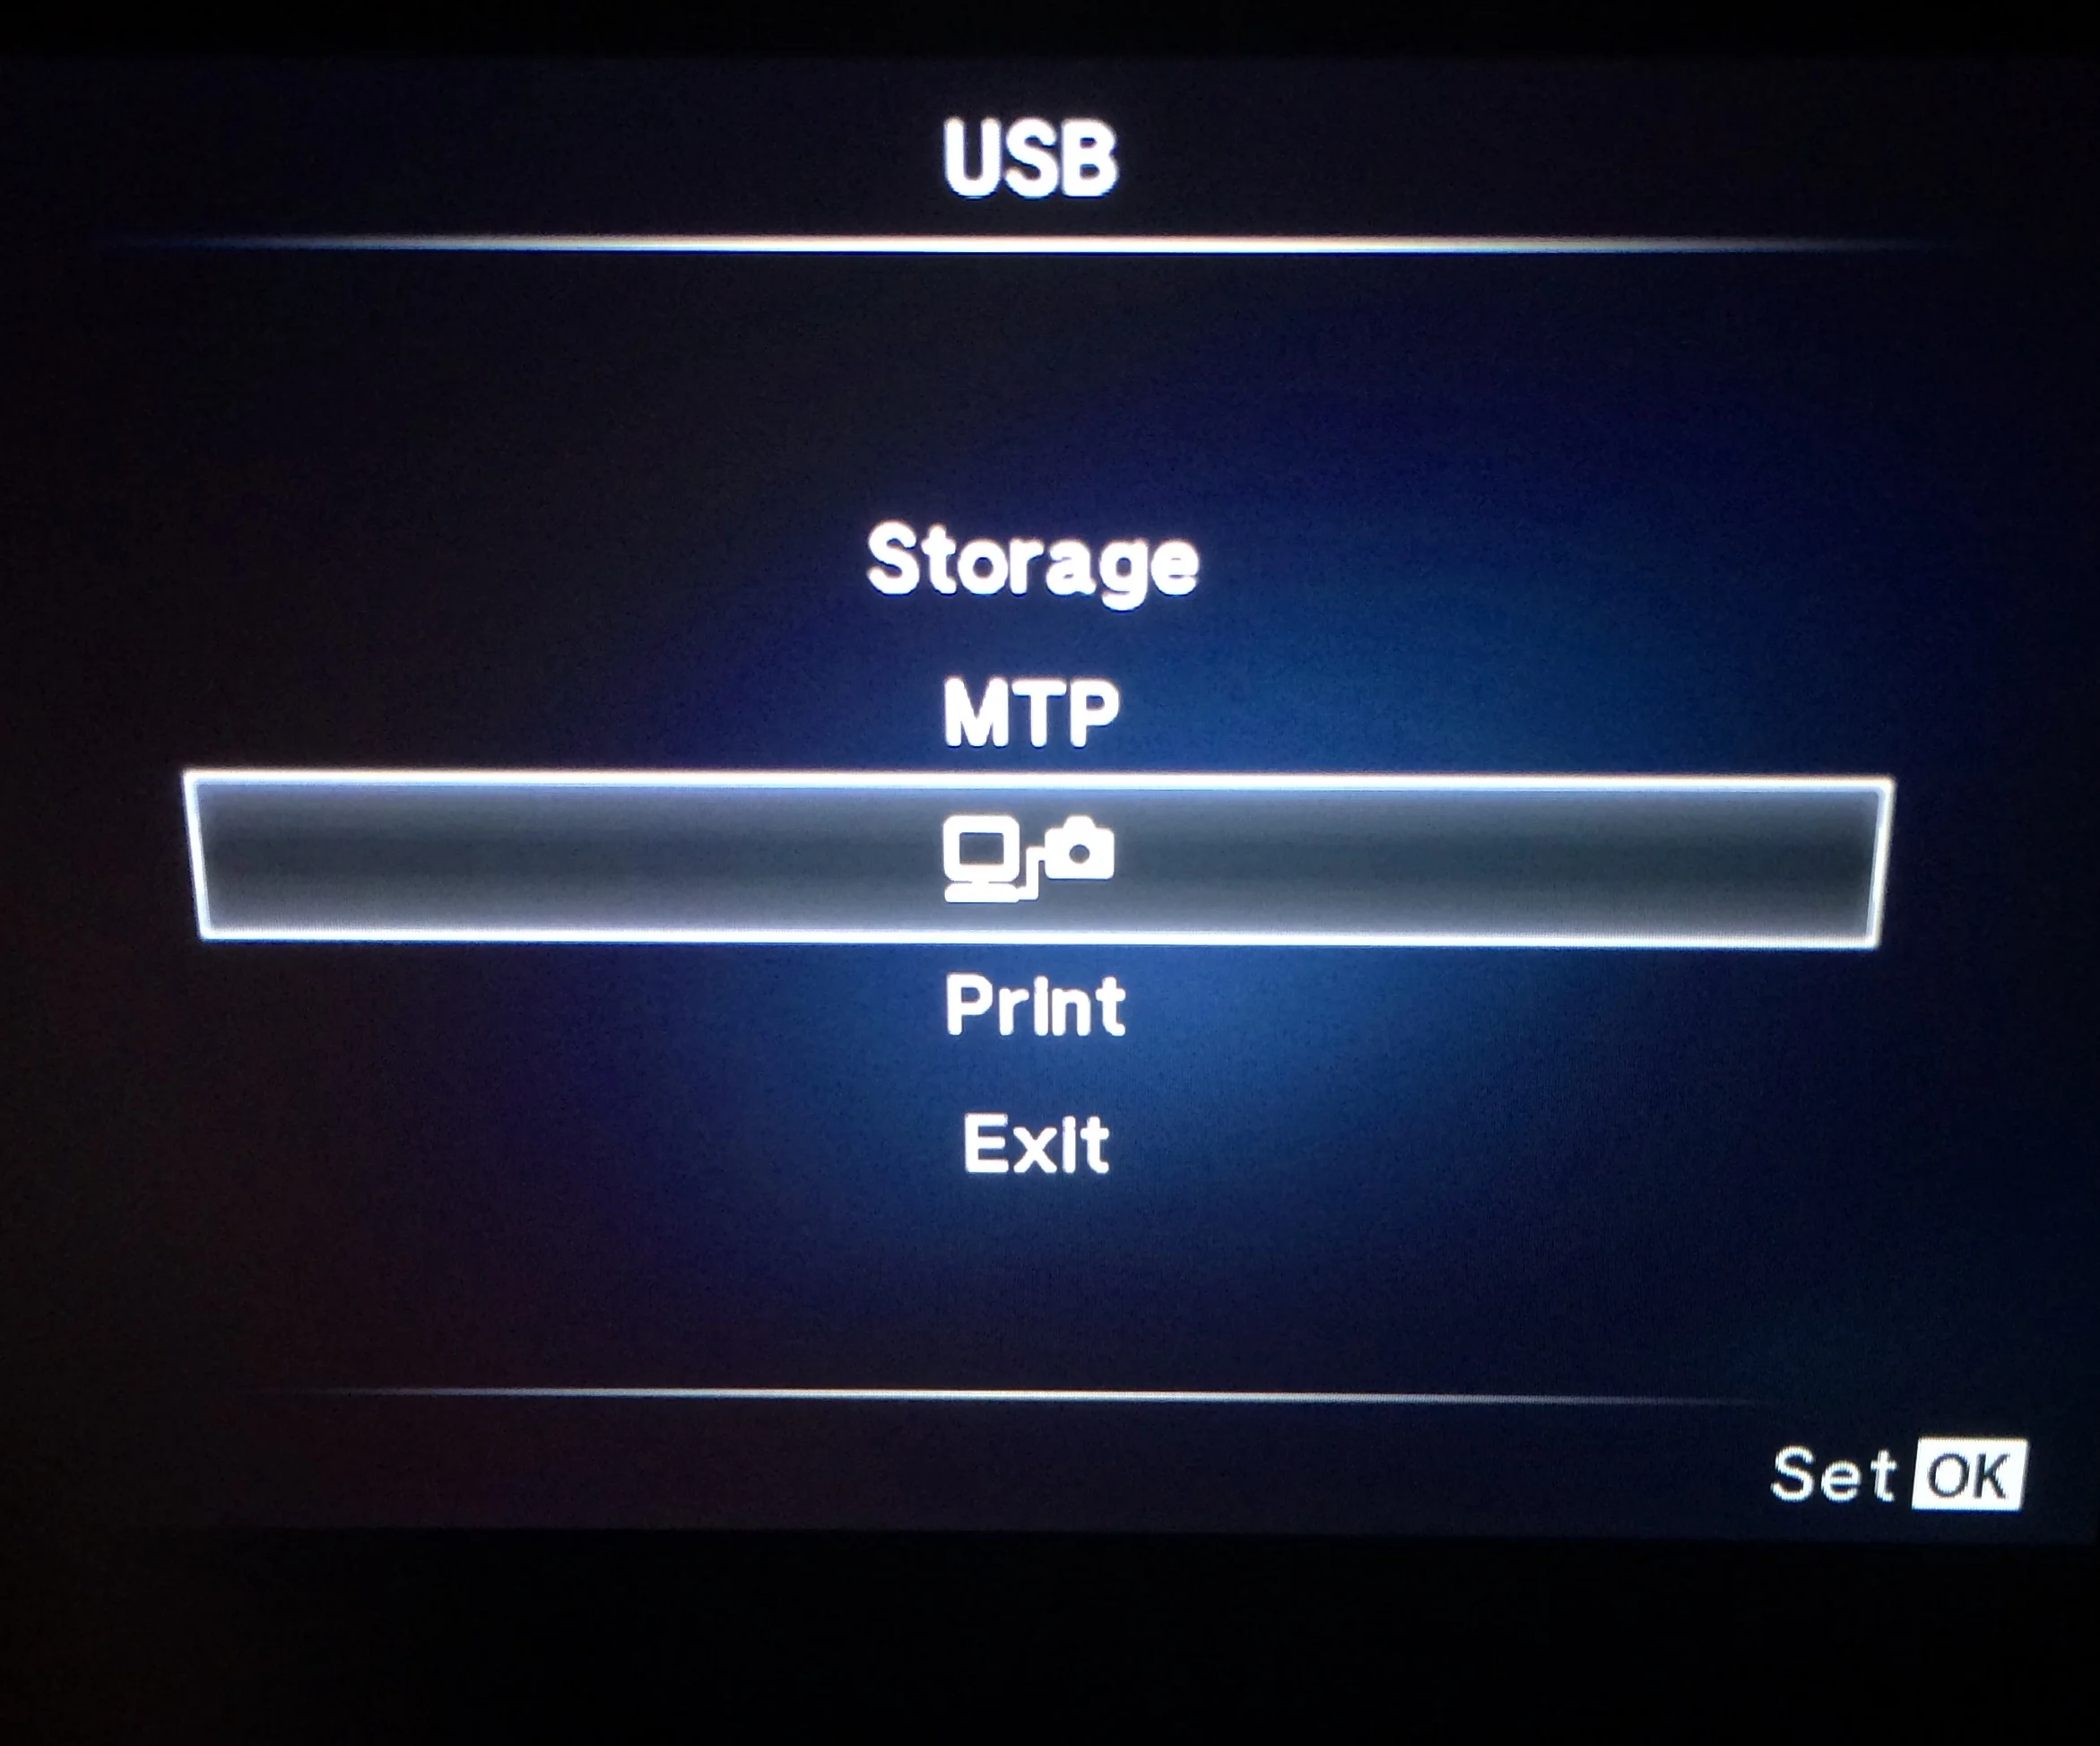
All Options Reset
So I went through the motions and updated my E-M1 to firmware version 4.0. It was impressively smooth and very fast to complete. However, everything had reset! I should have paid more attention and made a note of some of my settings, but after navigating through each and every setting in the menu's it was only about 5 minutes before I had everything just how I like it again: rear dial for the aperture, front dial for the shutter speed, Fn.1 for white balance, Fn.2 for the ISO and the 'lever' disabled. I make use of the directional buttons to adjust my focus point. I of course had to go through other settings as well, such as disabling the face autofocus detection, putting the EVF back to Mono etc. But it didn't take long at all.
Things to be aware of
One of the things I was really conscious of, having ran into this issue with my original OM-D E-M5 was that the USB cable supplied with the camera is the one you're going to need for the update. Although the port on the side of the camera is referred to as a Mini USB port (and it looks just like one too!) it's actually a slightly different version of the port that requires the Olympus-own USB cable. If you haven't got one for your E-M1 you're looking for the 'Olympus CB-USB8'. I daren't link to one on Amazon or eBay because i tend to be a little suspicious of their claims to be compatible with the E-M1. I prefer, as always, to buy the genuine accessories.
Silent Shooting - Shutter Speed Limitations
I remember reading somewhere, but now I can't remember, that the silent shutter mode is limited to a minimum shutter speed of 1/8th. I didn't think much of this, but my brain obviously had it's pen and notepad to hand and locked that information away for later use. So when fellow Olympus photographer Graham Jones got in touch to ask me if I knew why the E-M1 wasn't going any lower than 1/8th - I knew the answer. Just to be clear you can still shoot long exposures and what not using the regular mechanical shutter mode. It's just when you're using the electronic shutter in silent mode that the shutter speed won't go any lower than 1/8th. The advantage though is of course that the electronic shutter can go all the way to 1/16,000th of a second!
Focus Stacking - Compatible Lenses
I've seen a lot of people saying they can't get access to the Focus Stacking feature that was made available in this new release. This is basically (although, incredibly clever and massively useful) where your E-M1 will now take up to 100 photographs of an image at various focus points and your amazing E-M1 will stack them together and create one single image for you. This takes a lot of the heavy lifting away. I can't wait to use this feature; I'm going to go back and re-shoot my Macro Dandelions!
Anyway, the point of me mentioning this is that the focus stacking feature is only compatible with the Olympus 60mm f/2.8 Macro, the 12-40mm f/2.8 PRO and the 40-150mm f/2.8 PRO. If you haven't got one of these three lenses then you're going to miss out I'm afraid.
I will write a post of my own on the Focus Stacking feature, but in my opinion, for now at least, the best write-up and review with some of the best example photographs to illustrate how this works is by Kazuo Unno over on the Olympus.com site. If it's a feature you're interested in you really should take a look.
Summary
Not that I'm any sort of authority on the matter at all, but as far as I can tell and from what I can see others saying online - it looks like Firmware Version 4.00 for your Olympus OM-D E-M1 is pretty stable. I'm keeping an eye on the usual places online because of course I want to be sure that my own camera continues to perform as perfectly as it has since the day It arrived. If I come across anything though I'll be sure to update you. The best way to keep up to date with information is to Subscribe to the blog - it'd be great to be able to share new content with you regularly. Join over 200 other subscribers today!
I can't wait to get back out on the streets of London again, this time shooting in silent mode. I know that it'll give me a lot more confidence to point my camera at people a little more directly, just like I can when I shoot my sleeping commuters series!
So if you're waiting for everyone else to test this release - consider it a thumbs up from me!