


MeFoto Backpacker Tripod Review
Christmas isn't far away now at all. If you're still thinking of what it is you would like for Christmas then this could well be a perfectly timed post for you. Today I want to tell you about the MeFoto Backpacker Tripod.
I have something of a disclaimer before I continue though...
I am not endorsed or sponsored by any company or product. Everything I ever review, good or bad, is a product I've purchased with my own money. As I have said before I would change brands at the drop of the hat if I genuinely felt that a different product made my work noticeably better and the change was financially sensible. I am well aware that I can often seem to be an Olympus fan-boy, but if I believe a product is a bad product I'll say so.
Don't get me wrong, If Olympus want to come and sponsor me I will welcome it because I believe that Olympus cameras and lenses have elevated and unlocked my creativity. But even if I were sponsored, I don't see that it would change the way I review or talk about products
So, with all that said let's get into the subject of this post: The MeFoto Backpacker Tripod!
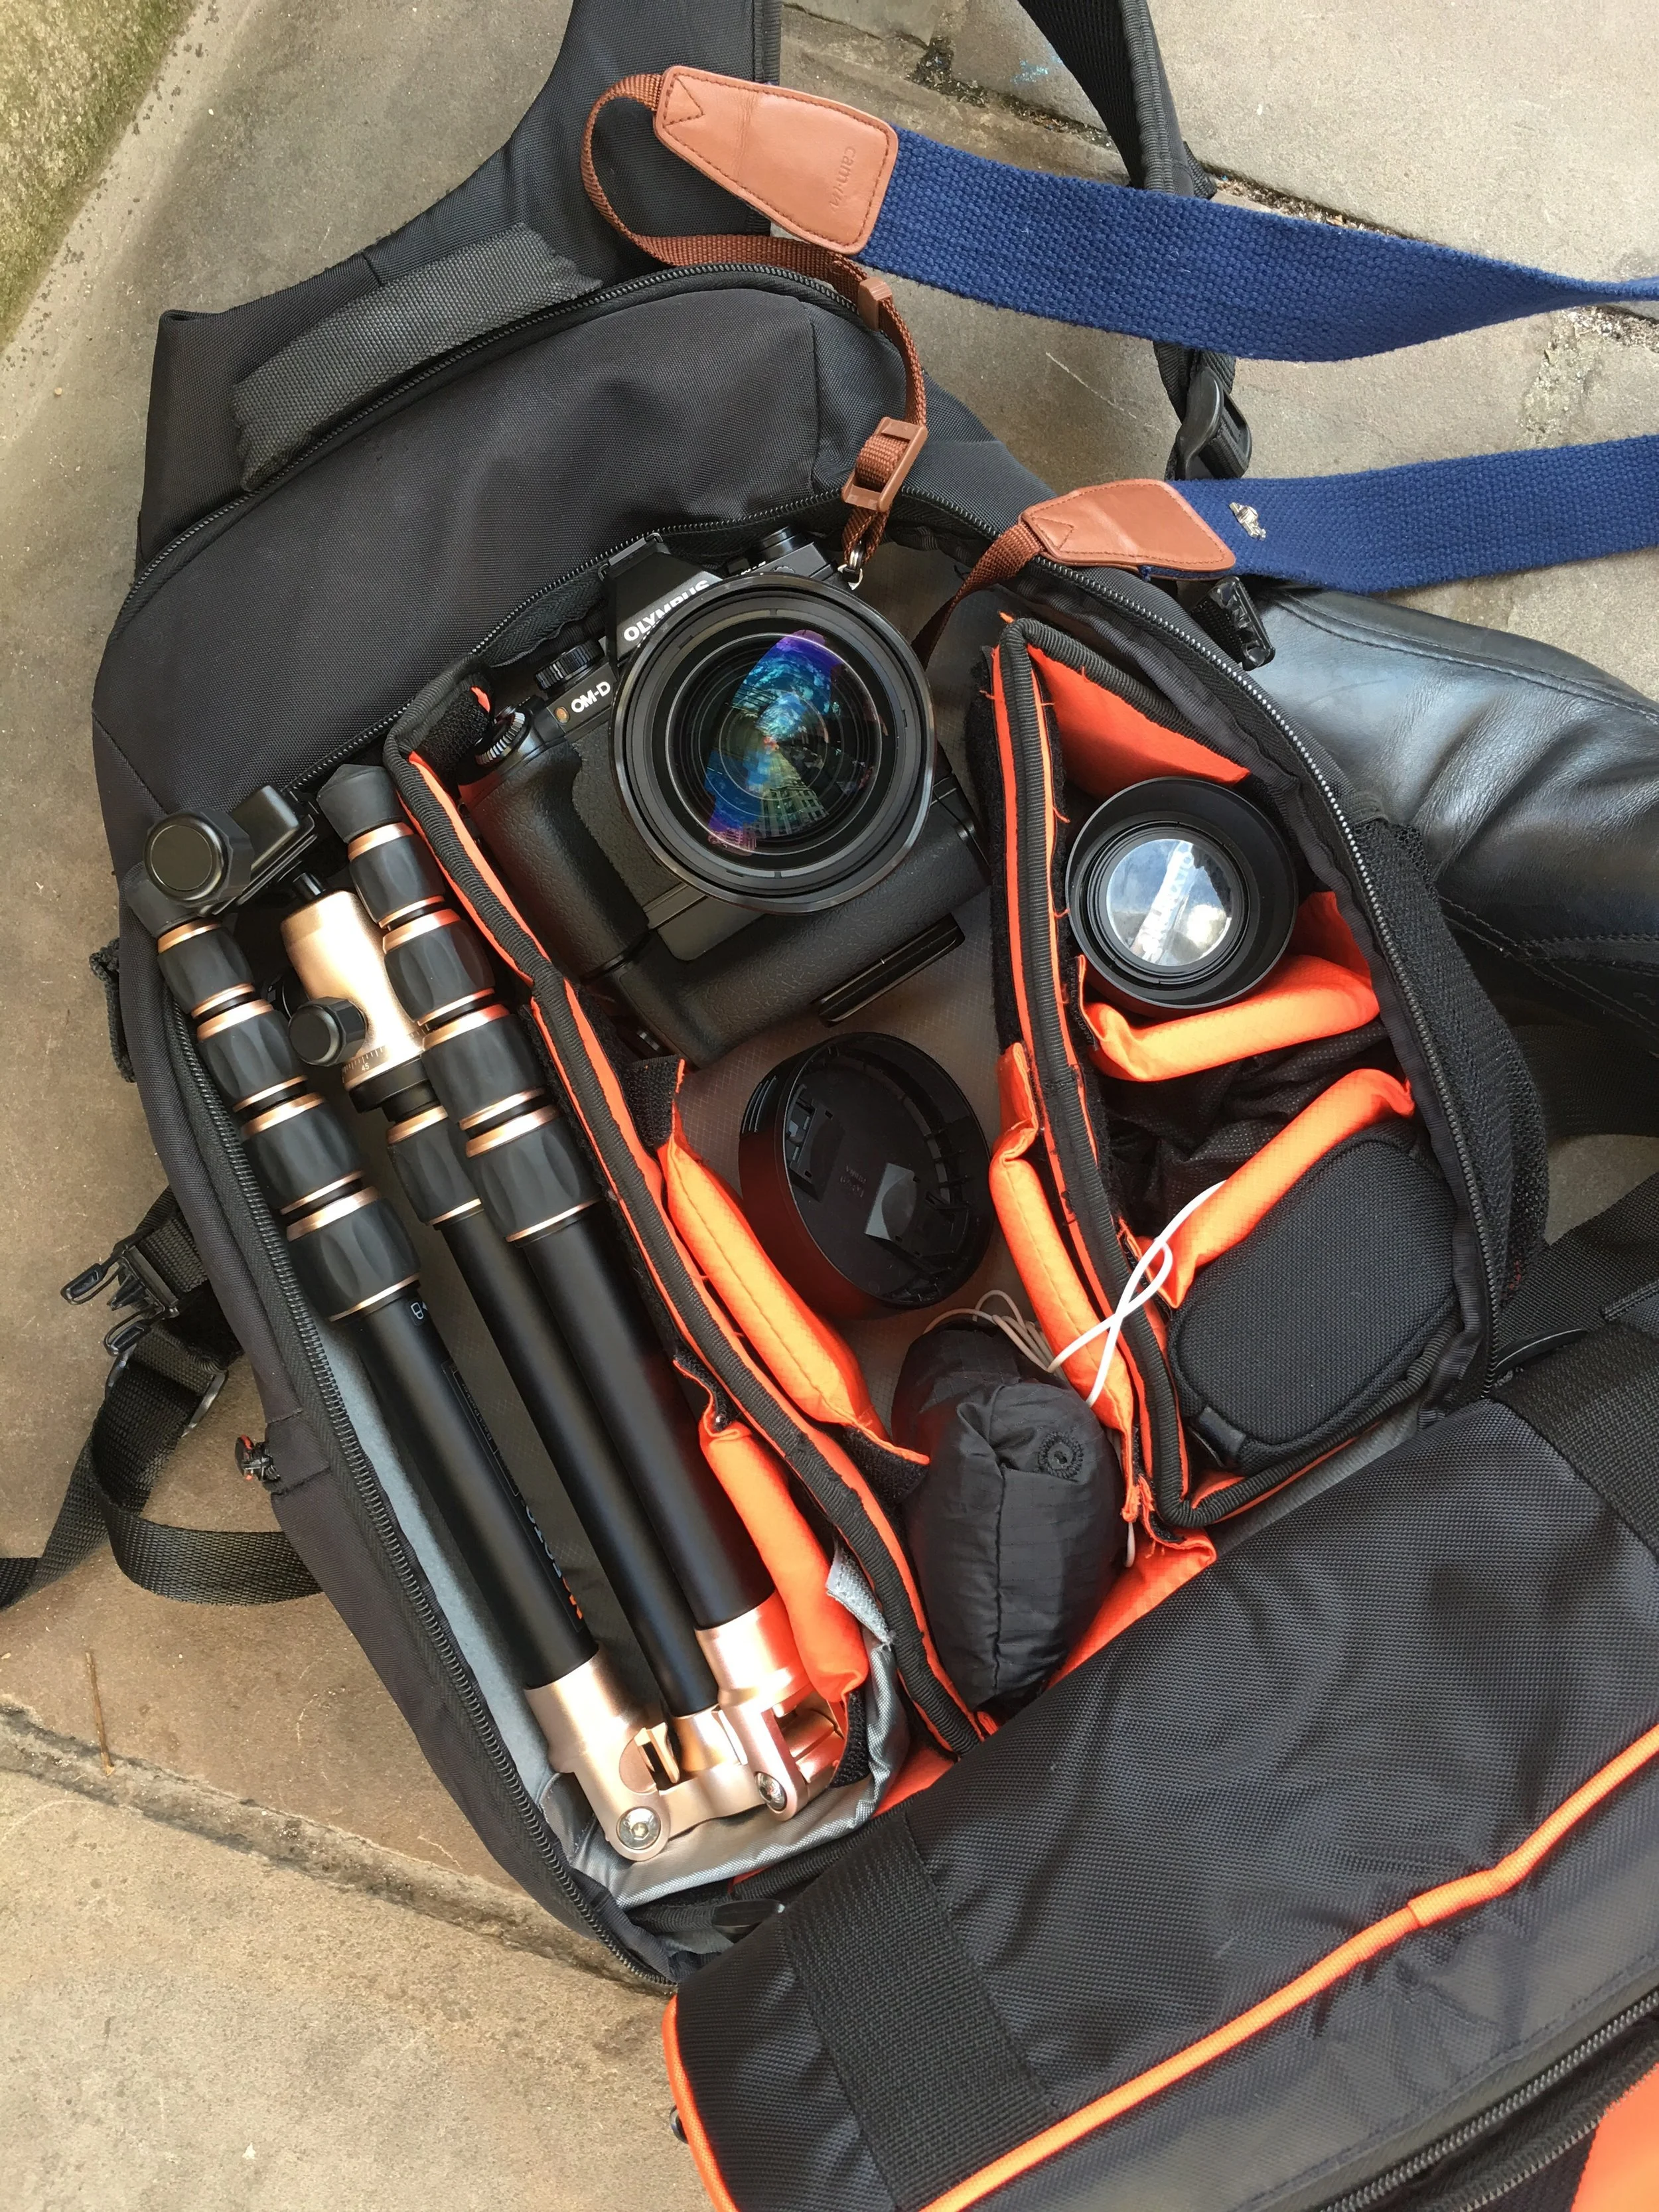
The diminutive MeFOTO folded away to it's smallest size. Fits snug inside my small Caselogic backpack
Small Camera allows for smaller accessories
Since moving to an all-Olympus setup back in January 2015, most of my other gear and accessories have also shrunk in size too: smaller flashes and smaller bags for example. But one thing that I hadn't downsized until recently was my Tripod.
For the longest time I've relied on my trusty Manfrotto Tripod; a heavy-ish and not-so-compact tripod by any means, but it was certainly sturdy most of the time and able to support the weight of my old Canon DSLR's combined with battery grips, a 580EX II Flash and my old favourite Canon 70-200 f/2.8 L II lens (that was possibly the heaviest setup I would ever have had on it back then at about 4Kg's).
I had that tripod for around 4 or 5 years and used it for everything from landscapes to wildlife and sports to weddings. It traveled all over the UK and Europe and the Middle East with me and even went along with me to two Le Mans races where it took a bit of a battering. In addition to being a tripod I've used it as a light stand, a climbing pole and a stick to beat down fern bushes as I waded through forests to photograph Deer and the like. It's been in sand, mud and seawater and still to this day works pretty well. Every now and then when I extend the legs you can hear the 'crunch' of sand between the extending leg sections. Also, those latch-type / lever leg locks become a little loose over time too.
But, 'Ol' reliable' was getting exactly that; Old.
So, naturally when it came time to seek out a replacement I looked for something smaller, lighter and more in-keeping with the size and weight of the Olympus gear I choose to use these days. I made a list of the things I was looking for in a tripod, and this is what I came up with:
- Small & Compact when folded away (ideally could fit in to my bag)
- Lightweight
- Sturdy enough to support my Olympus OM-D E-M1 with a battery grip and my Olympus 40-150 f/2.8 PRO lens
- Twisting leg mechanisms to lock them in place (instead of levers) both to ave weight and to ensure that sand can't get into those parts and ruin the way it works
- Arca Swiss style plate* (reasoning explained later)
- £200 Budget
The MeFOTO Backpacker ticks all the boxes
I did a lot of research and tried out a few tripods at The Photography Show back in March here in the UK and the result was that the MeFOTO BackPacker just seemed to be the best of the bunch. And as a bonus it also came in at the lower end of my budget too which was a pleasant and welcome surprise.
The MeFOTO BackPacker has those twisting locking mechanisms on the legs, it's the smallest of all of the options and is one of the lightest too. At the same time it is able to support the required weight of my Olympus Gear. The included Ball Head is simply something to behold as well (especially at this price point!). In design terms it is relatively similar to the premium products on offer from Really Right Stuff.
One of my favourite things about it though is that the dials and knobs used to adjust the tension and movement are big and chunky, meaning even with gloves on I can make the most of this tripod!
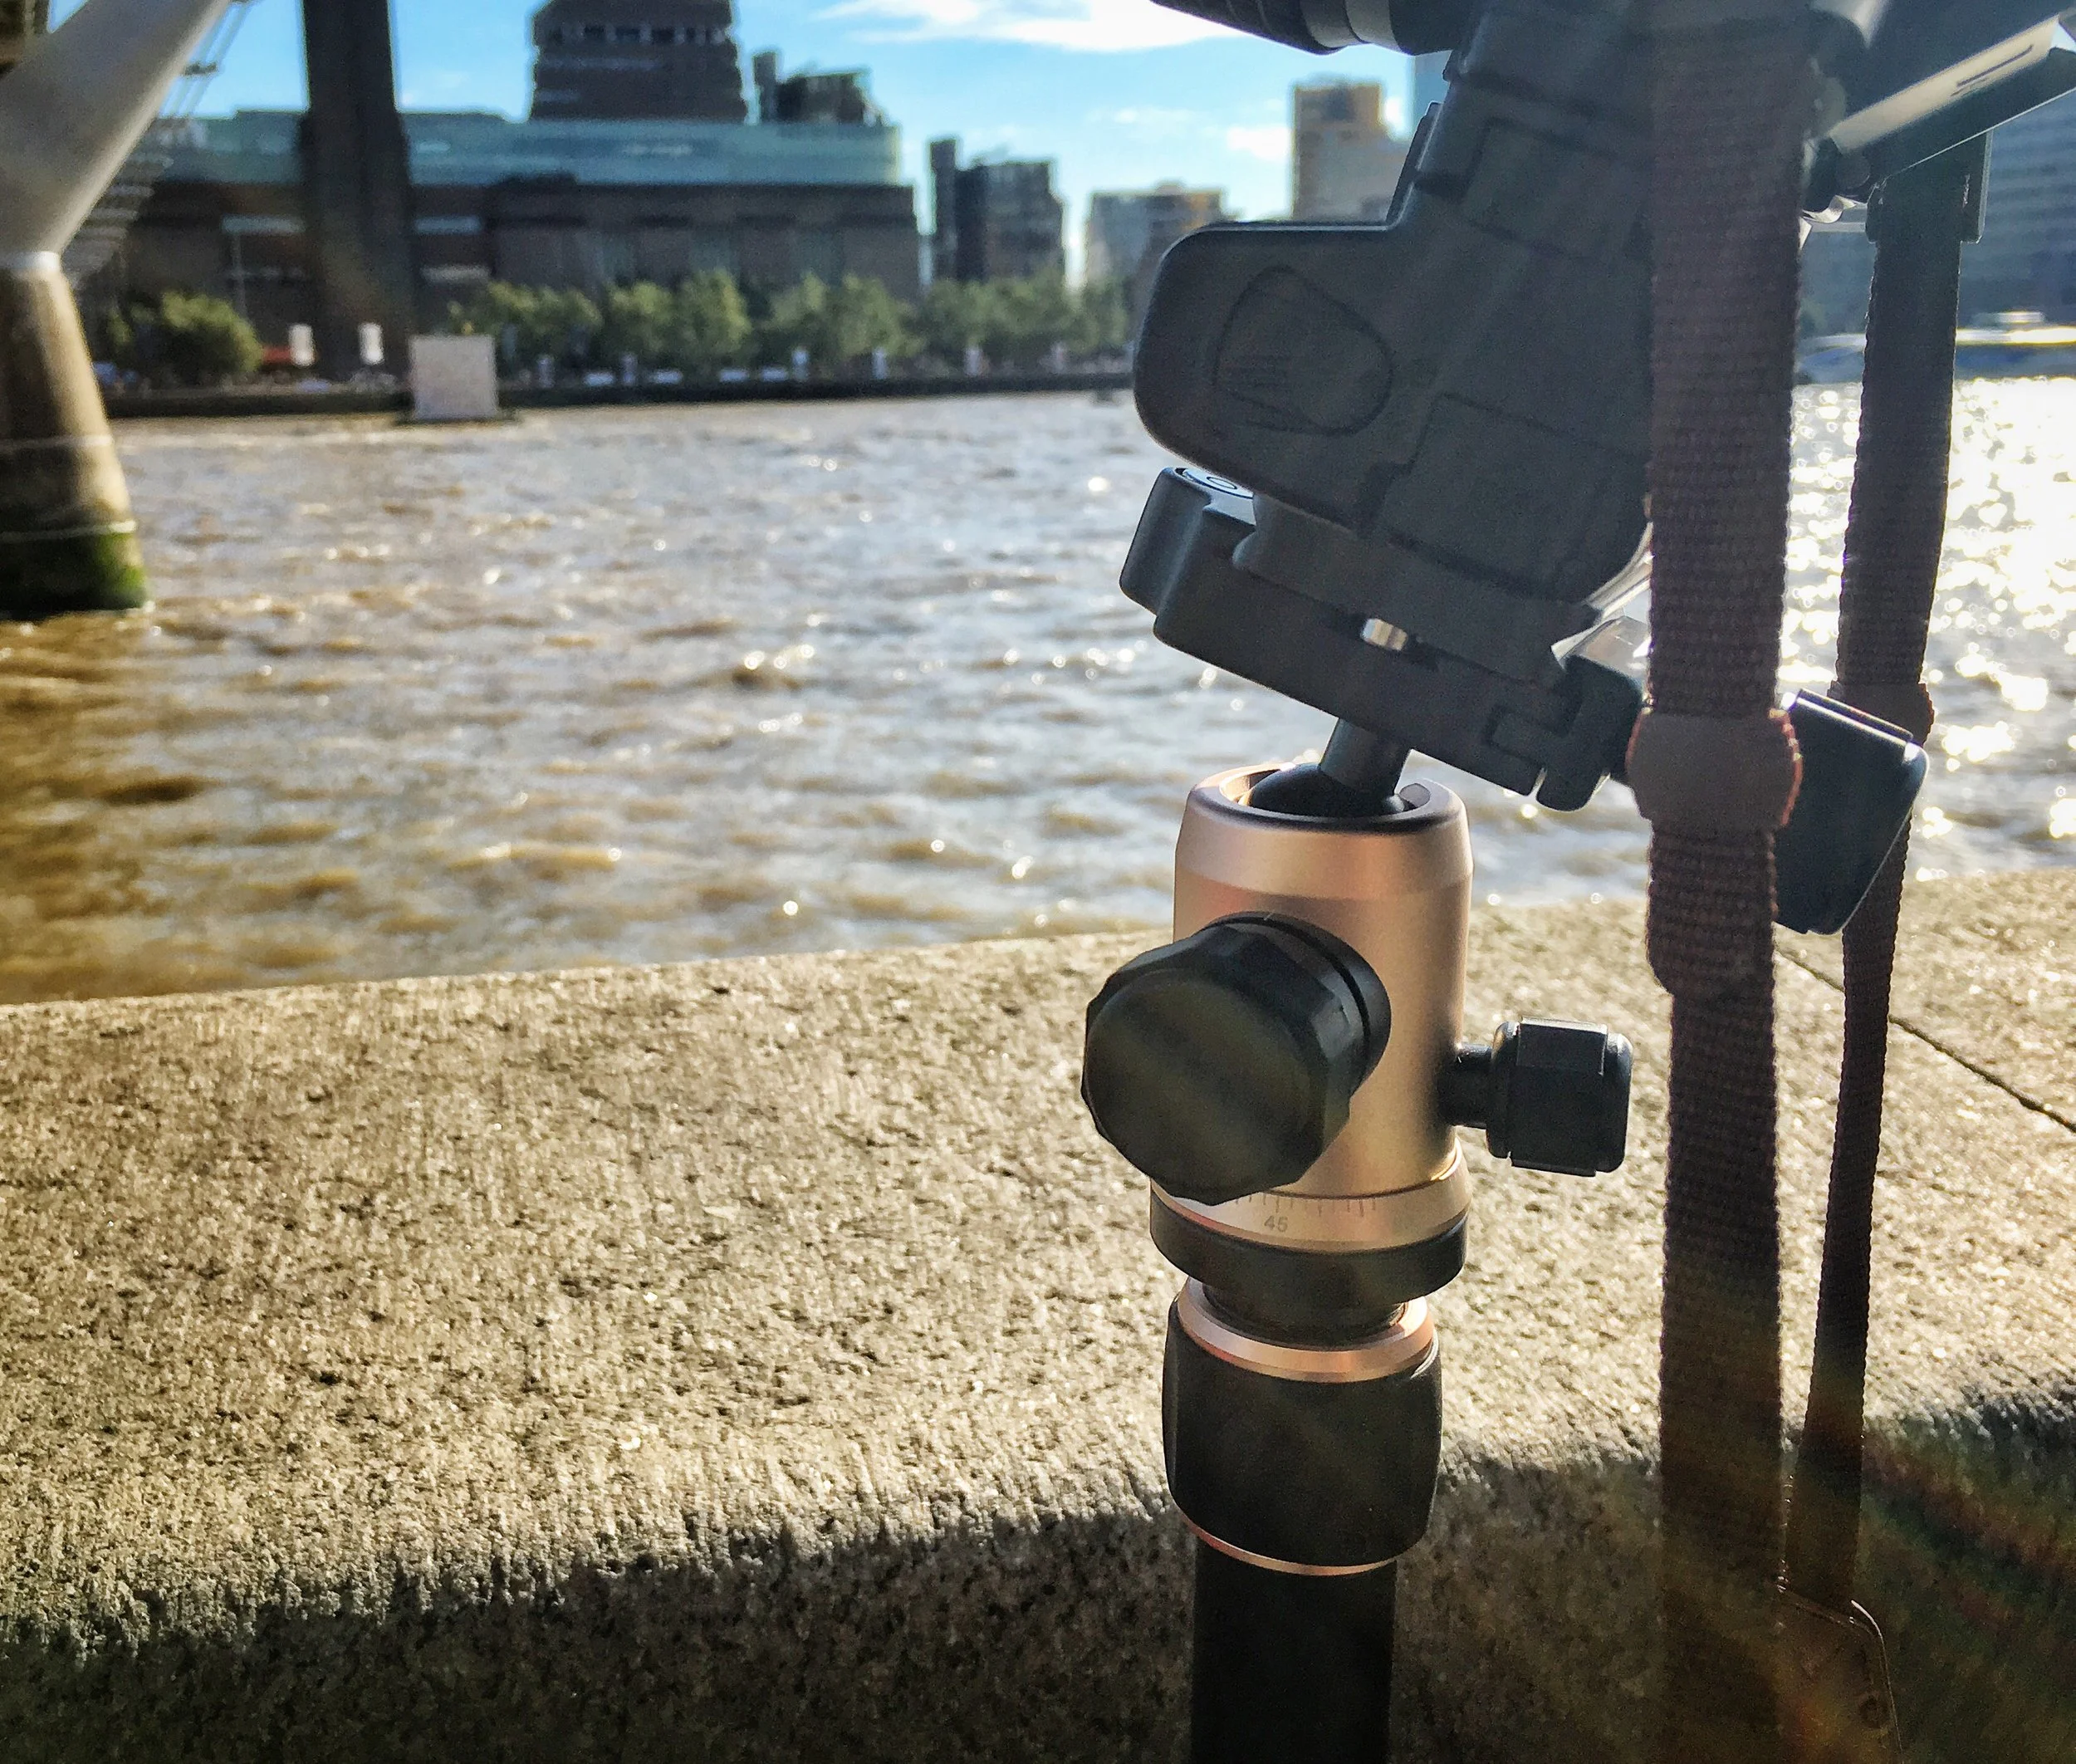
Chunky Dials on the ball head. Finished in gold to match my iPad and iPhone :)
Why The Need for Arca Swiss?
So, it was light, small and within the budget, but why was it I wanted that Arca Swiss plate so much you ask? Here's why: An Arca Swiss style plate offers more options in terms of compatibility with cameras and mounts. All tripods and monopods I know of work in the same way; that being a plate that screws in to your camera (or lens) and then a system of some description on the tripod head will latch onto said plate. Some monopod's so will screw directly into a lens, sure, but if you want to use a ball head you'll need some sort of plate to fix your camera or lens to it. Most manufacturers, such as Manfrotto, have come up with their own unique shaped plate that will then fit only their tripod (or tripod heads).
This is where Arca Swiss is different: You still have a plate, sure, but this particular plate mounts to whichever ball head is also Arca Swiss compatible, which you can find on offer from a wide variety of manufacturers. Arca Swiss style plates and tripod heads attach to one another using a dovetail approach with (usually) a screw mechanism to then tighten the grip of that dovetail.
Furthermore, because the Arca Swiss is considered a more widely adopted mounting system the plates themselves are usually a little more adjustable in terms of their positioning so that they can work and be better suited to the size and shape of the various cameras they may be used on.
This was really only apparent to me when I saw this video from David Thorpe over YouTube with his review of the Olympus PEN-F.
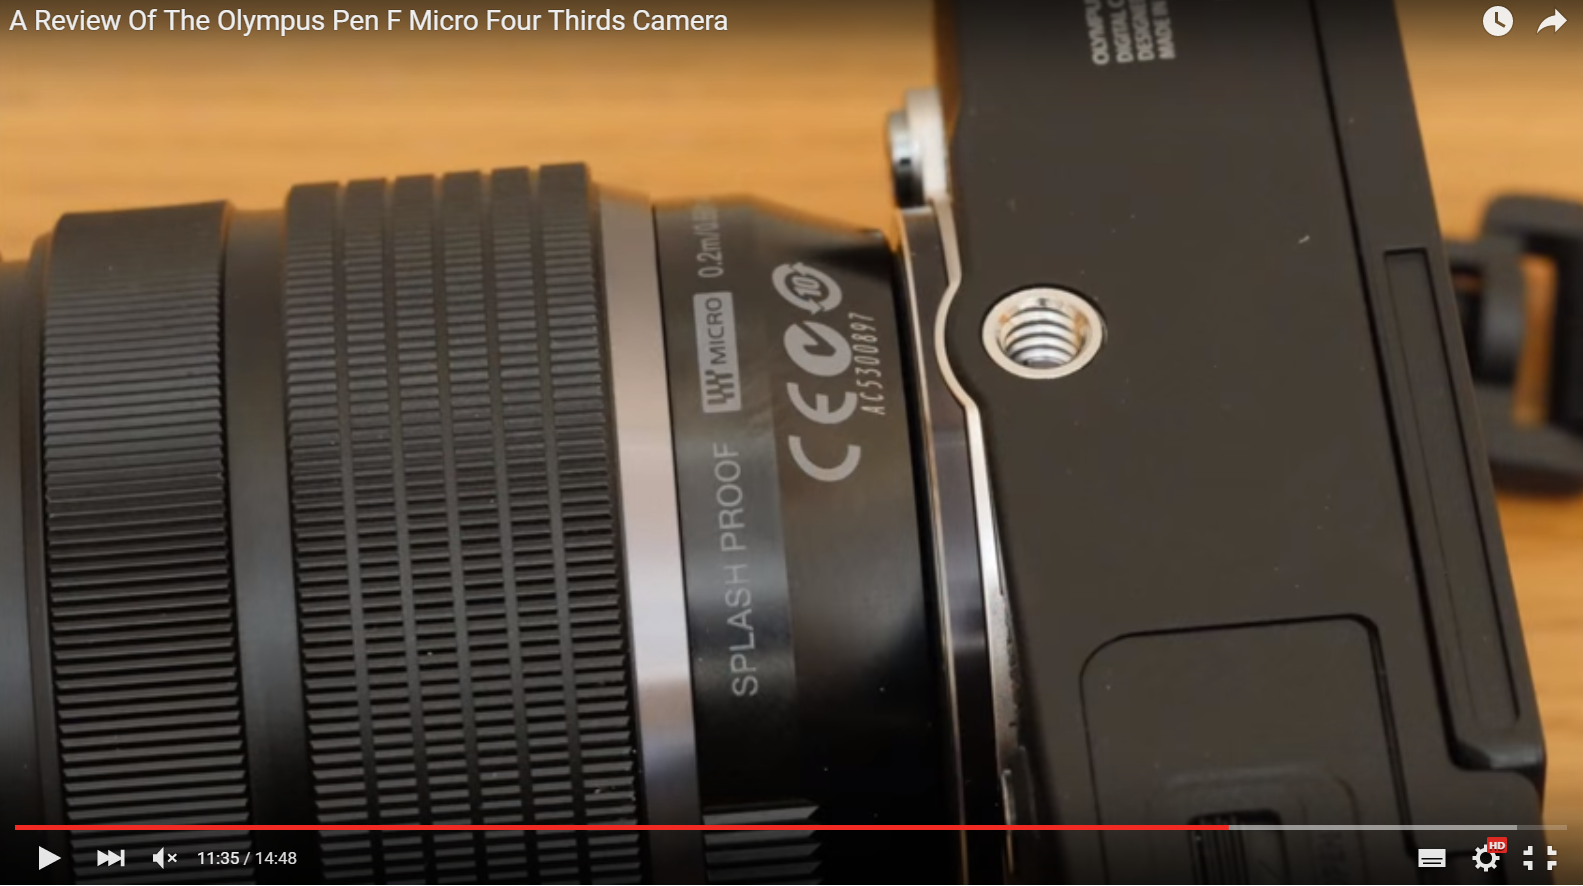
In his review David highlights the point that the awkwardness of the threads' position on the PEN-F, which is relatively forward on the camera, affects the possible compatibility of certain plates: When you mount one of the PRO lenses, such as the M.Zuiko 12-40mm f/2.8 or the M.Zuiko 40-150mm f/2.8 you may find that mounting a plate and therefore tripod of your choosing is a tight fit (or worse, not possible at all). It's for this reason that I wanted the Arca Swiss plate: they offer a little adjustment and movement and being something of a standardized type of plate, as opposed to a brand-specific plate like Manfrotto's, should mean that if the new Olympus OM-D E-M1 mark 2 (which I will be sure to get when it is released) features the same issue as the PEN-F, I should be able to continue to use the MeFOTO backpacker, or at least find a plate that works from a company such as Really Right Stuff (thanks Martin Bailey).
Now, typically I use a battery grip, so it would give me plenty of clearance no matter which one of my lenses I'm using. But, when investing in a new tripod I just wanted to be sure I wasn't going to encounter any issues at all. After all, as I've found out my Tripod should out-last my camera and so giving thought to this should mean I am future proofing myself (I hope)
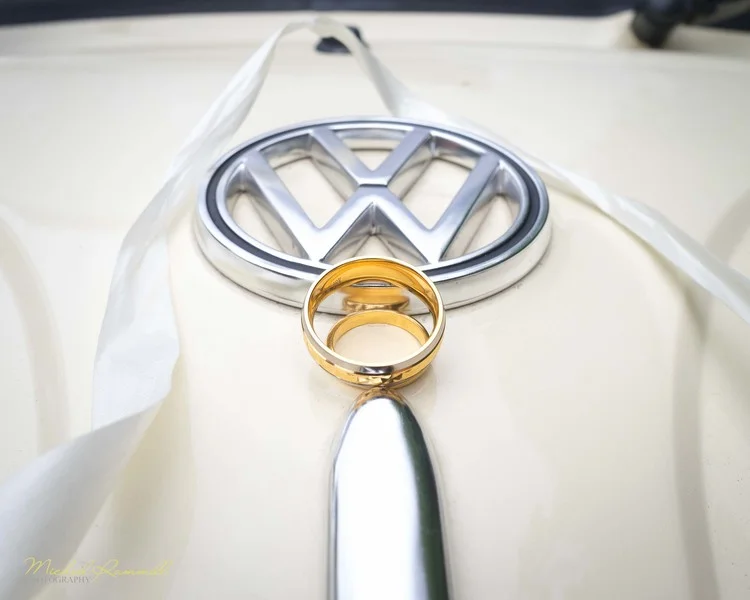
So, that said, I've had the MeFOTO Backpacker tripod for a few months now and have had some to get out and use it and am thoroughly enjoying it. As you can see from the sample images here I've gone for the gold option. It may be a bit 'flashy' for some people's tastes, but my Wedding Photography branding is golden & yellow and thought that this matched quite neatly indeed. It also neatly matches my iPad Pro and iPhone too :)
There are also a series of other quite colours available, but I felt the yellow and the red were perhaps too loud and could even possibly get in the way when photographing Deer at Richmond Park and wildlife in general, where subtlety is your friend!
All in all the MeFoto is sturdy, folds up to a wonderfully compact size and comes with a generously high quality ball head with chunky, solid dials and mechanisms. It's build quality gets top marks too.
I've not been this excited and impressed with a tripod...well...ever!
Alternative Tripods to the MeFOTO & what I found
So now let's talk about the competition and why it is I felt the MeFOTO won out over them.
I stumbled across this comparison of lightweight travel tripods from Digital Camera World and found quite quickly that it was down to one of three tripods (and this was generally the consensus from many other comparisons too): The Manfrotto BeFree Aluminium, the Nest Traveller or the MeFoto Backpacker. Each of these most closely met my requirements and often came in among the best rated for travel / lightweight tripods.
Initially of course, being a previous Manfrotto tripod owner I was pleased to see the Manfrotto BeFree making the cut and being mentioned as one of the better Tripods available. Being a Manfrotto user all these years I felt compelled to remain loyal and to stick with a brand I know. But, then I realised it had the lever-type mechanisms to lock the legs in place. I wasn't a fan of that on my old tripod. It only took me about a week to lose the plastic tool that comes with the tripod to allow you to tighten those levers, due to them loosening over time. It also didn't feature the Arca Swiss head I wanted. So, the Manfrotto option was removed from the table, leaving me with the Nest Traveller and the MeFOTO BackPacker.
Nest & MeFOTO - Neck and Neck!
It really was neck and neck between the two remaining tripods. Both had everything I was looking for; they were nearly identical, even on price!
Both Tripods were available for between £120 - £140 each online. Both featured the Arca Swiss ball head, twist-to-lock legs. Both even featured a recessed hook hidden in the central column so you can hang some weight from it to keep it steady and a bonus in-built bubble to level the tripod. Each came with a padded shoulder bag too. Handy! The only remaining thing to tell them apart was their size and weight.
In terms of weight, the Nest comes in at 1.75Kg (or 3.8lbs). The MeFOTO BackPacker was lighter at 1.18Kg (or 2.6lbs). That's a pretty decent difference in weight.
The size difference when folded away was a similar story: the Nest is a neat 415mm (or 16.3 inches) whereas the MeFOTO was smaller still at 320mm (or 12.6 inches).
In fact, the only thing that the Nest won a point on was it's maximum height when extended. The nest could reach a maximum height of 1500mm or 59 inches, beating the MeFOTO, which can only go to 1300mm or 51.2 inches.
For these reasons, the MeFOTO better met my brief and it was my new tripod of choice.
Criticisms / Issues
So far, so good. The built quality is superb and the moving parts are expertly machined I have to say, but if there was one thing I would say about the MeFOTO is that when it's extended to it's absolute maximum height (the legs are out and the center column is as tall as it can go) there does seem to be a little bit of wobble going on. The legs slide into one another to hide away. It's the thinnest legs at the very end that seem to have a little bit of flex. Typically speaking when I use a tripod I am shooting with a trigger or using a 2 second delay time to ensure I've not touch the camera when the image is captured, so this isn't too much of an issue, but I would prefer if it were stiffer.
I haven't yet tried to tackle this issue by attaching a weight to the concealed in-built hook, but I'm sure that would go some way to helping reduce or prevent this behavior by centering the weight of the tripod to keep it grounded.
It could well just be me though and my expectations of a travel tripod are way off the mark. After all I am coming from a massive, heavy and rather clumsy aluminium Manfrotto.
All that said, the shake in question doesn't appear to have impacted the resulting images at all. They're sharp to me and I'm happy. The fact that it fits inside my backpack is a bonus and one that I don't think I would be willing to lose moving forward. It's a good compromise.
Conclusion
I'm not shy of spending good money on good accessories in the belief that they'll last longer, but having not looked at tripods in such a long time (not needing to) I was surprised to find that generally I was able to find far more value for money than I was 5 years ago when I picked up my Manfrotto.
I imagine, thanks in part to the growth in popularity of mirrorless cameras, that the tripod market is now far more diverse. Historically purchasing a tripod meant you spent a lot of money or your purchase would involve some sort of compromise of weight, the weight it could support or it's general quality:
- A heavy tripod could support a heavy weight and cost less.
- A light tripod that could support more weight was typically made of carbon fibre and as such the price would soar too.
- Alternatively you could pick up a cheap tripod from eBay and throw it away after just a few uses as plastic components broke and aluminium parts would buckle or dent!
These days though, with my gear weighing less I can focus more on the weight of the tripod and be less concerned about how much weight it can support. As such I've found that Tripods in the £100 - £200 region appear pretty reasonably equipped and very well reviewed indeed!
The MeFoto was my pick of the bunch for a mirrorless-ready tripod and so far I'm very happy with my choice. Time will tell. For now though, The old manfrotto comes along with me to most weddings as a stand for the video light or ends up staying in the boot of the car, with my MeFoto backpacker more often out in the field.
My Three Favourite Olympus Lenses
It's been a few weeks since I've managed to sit at my desk and write for the blog, but in that time over 50 of you have subscribed! Thank you to all you newcomers and subscribers.
The reason for the absence was largely because I've been so busy and focused on shooting weddings. The wedding season here in the UK typically runs from April to September and this year has been my most hectic yet! With me shooting nearly every weekend and then post processing during the week, I've had to shuffle a few regular tasks around and give priority to the wedding work, naturally. I also had a bit of an accident where I was knocked off my bicycle too. Many evening's were taken up with Physio to get my shoulder back to a good place, when I would have perhaps otherwise been writing. So all in all, a busy schedule meant something had to give.
At every wedding my Olympus OM-D E-M1 has been on-hand and has worked flawlessly every time.
But, over the course of the weddings I have shot this year I've tried to refine what equipment I've had with me in the bag over my shoulder (and what equipment gets left in the other bag in the car). Despite using Olympus gear I still have to lug around a fair bit of kit including no less than 2 light stands that each reach up to 9 feet, a 40" Octabox, reflectors, flashes and constant lights. So, suffice to say the lighter my camera bag can be the better. It's for this reason I decided looked at which lenses I've used the most; those lenses that have earned a permanent place in the bag. I've even sold a couple of lenses as a result of this exercise too, including my 12-40mm f/2.8 and my 25mm f/1.8. More on that later in this post...
Although my need to reflect upon which lenses I favoured most was borne out of my desire to work with only the essential lenses at weddings, I do feel that this list actually represents my favourite all-round lenses for any type of shooting situation. So, if you're not a wedding photographer, this post will still hold true for you too...Enjoy!
1: 7-14mm f/2.8 PRO
The 7-14mm f/2.8 is the newest addition to my lens bag and a lens that I anticipated for such a long time before its' release. As a wedding photographer and a keen landscape photographer too, an ultra wide angle like this makes up 1 of 3 of the 'Holy Trinity' of lenses; that being an ultra wide, a standard zoom and a telephoto zoom. In my favourite three here, I include 2 of the 3 lenses from that trio (with the 12-40mm f/2.8 missing out).
The 7-14m is an absolutely amazing lens and scores very highly in every department: the build quality is second to non, its' super sharpness and ability to focus well in low-light make this lens very versatile.
The effective field of view becomes a 14-28mm on an Micro Four Thirds sensor. It's a focal range that can help you to produce some massively creative and interesting photographs, results that perhaps a slightly less wide lens just couldn't offer (the 12-40mm f/2.8 for example). Here are a couple of shots I've made during 2016 using this lens.

As with all wide angles, the key is often to pay attention to those things that need to be excluded from the frame, as much as what you manage to capture within it. Owing to the extremely wide field of view it's not uncommon that you'll find things sneaking into the frame that would have perhaps been outside of the frame were you shooting with a standard zoom or something slightly less wide.
The 7-14mm pairs up wonderfully with the OM-D E-M1 in particular with matching build quality and performance. Thanks to its constant f/2.8 aperture it's a fast lens too, meaning it can be used in many situations only adding to its versatility.
I've used the 7-14mm f/2.8 at weddings and find that the wider shots tend to give a feeling of grandeur to a scene. Think of large staircases and shots from low down on the ground - that wide angle perspective can help to give a feeling of huge by exaggerating things near the edge of the frame and stretching things out to make them look taller or wider (not a good thing with people mind you!) I wouldn't typically use the lens close up to a person unless I was intentionally looking to distort them. These two images show my typical use of a wide angle:
The wide field of view also allows a photographer to capture more in the frame when you have less room to work with, making this especially useful in situations where another lens would have simply too narrow a field of view.
As with many wide angles, flaring can be an issue if you shoot into a light source, but with this 7-14mm I embrace this. The flare and behavior of the light as it bounces around inside the elements can create a wonderful effect. For example (not an award winning image with that wonky horizon):
Another trait of many wide angles and something that the nature of the Micro Four Thirds format 'enhances' is that it is susceptible to chromatic aberration, but with software like Adobe Lightroom, I rarely, if ever, consider CA an issue at all as it is so easily removed with only a few clicks. No layers or masks required!
2: 17mm f/1.8
The 17mm f/1.8 is the only prime lens to make it into my top three favourites, which is actually odd for me when I think about it because I feel that the Olympus bodies work especially well when paired with a prime. It really was a close call between the three primes I do use regularly; the 17mm, the 45mm f/1.8 and the 60mm f/2.8 macro. But, ultimately, the compact size of the 17mm, coupled with its stunning build quality wins it for me.
With build quality you would expect from a lens upwards of £600 and sharpness that you have come to know from some of the most premium glass, the 17mm f/1.8 is an absolute bargain as well as a lens for many occasions. I am an advocate of the saying 'You get what you pay for', but so often is the case with Micro Four Thirds you actually get more than you pay (this is especially true in the case of the 45mm f/1.8 which just missed out on my top 3. I'll come to that later).
The effective field of view equates to 34mm which is a focal range I feel really comfortable using. I've traditionally enjoyed a 50mm prime among my favorite lenses, but with the 4:3 aspect ratio of the MFT sensors I just feel sometimes that a photograph made with a 50mm field of view can sometimes feel rather square, whereas I much prefer a wider frame. It's for this reason that I sold my 25mm f/1.8 lens. It may not be an accurate thing to say, but the 17mm pairs up very well with the E-M1 and gives for a superb result. It's just how I 'feel'.
You'll find that much of the work here on my website, in my street portfolio, was actually shot with the 17mm. Again owing to it's size it is often the only lens I'll take to the streets of London with me.
The 17mm f/1.8 also has other features that really do help this lens to take the 'prime lens crown' (in my opinion) over the others from Olympus. Such as the fact that the minimum focusing distance is just 25cm (or about 10 inches if you prefer). This means you can get nice and close to subjects. When I'm shooting things like wedding cakes and details with this lens this technique can give for wonderful shallow depth of field whilst at the same time not giving that Macro look, which is a look I find works for me.
Another benefit that makes this lens great is the very small front element. The size of the glass on the front of this lens is actually very tiny! Traditionally we expect the front element to be pretty much the same diameter as the lens itself, but because of the 17mm's near-pinhole size element, it means it's sturdy and tough and you don't find yourself constantly covering the front of the lens or worrying about it getting scratched. That makes this lens tough and ideal for many applications (street, weddings etc). Handy!
3: The 40-150mm f/2.8 PRO
The final lens to make it in to my top 3 favorite micro four thirds lenses is my favorite of them all. For me the 40-150mm f/2.8 PRO is something of a marvel: It packs the equivalent of 80-300mm in the size of a lens that is about the same as a Canon 24-70mm f/2.8.
I've written a full review of the 40-150mm f/2.8 right here on the blog. For my full thoughts and for more details about this lens you can check out that review too, but the fact is, in summary, this lens is fast to focus, sharp, has great IQ and the ability to resolve detail even at the farthest end. It's built like a tank but isn't too heavy. It features a clever retractable lens hood design. It doesn't hunt back and forth to achieve focus and performs as well as any premium telephoto lens you would expect to pick up for £2,500, even though a savvy shopper can pick one of these up for around £1,200 - £1,300 brand new.
At both ends of its zoom range, it does a great job. The first image of the three below is at 40mm. The second image is at 97mm and the third image at 140m

In addition, the 40-150mm f/2.8 was designed alongside and to work specifically with the 1.4x teleconverter. So, if you want more reach - you can get it without sacrificing much (if anything) in the way of image quality or lens performance. Sure, as with all extenders you lose some depth of field and the 40-150mm f/2.8 quickly becomes a f/4, but, with that extra that you gain it can often be a trade-off well worth making.
The 40-150mm f/2.8 makes it as my favourite in the top 3 because it was the lens that finally sealed the OM-D deal for me. It was when I tested this lens I was convinced that it had what it took to work as a replacement for my previous all-time favorite lens; the Canon 70-200mm f/2.8 L IS USM II (considered to be possibly the best telephoto lens in the standard telephoto lens class!).
Whether I'm at the back of a church photographing the first kiss, in a low light situation photographing a newlywed's first dance, in a forest photographing deer, track-side photographing motor sports or even making a studio lit portrait, the 40-150mm f/2.8 PRO is a lens that will take all of those situations in its stride whilst feeling great to handle and use at the same time.
If I had to rescue one lens from a fire, it would be the 40-150mm f/2.8 PRO.
Other lenses in my bag
I also have the following lenses in my kit bag and to be honest I love them all, but I find myself reaching for these lenses slightly less than those above that I've written about. Either because the above three lenses tend to be what I favor, or, in the case of the 45mm and 60mm Macro; they're a bit more specialist in their purpose and only suit certain scenarios:
- Olympus 45mm f/1.8
- Olympus 60mm f/2.8 Macro
- Olympus 9mm f/8 Body Cap Lens (not really a lens, as such, in my opinion. But handy to have on the backup body at all times)
It's only now I list my lenses that I realise over time I have really reduced what I have in my bag. This has been really effective in helping me to choose the correct lens for the right scene. It's great to have a lens for every occasion but be wary - that can often paralyze you with too much to choose from.
Lenses I've Sold
I've recently sold both my 25mm f/1.8 and my 12-40mm f/2.8 PRO. Before I wrap this up I'm sure people will want to know why I sold my 25mm and 12-40mm lenses
25mm f/1.8
I mentioned earlier that I wasn't a fan of the 50mm field of view on the Micro Four Thirds System. Despite this when I made the switch over to Olympus I picked up the 25mm f/1.8. I felt that at the time that every photographer should have a 50mm equivalent in their lens bag. I owned that for about a year but found that I hardly used it, and when I did I wished I was instead using the 17mm f/1.8 instead for that slightly wider field of view. In comparison with the 17mm f/1.8, which is a very dense and somewhat heavy lens for its size, the 25mm felt plastic, too light and quite cheap in the hand (only when compared directly, but I think this speaks more to the quality of the build of the 17mm f/1.8, rather than anything negative about the 25mm f/1.8). I've never exactly had an issue getting in closer to a subject either and for that reason, the 17mm f/1.8 always seemed to be my preference. Don't get me wrong, the 25mm f/1.8 Isn't a bad lens. I just prefer the 17mm f/1.8 instead.
12-40mm f/2.8 PRO
The 12-40mm f/2.8 I appreciate is a highly popular lens for many Micro Four Thirds photographers. It's 24-80mm effective focal range make this an incredibly versatile lens. Couple that with the build quality we've all come to know and love of M.Zuiko PRO lenses and you have a sturdy lens ready for many situations. It does however just miss out being on my favourites list because I find the effective depth of field on offer (f/5.6 throughout the range) at this focal range just doesn't produce that same separation as some of the f/1.8 primes that sit in that same focal range (that being the 17mm f/1.8 for example). At a longer focal range, such as with the 40-150mm you can create better separation between subject and background whilst maintaining a preferred, tighter composition too. For that reason with the 40-150mm f/2.8 PRO the effective focal range is fine and you can still get that wonderful soft background that we've all come to know and love from a telephoto lens. I've found that whenever I'm shooting something and need that little bit of versatility, I will often reach for the 7-14mm f/2.8, the 17mm f/1.8 or even the 45mm f/1.8. My poor old 12-40mm f/2.8 rarely got a look-in.
In case you weren't aware, the crop factor of the MFT sensor is x2. As most of us may be aware that affects the effective focal range; with lenses such as the 40-150mm becoming an effective 80-300mm and the 12-40mm becoming a 24-80mm for example. What everyone may not know though is that focal range is not the only thing affected by the crop factor of the MFT sensor. The aperture of a lense is also effected too. However, there is a caveat to this. Firstly, the f/2.8 aperture is doubled and so works out at f/5.6 (2.8 x 2 = 5.6. Furthermore an f/1.8 has a depth of field equivalent to f/3.6). The reason then that these lenses are still advertised as 35mm film form (17mm f/1.8 and 12-40mm f/2.8) is because those lenses and apertures are still accurately representative of the speed of the lense. I.e they let in the same amount of light as other f/1.8 lenses. In simple terms, they have the ability to let in light, directly representative of their aperture, but a depth of field of twice of that.
Conclusion
Thanks to Olympus putting the stabilization in to the body, Olympus lenses are all about optics, leaving the camera the job of steadying your scene. I believe that the stabilization on offer inside the OM-D bodies is the best available and the lenses are reaping the benefits of this. Because they don't need to feature those additional motors and parts the lenses are smaller and lighter. This, coupled with the sensor size of course means that they are smaller even still!
Olympus, unlike Canon and Nikon have one sensor standard and make lenses specifically for that one sensor size. As such M.ZUIKO lenses are designed to work in perfect harmony without any need to compromise or have any sort of change to their design to take another sensor in to account. Square Peg - Square hole!
So, whilst pretty much all of Olympus' lenses are absolutely superb, I've picked out my three favorites based on how much I find myself reaching for to the results I get. My switch to Olympus was of course motivated by the superb OM-D range, but those bodies would be nothing without stunning glass to mount to them.
What are your favorite lenses?
So, what are your favourite lenses? I've chosen all Olympus lenses here in my list, but that's not to say that I couldn't make use of those lenses on offer from Panasonic too! Post your comments and thoughts below and let me know what you find yourself reaching for when you head out shooting.

Gear for Street Photographers
On April 18th I'll be hosting another great photowalk in London! If you're a subscriber to the blog then you may have already seen that this walk will be something slightly different to the usual walk.
Previously, walks have started in the morning with us stopping for lunch, however, this walk will start at 1pm and see us take in quite an extensive route. We'll make a 4pm stop in Covent Garden, whereby those wanting to join the walk at a later time can meet us then.
The idea behind the later start is so that we can stay out later and photograph London at night! The sights and scenes change when the sun goes down and of course the way you shoot will also have to change: higher ISO's, lower shutter speeds and pockets of illuminations. There's more though: long exposures and cityscapes.
After the sun sets we'll stop for a bite to eat before heading back out into the city to photograph some long exposures of The River Thames
Tripods
With this walk starting at 1pm, so the idea of carrying around a large and heavy tripod for the entire day may sound very unattractive indeed, so I wanted to propose that those of you joining us have a good look at the Gorillapod's from Joby.
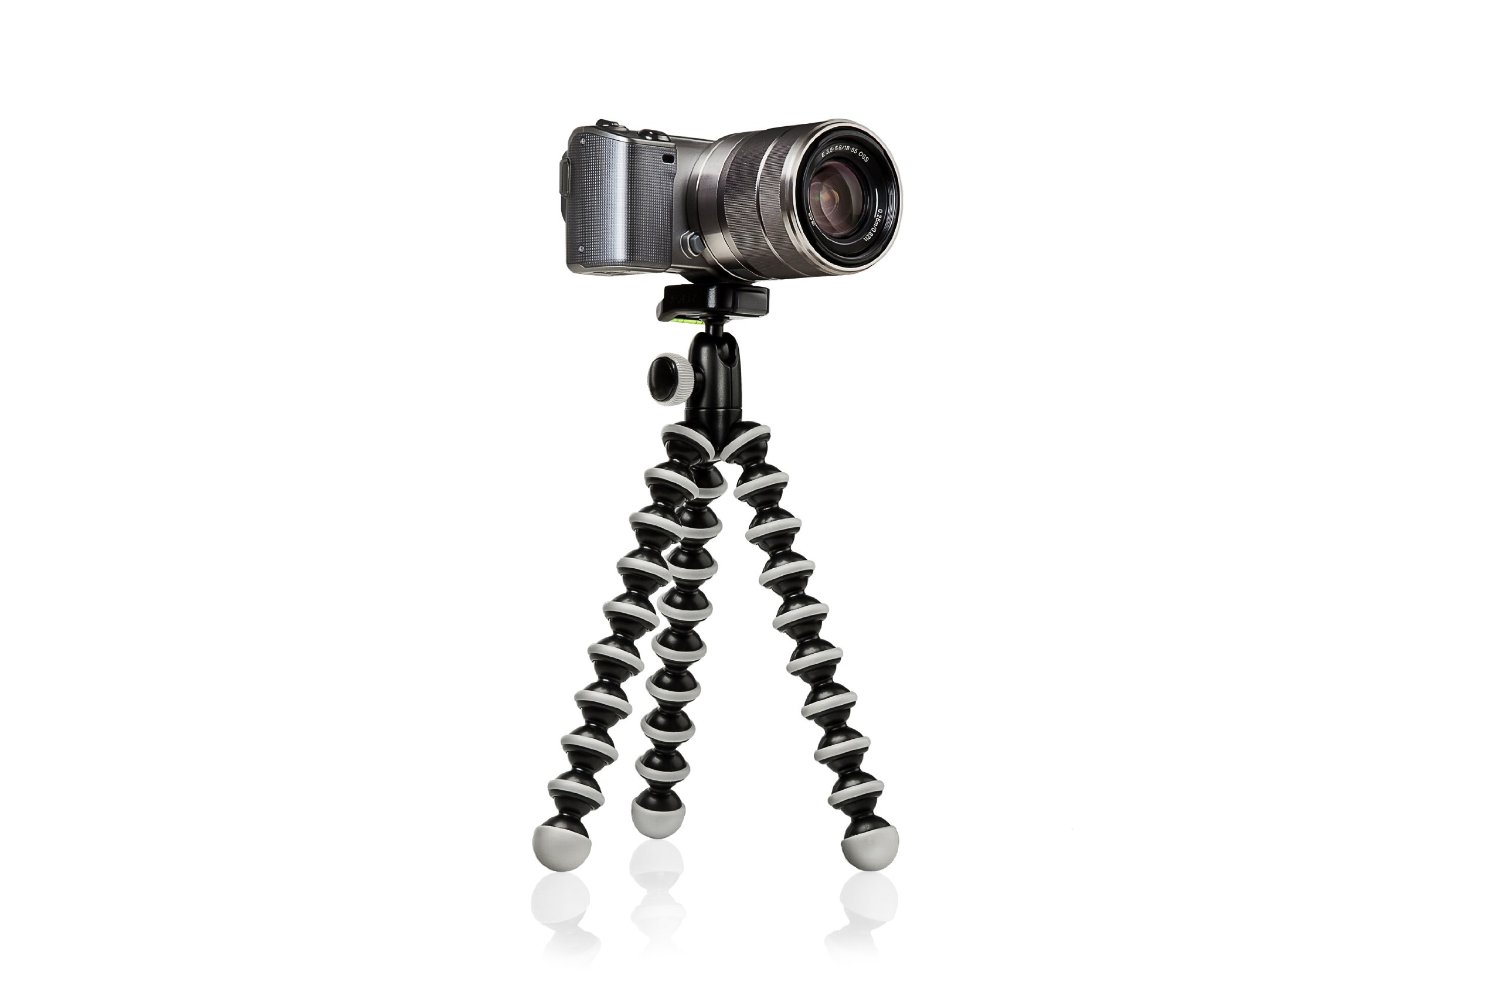
I've got the Gorrillapod with a ball head for my Olympus and it's excellent: fits neatly into my bag and has a ball head too. It's incredibly light and superbly useful! I've tried a few other solutions, but to be honest the Gorillapod is the best of them all.
They come in different sizes and there options with and without ball heads. If you're interested in picking one up you can get them reasonably priced through Joby's shop on Amazon, right here:
Gorillapod for CSC's (Fuji, Sony A7's, Olympus etc)
http://bit.ly/joby-gorillapod-csc-ballhead
£23.66
Gorillapod for DSLR's
http://bit.ly/joby-gorillapod-slr-ballhead
£39.99
Join Us
If you're interested in coming along for the walk simply register your interest over on the events page. Or, if you're a member of Ready Steady Pro, or The Guild of Photographers you can confirm your attendance using the events page for those Facebook communities too.
See you on April 18th!!
Olympus 40-150mm f/2.8 PRO Review
More and more professional photographers are making the switch to mirrorless cameras than ever before. With cameras such as the Olympus OM-D E-M1 being sturdy and built to take on the rigors of professional assignments, yet considerably smaller and lighter than DSLR's, photographers are reaping the benefits of such systems. However, it's one thing for the camera body itself to be up to the task - but what about the lenses?
One must-have lens in any wedding, event or wildlife photographers' arsenal is a 70-200mm f/2.8, whether it be Canon's 70-200 L Class offering or Nikon's 70-200 f/2.8 Nikkor: These lenses provide us with a convenient focal range and great low-light ability. They're typically built to very high standards, making use of metal bodies and quality optics. They can take a real beating in everyday use and continue to produce excellent images. These are the tools of the pro photographer.
Now, Olympus have introduced their professional-grade, weather sealed, constant f/2.8 aperture telephoto offering, giving professional mirrorless photographers the lens they've been waiting for.
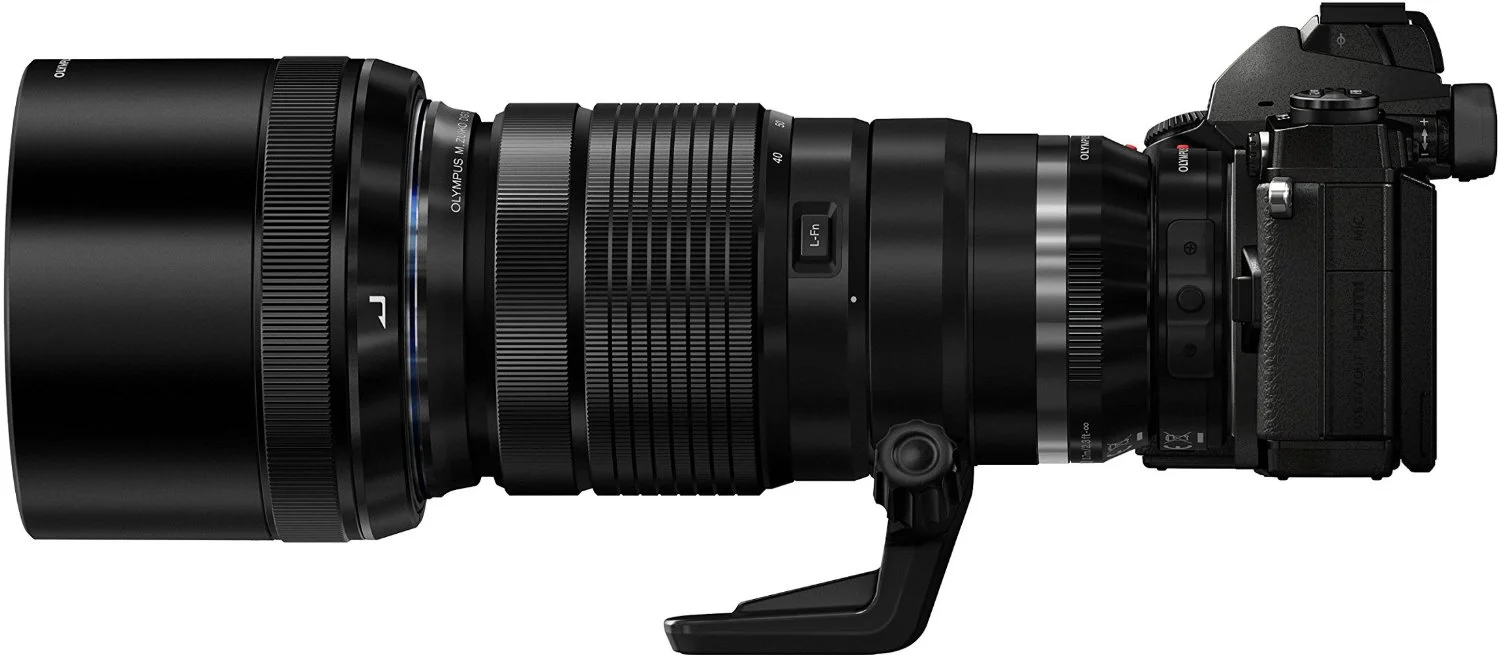
Enter, the Olympus M.Zuiko 40-150mm ED f/2.8 PRO!


Specs & Details
- 40-150mm focal range provides an 80-300mm, 35mm equivalent field of view
- The 40-150 ED f/2.8 PRO is available for around £1,150 on it's own
- Also available with a 1.4 teleconverter for around £1,300 all together
- 9 Blade Aperture for circular bokeh
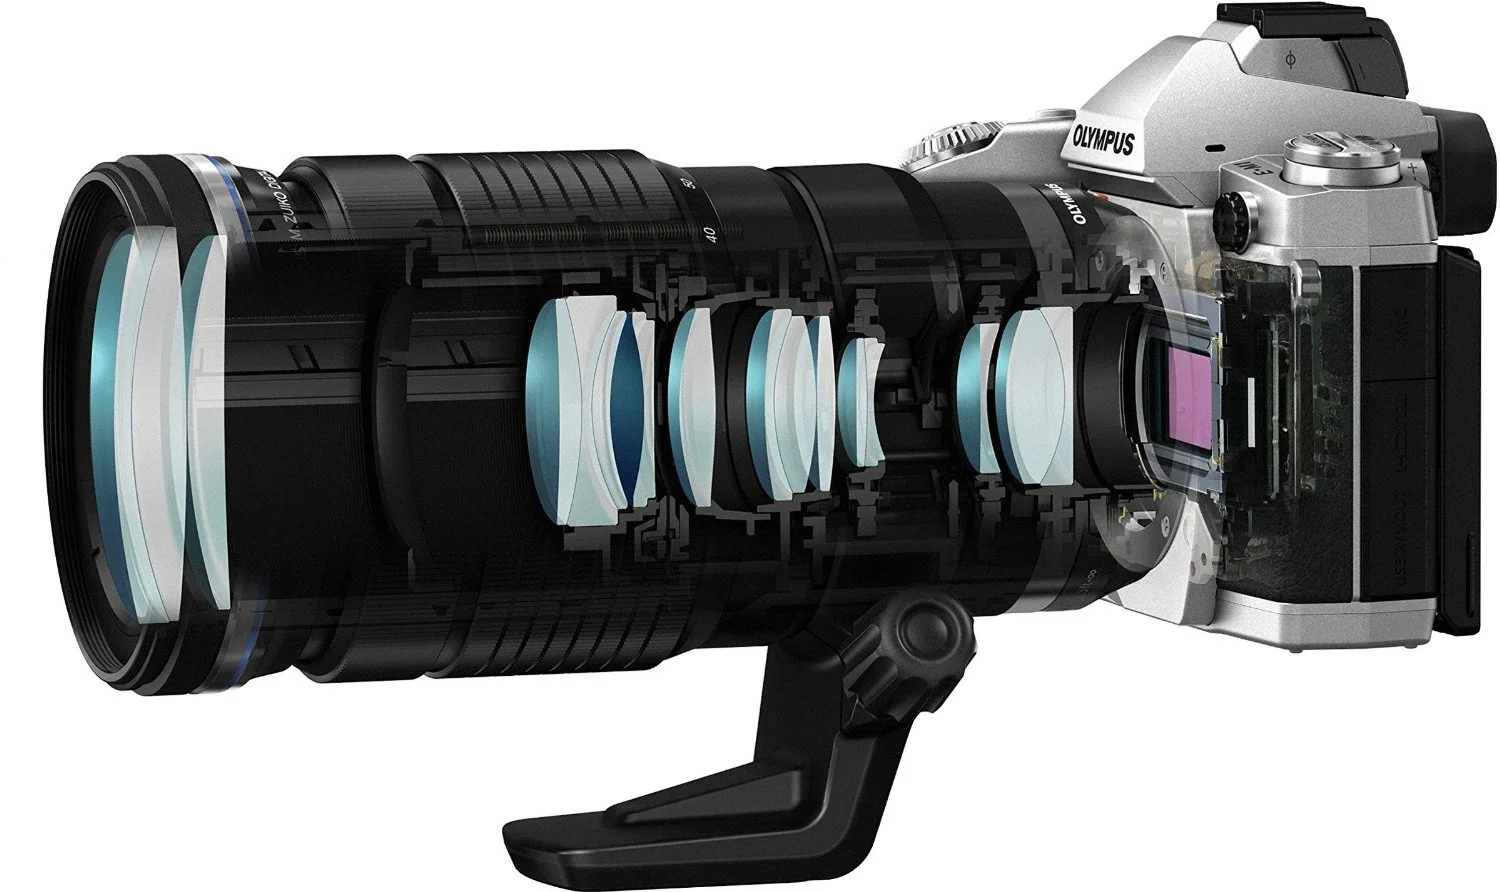
- 16 elements, 10 Groups
- Splash, Freeze and dust proof the same as the M.Zuiko 12-40 f/2.8 PRO
- Metal construction
- All-metal tripod mount collar included. Removable.
- Intelligently designed extending lens Hood. This is removable, just like a regular hood that you may find on the Canon 70-200, but the mechanism simply allows you to store it on the lens, without having to remove it and reverse mount it for storage. Very clever
- Internal focusing mechanisms (no extending parts, unlike the 12-40 f/2.8 PRO)
Size
The lens weighs in at 880 grams and is 160mm long, making it both shorter and much lighter than Canon's 70-200 (weighing 1490 grams) and even more so than Nikon's (weighing 1540 grams). Considering the Olympus has a field of view up to 300mm, this makes this a pretty impressive feat indeed. If you're reading this and you shoot with a DSLR, it would be a nearer comparison in weight and size to Canon 24-70 f/2.8 (weighing 805 grams, and is 113mm long)
The Olympus M.Zuiko 40-150mm ED f/2.8 PRO towering over the rest of the Olympus lenses
As Micro Four Thirds lenses go, the 40-150 is certainly the largest. In fact, it does somewhat go against the idea of what Micro Four Thirds is all about in that it isn't as small as many of the other lenses, but in a way, on this occasion, it isn't such a bad thing: the size and weight of the 40-150 when mounted to any of the OM-D's, especially when fitted with a grip, feels very neatly balanced. Coupled with the E-M1 it also makes for a serious looking setup too. So, if you're conscious about how you and your gear look on a wedding day, this will probably go some way to compensating for you feeling inadequate. (not that this should matter though). In short it looks the business!
First Impressions
When you pick the lens up you'll immediately be pleasantly surprised by how dense the lens feels. The quality of the build and the materials is instantly apparent. The focus and zoom rings aren't too loose or too tight, they're just about right. These also have a metallic, textured feel to them so you can both find them without having to take your eye away from the EVF and also to allow you to get a good grip when you've been working with the lens for long periods and may be a bit sweaty. Although having said that - I do feel that rubber zoom and focus rings would have been a better option (I'll expand on this in my criticisms below)
If you remove the tripod mount collar you instantly shed a fair amount of weight from the lens. So for those of us that will use this for weddings and portraits we can instantly make the lens lighter. I've personally no need to mount this lens to a tripod during a wedding, so mine usually ends up in the back of the car. The collar itself keeps up with the excellent build quality and feels like a very solid, chunky piece of metal. Which is reassuring when that is the part that will keep your precious gear sitting atop a tripod!
Remove the lens hood completely and the lens becomes even more compact.
Image Quality
When it comes to lenses a good one will often outlast the cameras you own. I'd say this is the case with the 40-150. It's incredibly sharp both at 40mm and at 150mm, which isn't common in a lens with this range of zoom. Here are some real-world photographs I've made with the 40-150 over the past few months. These photographs were all made in a variety of surroundings too: an engagement shoot, a model shoot in a studio environment and of course street photography:


As you can see from these photographs a good shallow Depth of Field is present thanks to the useful focal length and f/2.8 aperture. The photographs are all superbly sharp as well. The 40-150 in combination with the E-M5 and E-M1 really makes this lens come to life.
Who is this lens for?
The 40-150 is a must have for any MFT photographer shooting professional assignments or for any serious enthusiast shooting sports or wildlife. To be honest the lens is so versatile that it's going to be useful to a variety of photography niches.
The lens is designed to be able to continue to work in adverse conditions, so you're investing in a lens that can really do a professional job. It will certainly be around for many years and in my opinion, it's set to be a lens that many look back on as one of the great telephoto lenses of this generation: sealed, sturdy and up for the task, yet lighter and smaller than a DSLR equivalent. This lens is perfect for those who shoot portraits, weddings, wildlife or sports.
If you are in the Panasonic side of the MFT camp, then this lens may not be of as much interest to you owing to the fact it doesn't have stabilisation built into the lens (of course, when you shoot with Olympus the stabilisation is in-body and all lenses are stabilised). However, a Panasonic shooter will still find their stabilisation in their lenses, instead of the body. Effectively, this isn't stabilised when used on Panasonic cameras.
Criticisms
It wouldn't be fair to review this lens without at least pointing out something negative about it. Much like my review of the Olympus OM-D E-M5 when I first bought that last year, I really do have to be picky to find faults with this lens. I can't fault the build quality. I can't criticise the optical performance and the size is a positive. I guess If I had one thing to say, it would would be about the aforementioned zoom and focus rings (I would emphasise I am being hypocritical here):
Canon and Nikon's DSLR and Lens systems are very mature and have been around for a while, so naturally, as they have iterated they've made small, but useful enhancements and adjustments to their equipment that just adds to an overall feel. Things that we don't even realise as useful, because, well they've been that way forever. It's only when you move to a different system, such as the E-M1 and Olympus M.Zuiko lenses that you realise certain things about the other systems. Such as rubber zoom and focus rings on their lenses.
Olympus have opted to use plastic or metal on a majority of their lenses for these components. Whilst on smaller primes and even the 12-40mm f/2.8 Pro this isn't an issue, the larger circumference of the 40-150mm f/2.8 Pro perhaps warrants a different material for the rings on the barrel of the lens.
Again, this is me trying to find a fault. Sometimes, in a bid to be different and do things their own way, Olympus opt for a design or a method that perhaps is just that - different, but not better. Having said that though the PRO line of Olympus M.Zuiko lense have a theme to them; all black, metallic finish, professional feel. If they updated or adjusted the way one lens from that range looked, you'd have to update the others too. As a lens lineup, they look stellar.
I would also point out some chromatic aberration when you shoot into strong light as well. I've only had CA on a couple of photographs I've made using this lens and fortunately it's not apparent in some of the more common CA-causing scenarios (such as portraits with a strong and contrasting rimlight, or a cool, blue window light), but if you shoot a branch with the sky as the background, or if you photograph a building, looking upward, you may spot some aberration along the edges. Now, I know what you're thinking: "CA is easily removed in Lightroom" - and you're right. But this does have to be mentioned. So, this does become less of an issue, but I still wanted to point it out.
Now, I have probably gone on too long about the rings on the lens and through fear of risk of me sounding like you can't operate this lenses zoom and focus rings (you can, with ease), I would simply say that rubber would have perhaps been a better option. That's all.
So, those two very picky things aside, we have an absolute marvel of a lens here.
Conclusion
Quite simply, if you were ever hesitant to switch to Olympus, or Micro Four Thirds because of a lack of a constant aperture professional grade telephoto, you've now got it and there shouldn't be much to hold you back at all.
This is the lens that could push any photographer at war with themselves whether to switch to mirrorless, to switch. If you're having a dilemma and worry about lens selection when moving to Olympus - you shouldn't be concerned. This lens adequately replaces the 70-200 offerings on the table from Nikon and Canon. Whilst doing so it offers a greater focal range in a smaller package with apparent better edge-to-edge sharpness.
As a previous DSLR shooter with a heavy investment in Canon, I was reluctant to sell my Canon gear purely because I didn't believe there was an equal and equivalent lens to my Canon 70-200mm L f/2.8 IS USM ii. It was a lens that cost a good amount of money and worked excellently when paired up with the Canon 1.4 EX ii as well. Sure, the lens stopped down to f/4 when used with the adaptor, but it was built like a space rocket and was amazingly responsive. The resulting image quality from that lens was also unmatched by any other lens I had in my bag at the time.
My own migration to Olympus hinged on this very lens being as good as it is. Without a quality Olympus 70-200 challenger I wasn't prepared to move. My Canon 70-200L f/2.8 was the jewel of my kit bag. It was the one thing I'd save from my house if it were on fire (photographically speaking that is). After testing this lens at the Olympus Image Space last year I had seen enough to convince me it was capable. When I bought it and used it for an engagement shoot and some portraits, the Canon 70-200 was sold immediately.
The Olympus 40-150 is a feat of optical engineering and an incredibly well-considered design. The lens hood, the size, the very near minimum focussing distance of 70cm which is maintained throughout the entire zoom range make this a must-have tool for any Olympus photographer. The fact is goes to 300mm is a very welcome bonus indeed!
It's not as expensive as Canon or Nikon's 70-200's, but it's every bit as good a lens and one I would recommend without hesitation.