


iPhoneography - Editing with Snapseed
I'm often asked how I get my iPhone photographs to look the way they do. It's a compliment for me and I love to share how I achieve my results. So today here on the blog I'm going to share which apps I use, how I shoot with the iPhone and also, I've put together a video showing you what I do within my chosen iPhone photo editing software: Snapseed.

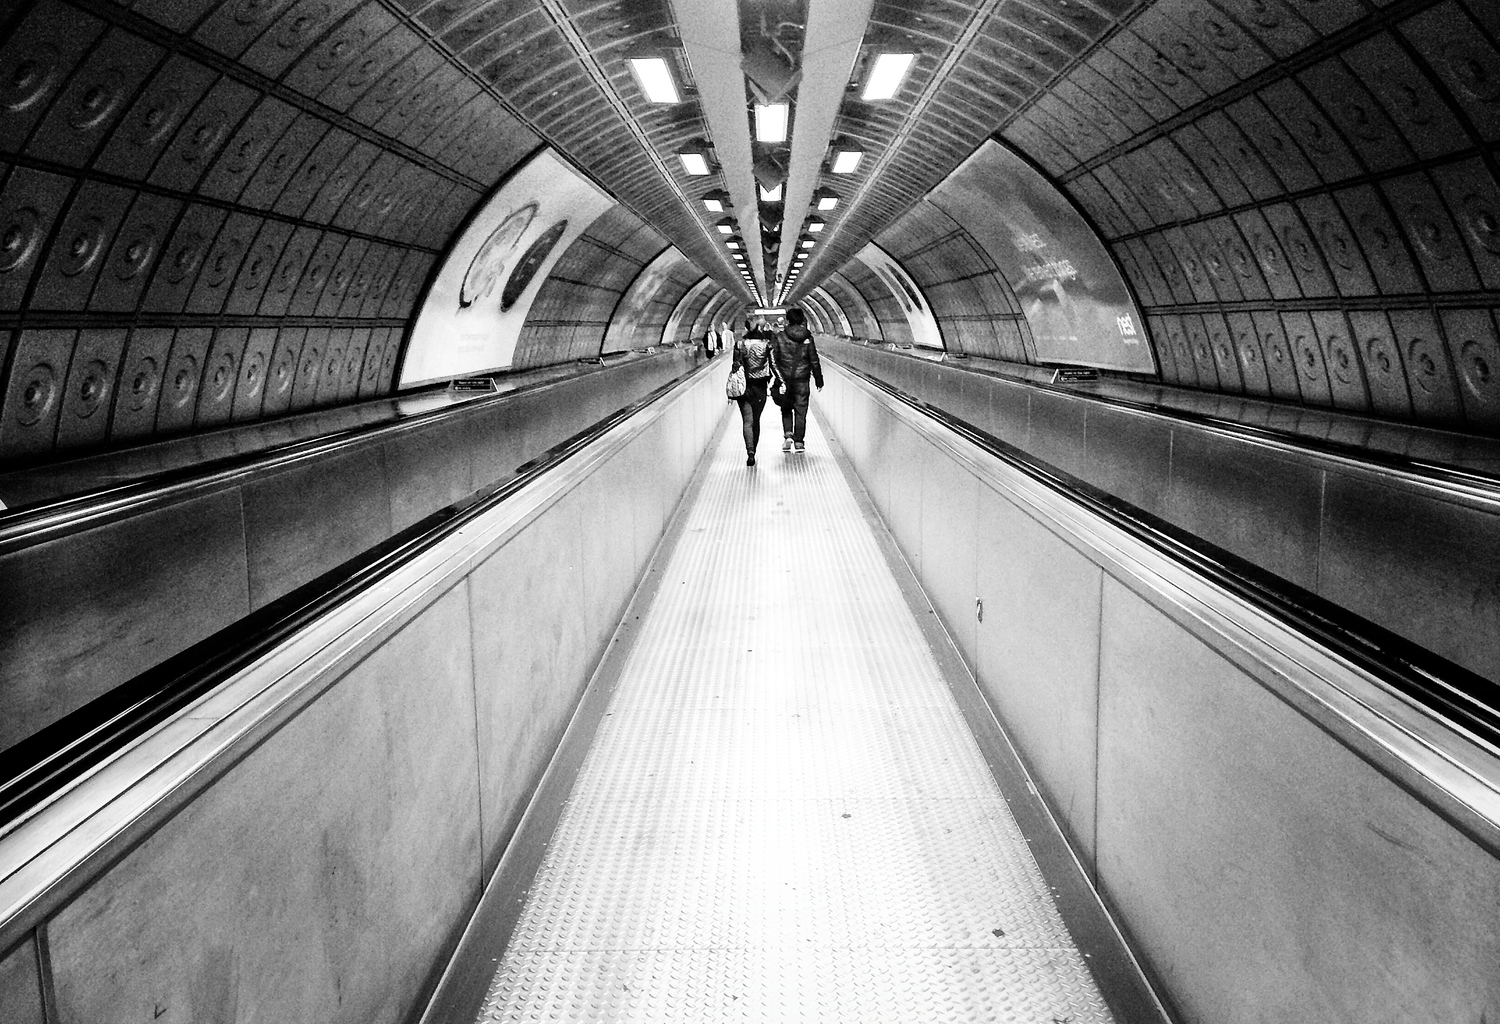
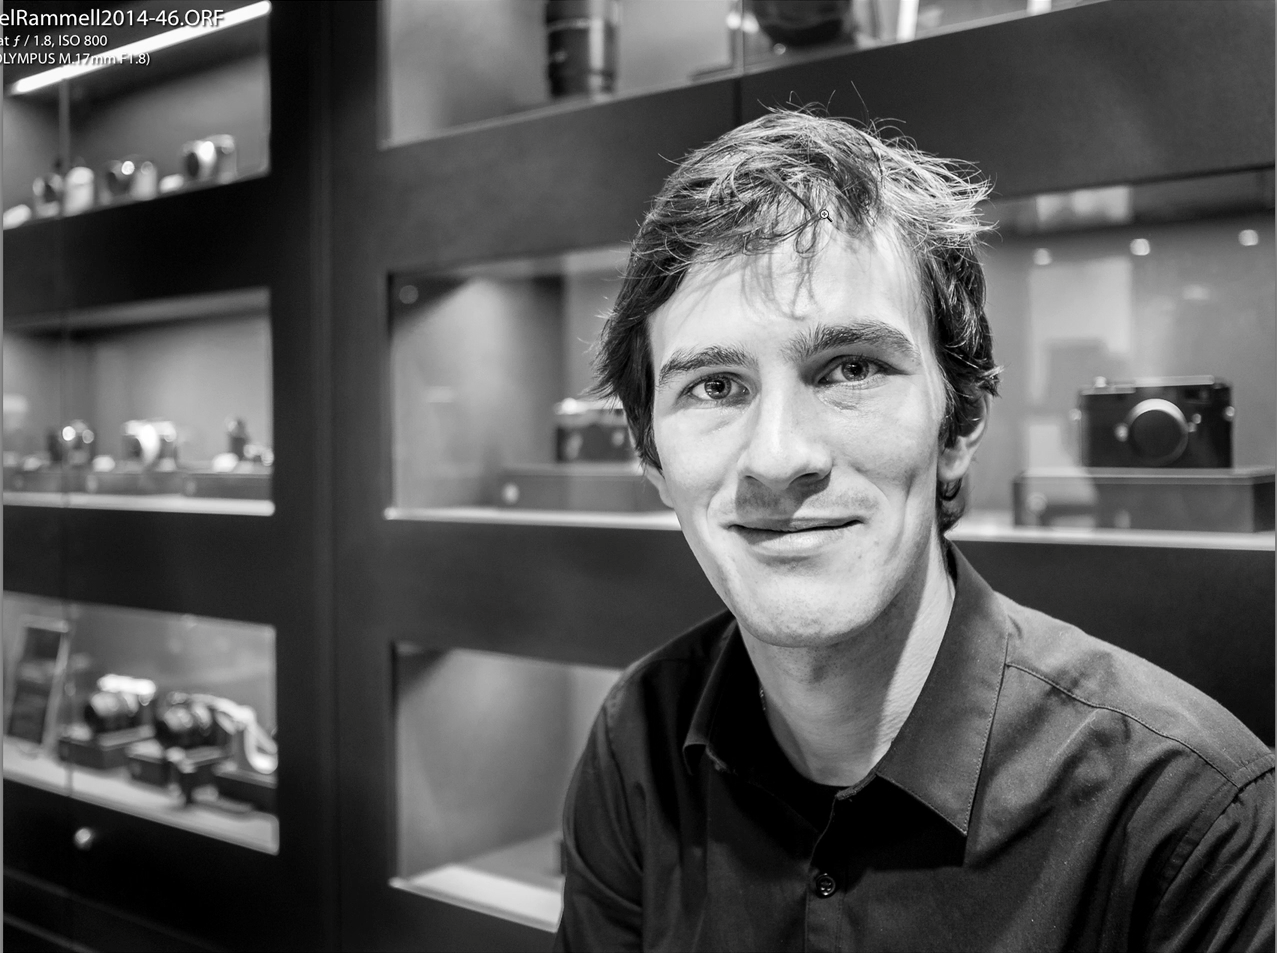
Richmond Park, London UK.
iPhone 6Plus
I've used the iPhone since the 3Gs, then moved to the 4s, the 5s and now the 6Plus. With each model the camera has gained a little something and has gotten better and better (see my iPhone 6 Plus review), but the one thing that remains the same for anyone using the iPhone as a camera is the persons ability to spot a moment and to use the light to get a clean, sharp image as well.
As you can see in the Richmond Park photograph above: I was still up early at Golden Hour, I made the effort to be somewhere where there was the opportunity to make such a photograph with such great light.
The iPhone has a limited set of controls right out of the box, but there are camera apps available to help you make more of the iPhone as a camera and apps to allow you to edit your photographs:
My Apps
Personally, I stick with the out-of-the box standard Apple Camera App that comes with the phone. It's fast to load up, available with a swipe from the bottom of the screen, which is how I often access the camera app) and allows you to control focus points and brightness. It has all the settings I need to enable to me to make a better photograph.
On occasion I may use Camera+ or Camera Awesome, but typically for me it's the standard app.
My Technique
I've got a way of working now that I apply to every scene I shoot:
- Tap on a dark area of the scene to brighten it up (tell the sensor the scene is darker and that it needs to add brightness)
- Get in closer than you think you need to with your feet and by getting closer.
- Pinching to zoom and cropping kill the file's quality. It's not quite like with a RAW file where you have a lot of leverage and scope to recover photographs and heavily crop - the iPhone files do tend so suffer when you start cropping them.
- Take a small burst of images by holding down the button to take pictures. I like to have at least a couple just incase something flies into the scene, or I'm shaking etc.
Editing
I don't use VSCO or film filters. I find them gimmicky. I do upload to Instagram, but I don't apply any of their filters either. I'm not a photography snob or anything like that, it's just that Instagram has millions and millions of people using it and just a limited number of filters - the last thing I want to be doing is choosing from a pre-defined set of filters that the millions of of other users have, making my photograph not stand out among the others.
My choice of App for all my iPhone photograph editing is Google's Snapseed App:

9 out of 10 of my photographs are converted to black and white. If you look at my portfolio here on the website you'll see this is the case with nearly all of my photographs, no matter what camera I'm using. I just love the atmosphere that mono adds to a photograph. But, rather than explain here in writing how I achieve my look time and time again, here's a video to show what settings I apply within Snapseed to make my photographs look the way they do:

The Gallery
This website (and my wedding website too) are built using Squarespace. One of the great features about the galleries is that you can give them an email address and then email photographs, videos and content up into the gallery. For iPhoneography this is ideal as I can now shoot a picture, edit in Snapseed and then from inside the snapseed app I can send that directly into my iPhone gallery. The file never touches my iMac (until it's time to backup my iPhone using iPhoto of course).
So, there you have it. That's how I make all my photographs that you see in my iPhone gallery.
Here is the gallery, in case you wanted to take a look:
Using Smart Collections in Adobe Lightroom
At this time of year many photographers are looking back on the work they did in the previous 12 months. A retrospective view. A year in review. An assessment. Whatever you decide to call it, it can actually be a tedious enough process just finding your best 10 in amongst thousands and thousands of photographs. Don't get me wrong though, this exercise is worth it's weight in gold as you can really gain some perspective on where you were at the start of the year and where you are now, as a photographer. It can often be a real eye opener to see in what ways you've improved and in what ways you've changed your style. After all, we're always evolving and adapting as photographers and therefore the photographs we produce are inevitably going to change as we grow.
Luckily for us though, this deeply rewarding (yet tedious) process can be made much easier now that we're in the digital era. We're fortunate to have software that can stores tags and meta data. It can order and time stamp our photographs, making sorting and filtering through them all and finding the photographs we're most proud of that much easier.
That is...if you know how to use the software you have.
Many people see Adobe Lightroom as a simple piece of software with a couple of sliders. Trust me, it's much more than that. It has brushes, a simple cloning tool, it's amazing at organizing photographs and preparing photographs for printing. It does nearly all a photographer could ask for.
Today, I want to help you to find your top 10 photographs from the previous year. To do this we'll be taking a look at Adobe Lightroom's Smart Collection feature, Target Collections and a few basic rules to set these up.
So, if you've been putting off doing a review of the year that has just passed us by have a watch of this video and the re-assess whether you think you have the time or not.
Grab a coffee, press play on the video below and enjoy!

If you have a Lightroom tip you would like to share, or even a question about Lightroom please do post your comments below, or contact me at michae@rammellphotography.com
Thanks for watching.
Check out Other Lightroom VIdeos here

Using brushes in Lightroom
Don't you just love Adobe Lightroom? It's neat and simple: no need to worry about layers and all that jazz (If that's not your kinda thing). It contains most of the tools you'll need to really polish a good photograph and improve it.
Adobe Lightroom, more than anything, is really designed to help you batch process images quickly and If you ask me it does it very well, but if you're just looking at a small selection of images it can still be tempting to sometimes whizz through them and rely 100% on the sliders. Again, if that's your style that's fine. But Adobe Lightroom is more than just sliders and batch-processing...
Brushes
Adobe Lightroom's brush tools are effective! Please don't forget about them. There are often occasions where you don't want to apply a change to the entire photograph through a slider: for example clarity, sharpness or even exposure. But, at the same time taking that photograph over to Photoshop can feel like a real chore, so this is where Lightroom's brush tool is your friend: selectively lighten the eyes, selectively brush some clarity onto a face or even just brush a little vignette to two of the corners, instead of all 4. The brush tool unlocks a whole set of other possibilities for post processing to compliment the use of sliders.
In this video I talk about how I use brushes to further enhance a photograph that you wouldn't otherwise be able to do with sliders alone. I show you how to go from this, to this:
Please note that I know that brushes may not be to everyone's liking and the brush work demonstrated in this video is rough and fast, but for those who don't have Photoshop or prefer to stay within Lightroom - this may be just the thing you need to take your editing to the next level.
Enjoy!

How to Create a Black & White Smart Collection in Adobe Lightroom - Black and White Challenge
Have you been nominated for the Black and White challenge? You know the one: someone posts a Black & White photograph to a Social Media site and then they nominate you to then post one black and white photograph each day for 5 days? You have? Excellent! Then this may help you out with that challenge.
Did you know you can actually setup a Smart Collection in Lightroom so you can view all of your Black and White photographs in one, neat collection? This will make finding all your best Black and White's far easier and participating in this great little challenge so much more fun.
If you're at home or in a place where you can watch a video, then check this out. If not just continue past the video for the instructions laid out with screen grabs:
(Be sure to share links to your 5 Black & White Photographs below!)
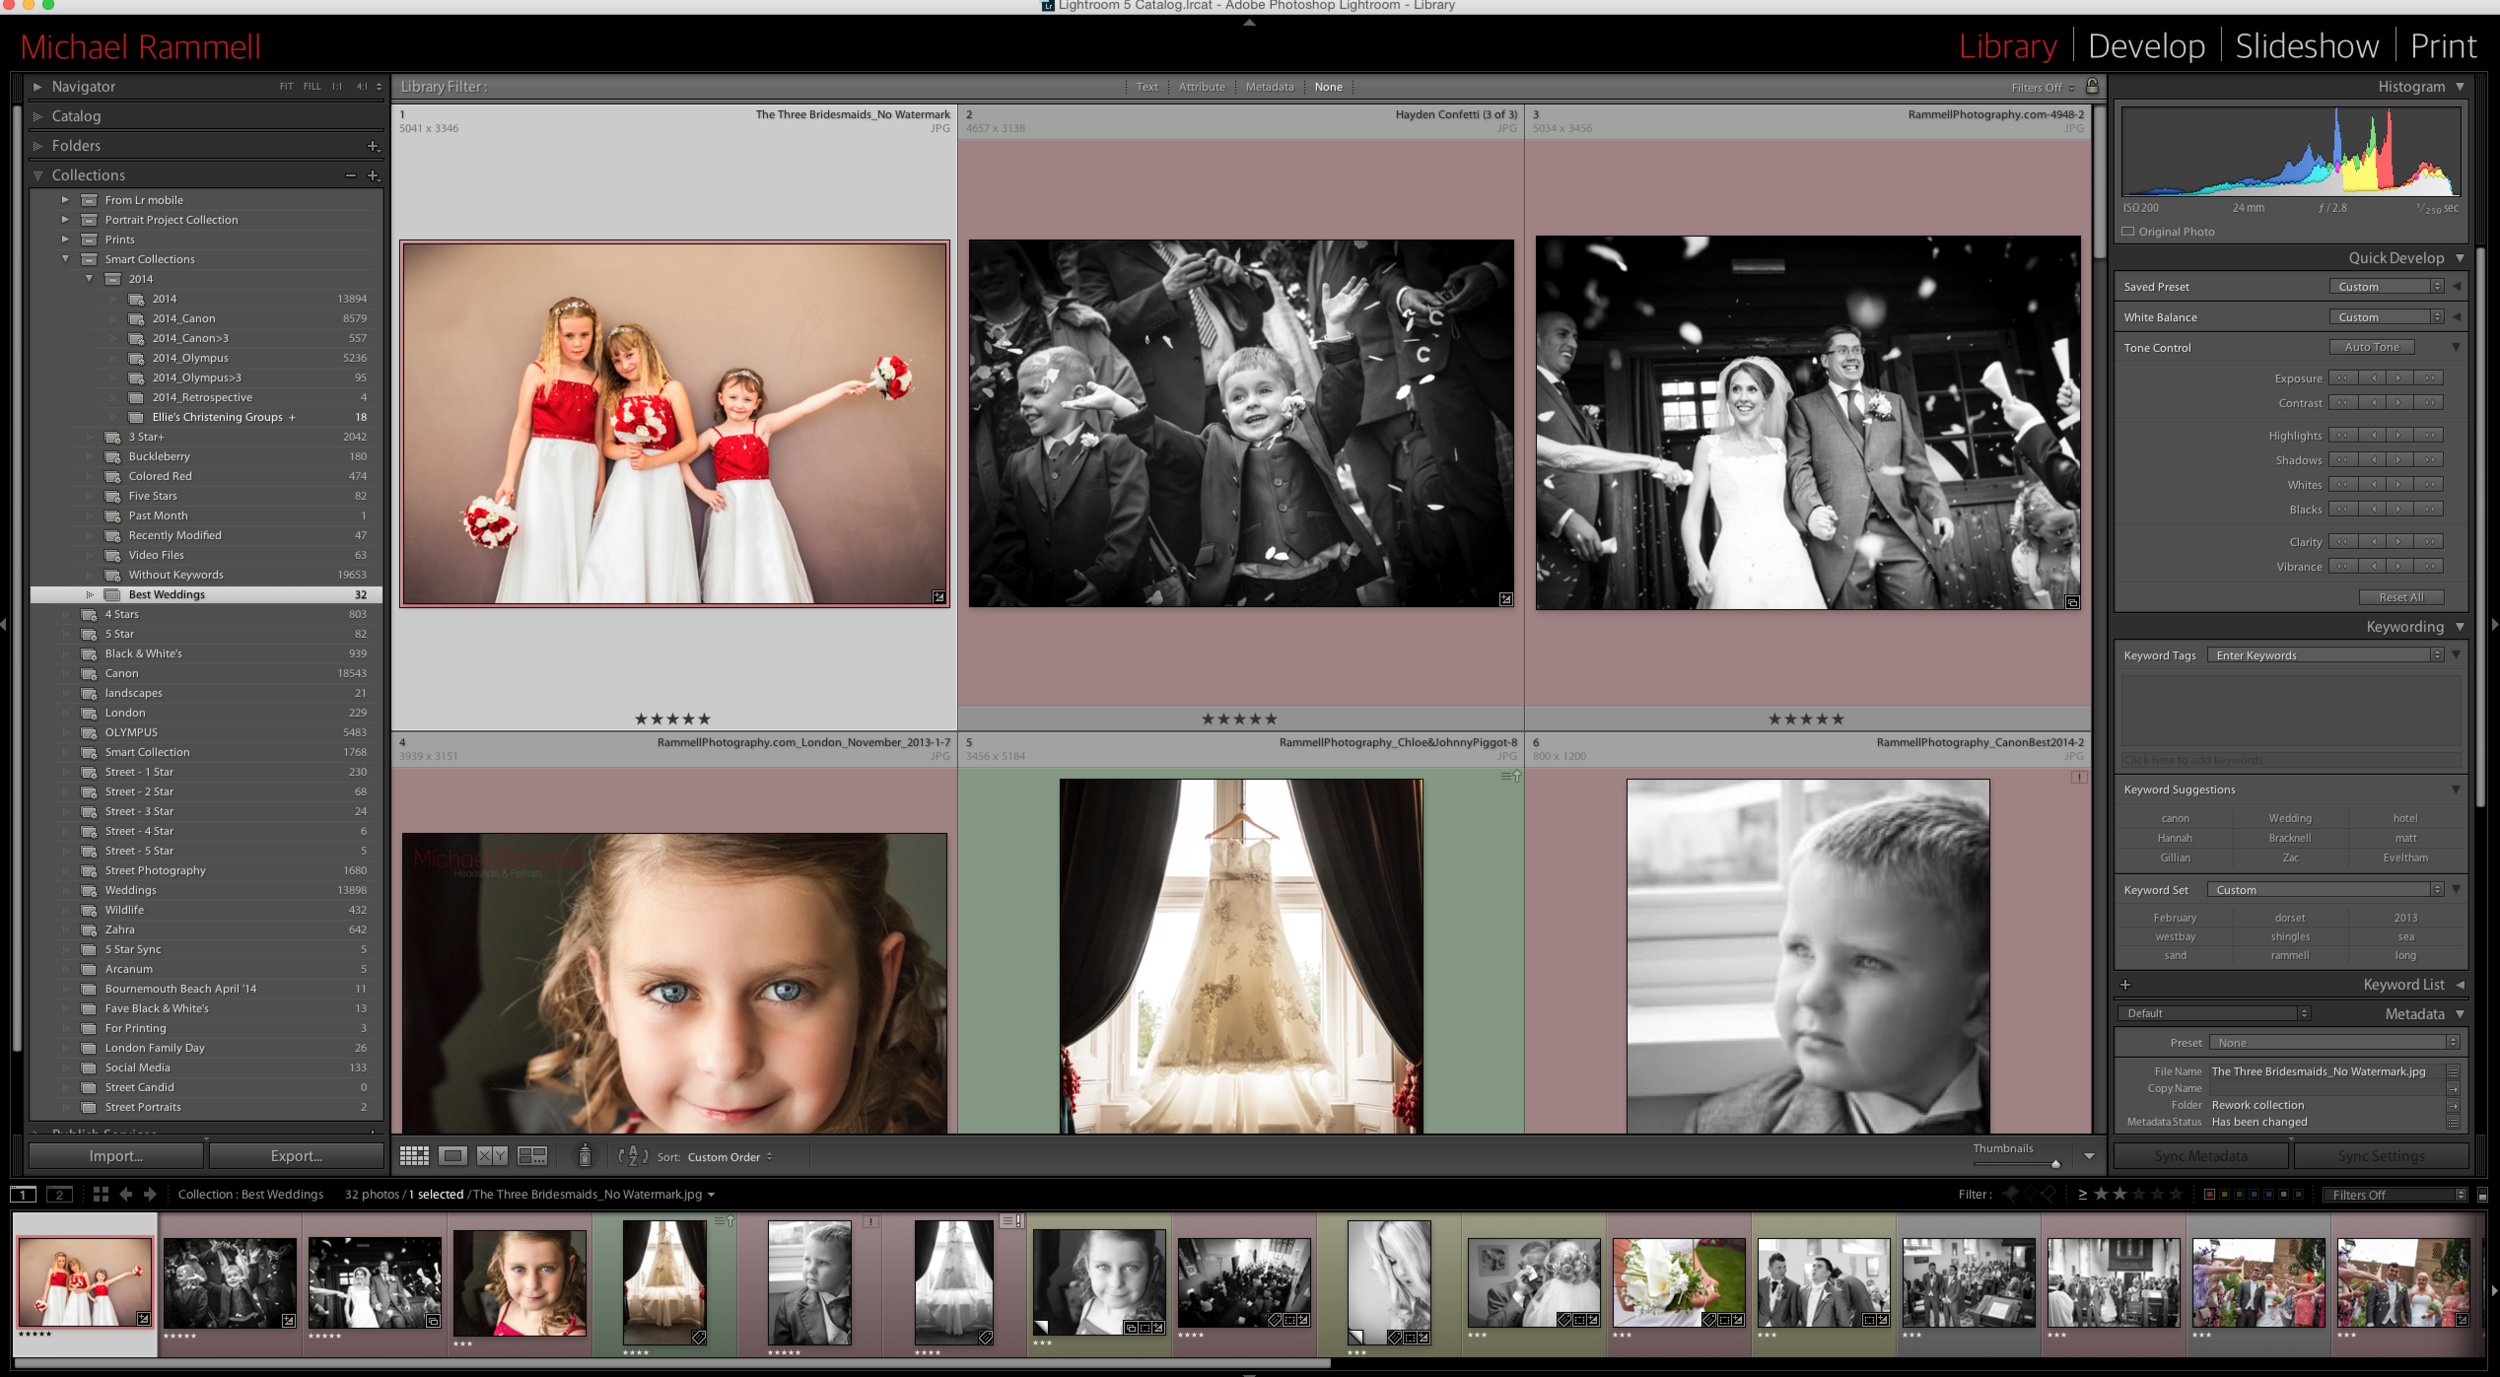
- Open Lightroom and then open the Library module:
- Click the 'Collections' view on the left hand side:
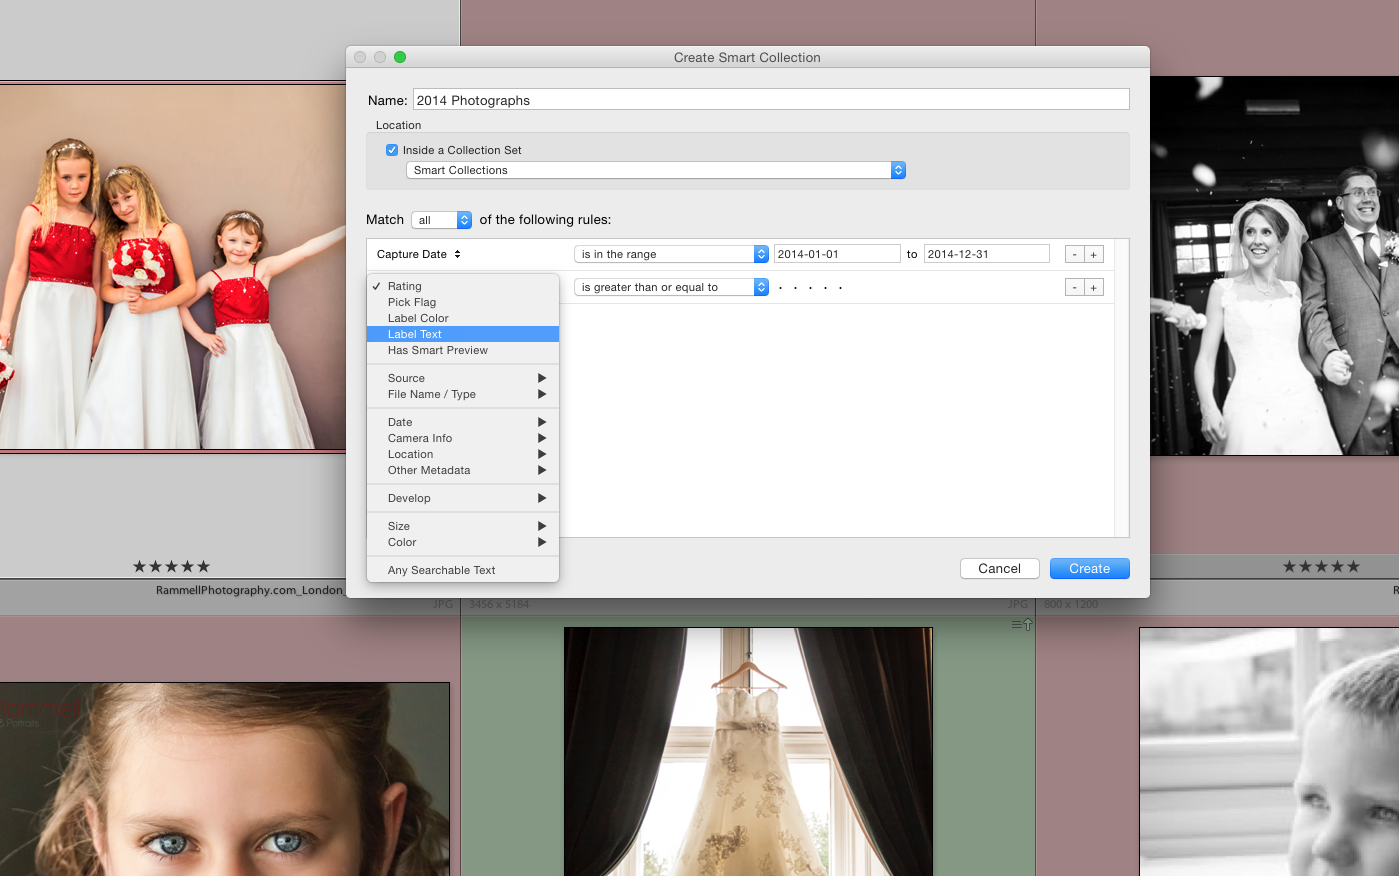
- Click on the small + icon on the left hand side and choose 'Create Smart Collection' from the new menu that appears:
- In the new window that appears give your new smart collection a name, such as 'Black and Whites' or 'Mono Only' etc...
- Optional: If you would like to include this inside a collection set, just check that box and choose your collection set. This is handy if you wanted to have sub-collections, for example Black and White's with a 1 star rating etc...
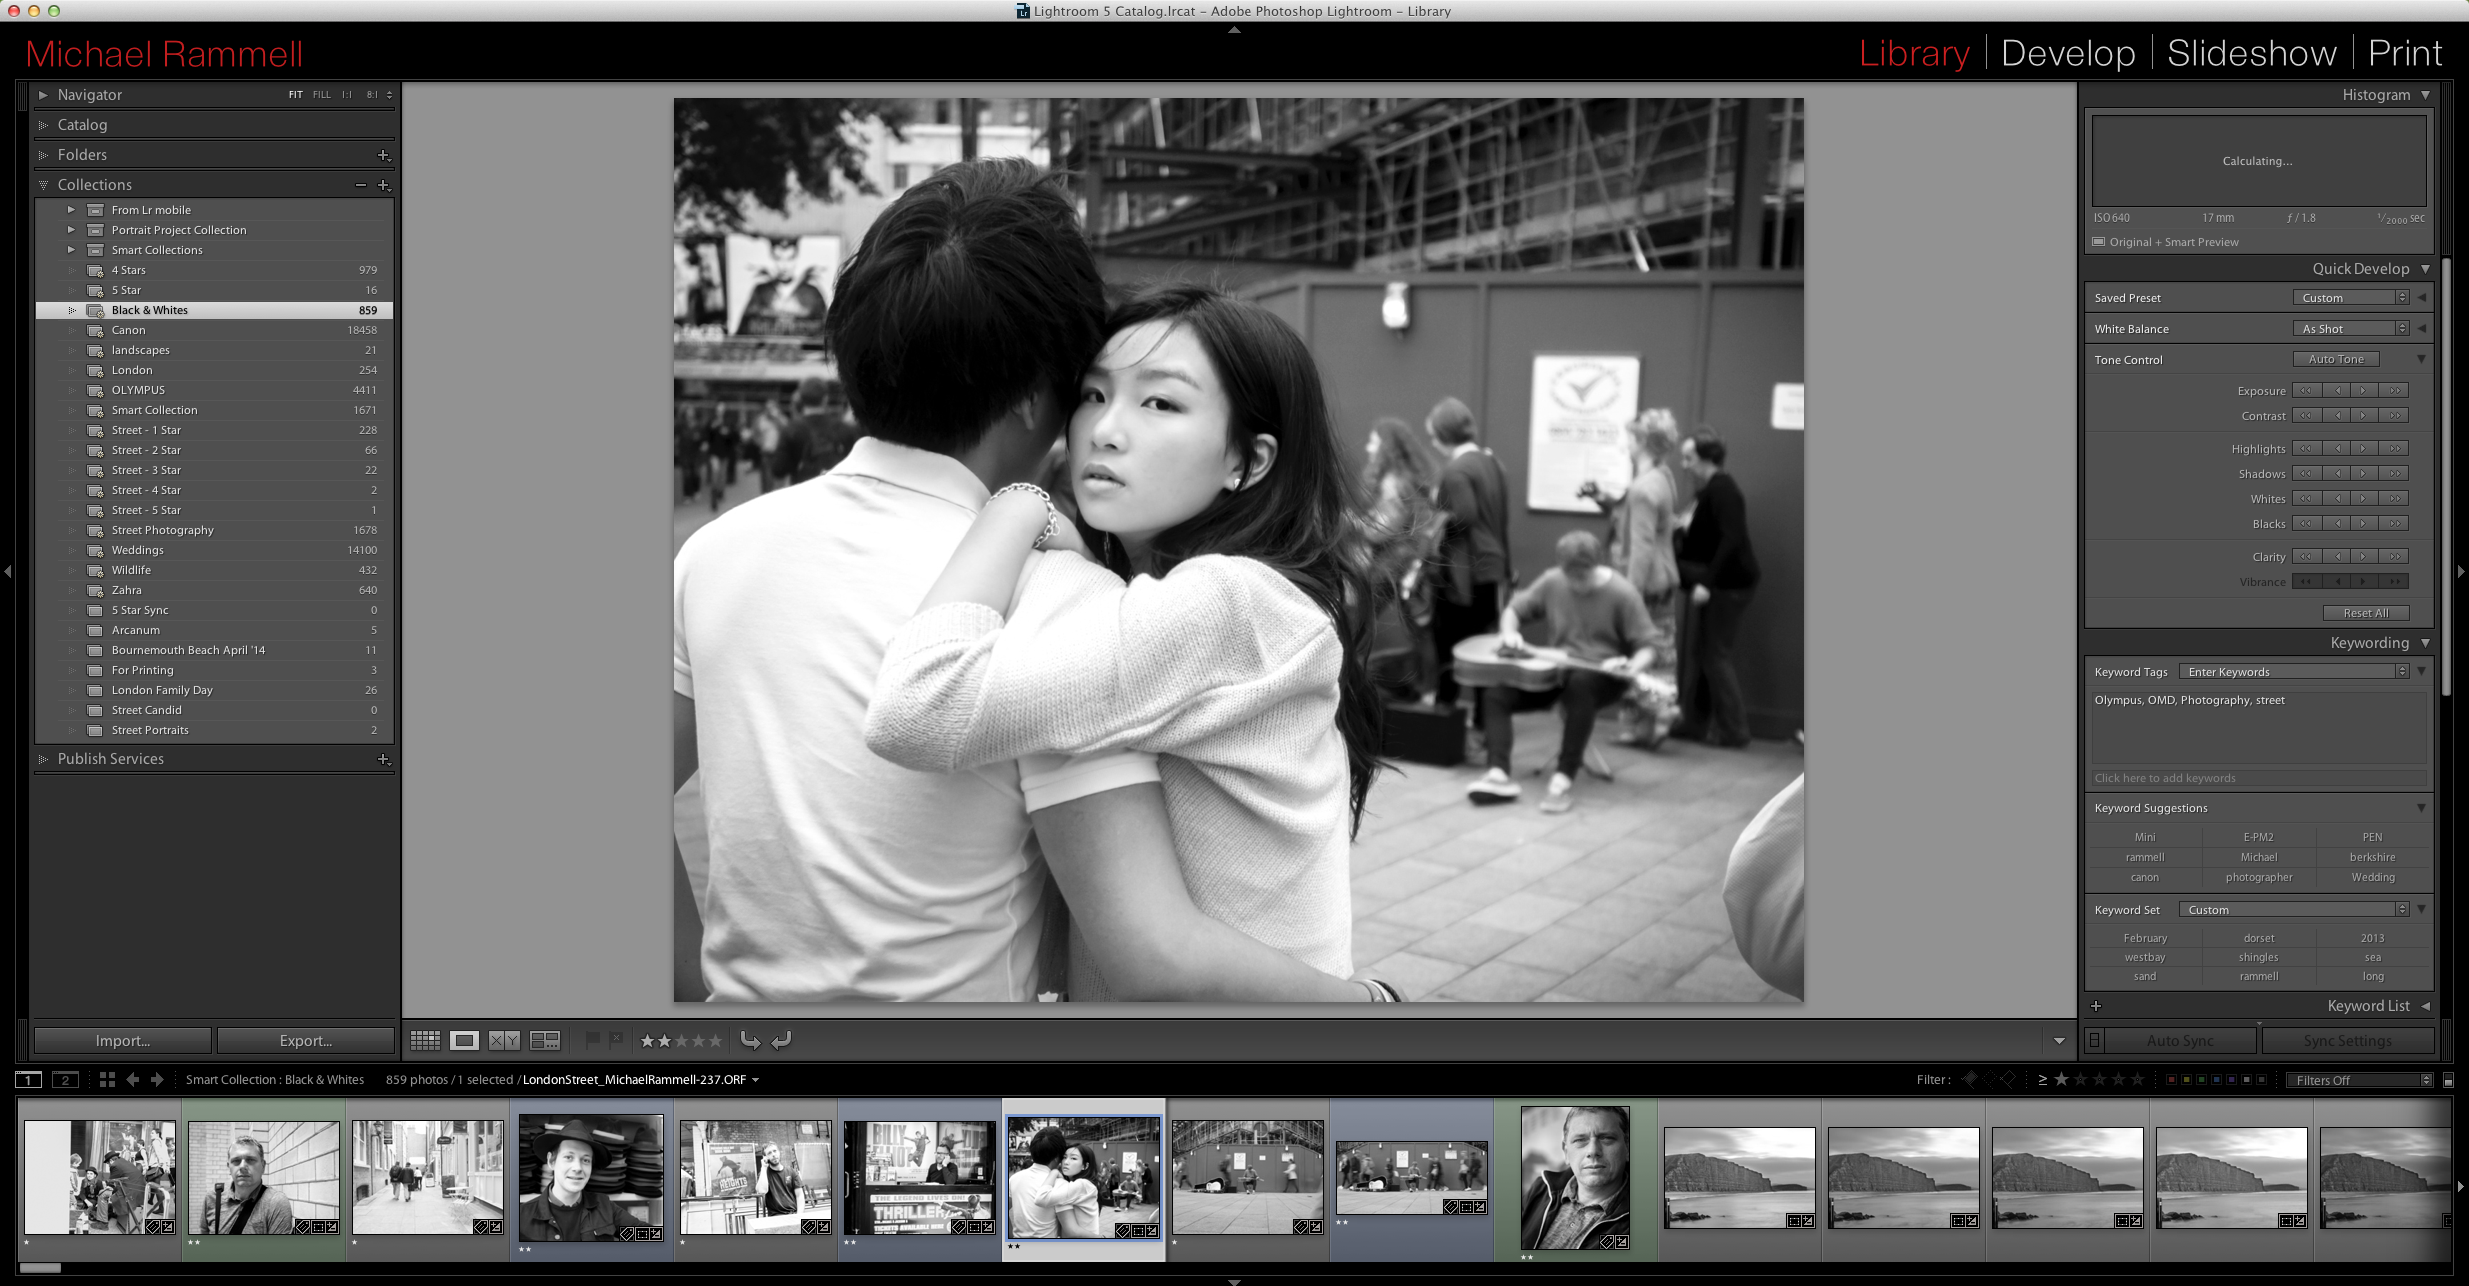
- Next up set the parameters of the smart collection by clicking on 'Rating', then choosing: 'Develop' > 'Treatment' (as shown below):
- Your Smart Collection then should look something like this:
- Click 'Create' and you should now be looking at all of the Black and White's in your Lightroom Library. Presto:
So there you go - a Smart Collection showing just the mono photos in your library! Have a go.
Why not share a link to some of your very own Black and White photographs below in the comments.