


Street Photography Tips (Part 1) & Book Giveaway!
[To listen to the audio hit play and then give it a second to buffer. Alternatively,be sure to subscribe to the blog over in iTunes where you can listen on-the-go too!]
There's a lot going on today! In addition to my own 3 top tips to improve your street photography, I've invited the fantastic Michael Pung to offer a top tip of his own for street portraits too! In addition to all of that, I'm also running the first of my giveaways for 2017!
If you're interested in the street photography tips then just keep reading. If however, you're just here to put your name in the hat to win the book, skip to the bottom for entry information and terms & conditions. Good luck to you all!
Improve your Street photography in 2017 with these top Tips:
Perhaps you've just picked up your first camera for Christmas? Perhaps with some of the spare time you had over the festive period you ventured out into the street for the first time to try your hand at what can at first appear to be a very easy and simplistic photographic discipline - Street Photography.
Whatever the case may be, I've got a few tips to help you to produce stronger, more compelling images when in public spaces.
Now, I'm not suggesting that the tips in this post alone will transform you into a master Street Photographer overnight! There is so much more to Street Photography than can be condensed into 3 tips. In fact, I've got lots to say on the subject. That's why I'm going to actually split this post into 2. This is part 1 of 2. You can check out Part 2 right here
Today I'll start with the practical things; the things that you can practice and implement right now to instantly make stronger and more engaging photographs of life on the streets:
1: Isolate & simplify
I see too many street photographs with no clear subject! It's massively frustrating for me when I look through people's work and all I see are busy streets, without a clear point of focus, intent, story or subject.
Through use of light and shadows this image successfully leads the viewer's eye to the illuminated subject. Note however that the background is illuminated just enough to help tell the story, whilst at the same time is not too bright so that it is a distraction from the main subject.
Camera: Olympus OM-D E-M1. Lens: 12-40mm f/2.8 PRO @ Aperture: f/2.8 Focal Length 12mm ISO: 3200 Shutter Speed: 1/160th
Now, of course sometimes the subject in the frame can be the order among chaos, but unless it's easily identifiable or intentional the subject is often lost and the viewer is left confused as to what the intention of the image actually is! As such my first tip is to isolate your subject. By this, I mean make it clear what your subject is. This can be achieved by using contrasting colours; a lady in a bold red coat in a crowd of darker coats perhaps?
If you aren't able to isolate your image using contrast, colour or shadows & light, then go for plan B; simplify the contents of the frame.
This can be achieved by removing elements that are distracting, such as bright spots in the background (bright and bold colours as well bright lights). Text and writing in images can also be very distracting. Signage and shop fronts as shown below can often be distractions. (unless of course they add to the story as I discuss in my second tip). A commonly used method of simplification is to find a plain background to use as a stage for your subjects; brick walls for example can work quite well:
By putting my subject against a plain backdrop, I ensure that my subject is the only thing for my viewer to look at. Simple Framing.
Camera: Canon 7D Lens: 85mm f/1.8 Aperture: f/4 Focal Length 85mm ISO: 1000 Shutter Speed: 1/400th
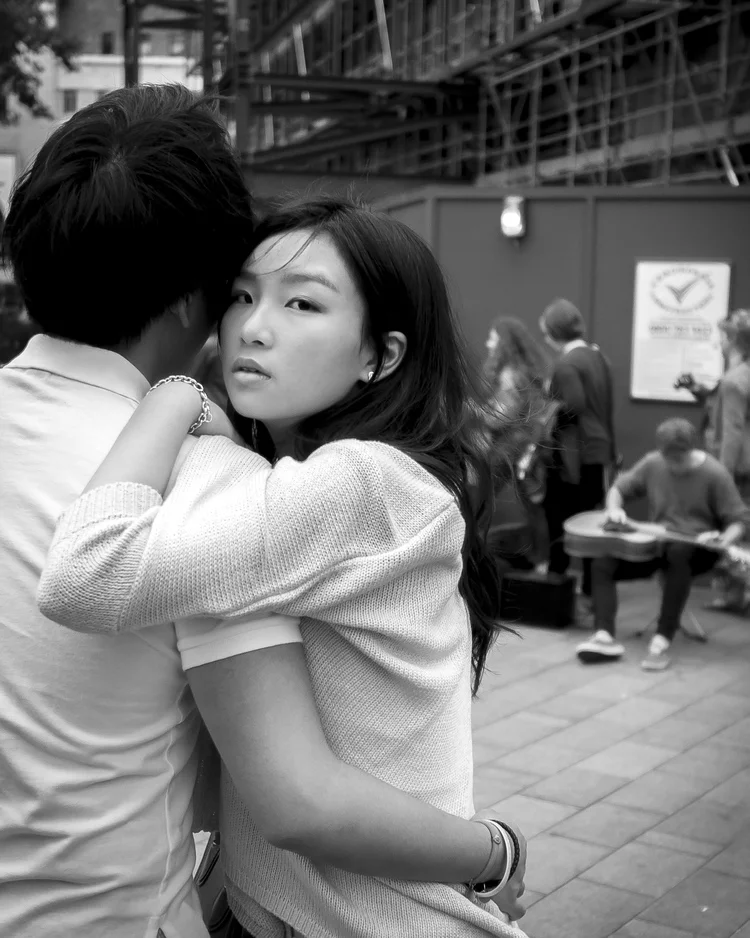
Another means to simplify is to use a shallow depth of field to remove or hide or reduce a distracting element of the background from a frame. Here for example you can clearly see the city in the background, however the use of depth ensures that the viewer's is drawn back towards the object in sharp focus; the musician:
Camera: Olympus OM-D E-M5. Lens: 12-40mm f/2.8 PRO @ Aperture: f/2.8 Focal Length: 31mm ISO: 800 Shutter Speed: 1/2000th
2: Tell a story
Before I photograph anything I subconsciously ask myself a few questions: Why are you photographing that scene? What's the point? What is the story? Will someone else see or get the story?
I don't literally stop and ask myself these questions, but over time this thought process has become very much part what happens before I press the shutter. As the photographer, we were present at the moment it all happened and so we have the added context in our mind to aid the story, things like how hot or cold it was, what the street smelled like, what sounds could be heard and what else was happening outside of the frame to inform the action happening inside the frame. All of those extra senses we have add more to the story for us. Instantly, that provides a different and perhaps more informed narrative for us when we view the image back. It makes us biased. So, unless we somehow capture more inside the frame to help put the pieces of the story together for the viewer, what we ourselves often consider to be a great image because of how we feel about it, is nothing more than a snapshot of someone on the street to someone else.
For me, this is why Street Photography in itself is an often-misunderstood genre: It appears easy to walk around and shoot all the interesting things you see on a busy street, but that doesn't necessarily translate into a compelling and engaging or even interesting photograph for someone else to look at.
A dark scene featuring a man smoking (the smoke is obvious) leaning against the front of a betting shop (bookies as we say in the UK). The text reads 'When the Fun Stops, Stop'.
Camera: Olympus OM-D E-M1. Lens: 12-40mm f/2.8 PRO @ Aperture: f/2.8 Focal Length 12mm ISO: 3200 Shutter Speed: 1/80th
Now, without all of that additional context provided by our own senses as I mentioned above, the story told within a frame can be left to the interpretation of the viewer, even if you have provided a lot of additional visual stimulus and a clear backdrop to the scene. This is absolutely fine. Often, it can be more interesting for a viewer to look at the image and begin to imagine and write their own story to bring the image to life. Don't be upset if the story that someone invents to surround your image isn't the story you saw at the time you made the image. Just be grateful that someone has taken the time to study your image enough to see a story within it!
3: Get Closer & Be Bold
This is something of an expansion on my point to isolate & simplify what is in your frame, but here I want to suggest that you get closer to your subject to make the image more engaging. This works particularly well when you achieve eye contact with your subject (if your subject is a person or an animal that is). For example:
Note that despite my subjects occupying a large proportion of the frame, I still have composition, isolation and a story being told in the background.
Camera: Olympus OM-D E-M1. Lens: 12-40mm f/2.8 PRO @ Aperture: f/2.8 Focal Length 12mm ISO: 3200 Shutter Speed: 1/160th
Standing at a red light waiting to cross the street I took a few side-steps to get closer to this woman. I waited for the lights to turn amber before raising the camera and making a frame. With so much going on around us all my subject could do was to throw me a glance before crossing. This frame would have arguably been too busy had my subject been farther away and occupied a smaller amount of the frame.
Camera: Olympus OM-D E-M1. Lens: 25mm f/1.8 @ Aperture: f/1.8 Focal Length 25mm ISO: 320 Shutter Speed: 1/640th
Helping your subject to dominate the frame makes it immediately more obvious exactly what your subject is. Fact.
You will still of course have to keep an eye out for distracting elements, as always.
If you're shooting a street performer, get in closer to them (but be safe and don't invade their space). If you're shooting street, you're typically going to be in an open public space. As such you should have the freedom to move around - so do it! Don't just let life pass you by from one spot - go and get those images! That is of course, unless you're setting a scene and waiting for the subject (more on that part two though)
Don't be scared to raise the camera to your face to make a photograph of someone. Sure, this feeling will be worse if you're in a less densely populated area, but don't fear question or conflict; make the image and congratulate yourself for having done so later, because the alternative is missing the shot and kicking yourself for it later. Raising the camera up to your hip can be fine, but it will dramatically reduce your chances of getting the shot. It's also sneaky! So be intentional, bold and get closer to the subject!
4: Bonus Tip: Michael Pung Shares his thoughts on making strong Street Portraits:
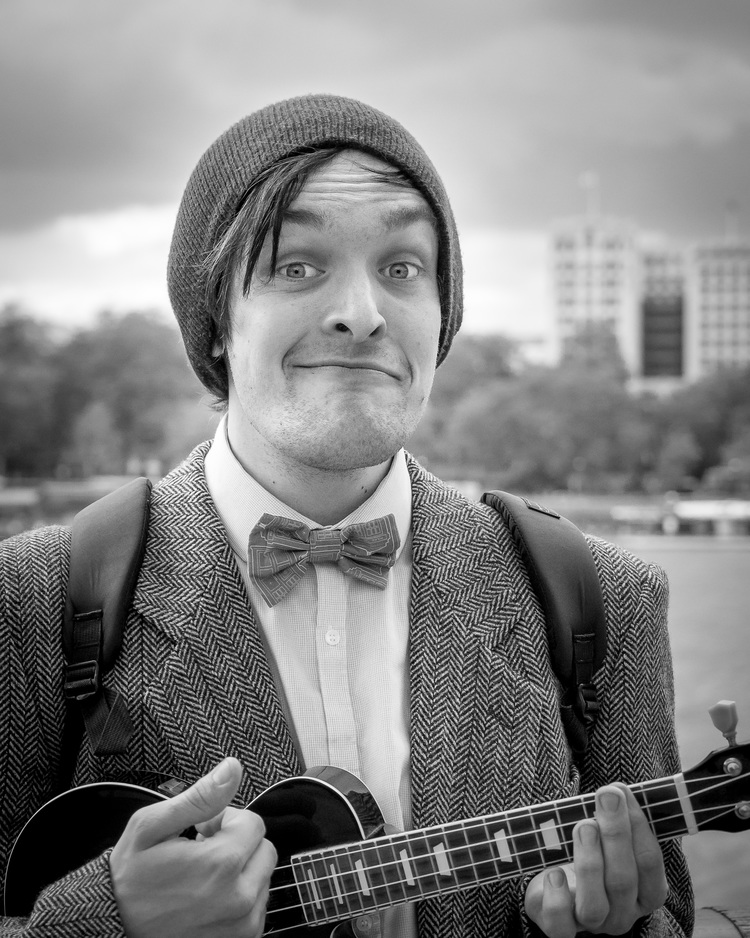
I've got an entire gallery filled with Street Portraits, however, I have to admit that the street portaits made by Michael Pung are on another level. As such, rather than me offering my thoughts on street portraiture, I have instead invited Michael (Pung) to give you his expert opinion on the matter:
I love taking street portraits. There is something exhilarating about making the approach, forming that connection (if even for a brief minute or two) and capturing their photograph.
Image used with permission of Michael Pung. Image Copyright of Michael Pung.
The approach is quite possibly the scariest part of taking street portraits, but once you get past it, you will discover that it really is quite rewarding. I enjoy making that connection with everyone I meet. It really isn’t about what you say, but how you do it. Try not to hesitate and just be upfront with your intentions. I usually just introduce myself in a friendly manner and ask for their photograph. I like to gauge if they’re busy, and if they aren’t then I ask them some questions to get to know them better. Sometimes conversations can go on for 20 minutes or more! But if not, it’s still okay! And even if you don’t get the photograph, making that connection really is something special.
Image used with permission of Michael Pung. Image Copyright of Michael Pung.
As for making the portrait, here are a few of my ingredients! I enjoy shooting at lower apertures to make the backgrounds soft (1.2 to 2.0 aperture on a 56mm on an APS-C sensor). If you find it too soft, it is okay increase it a little to have more of their facial features in focus. In general, try to keep eyes in the top half of the frame and if this means cropping a little off the top of their head, that’s okay! There should be a balance in the shot and this varies from how close or how far you want to crop. The focus here is on the individual and you want to remove as much of the distractions away from the subject. The individual doesn’t need to smile usually and a neutral expression is better than anything forced. Make a connection, and once that is made, the other things come together to make a strong portrait!
Image used with permission of Michael Pung. Image Copyright of Michael Pung.
For more of Michael's wonderful work, check out his blog at www.michaelpung.com/blog
Part 2 - January 2017
This post runs the risk of becoming way too long if I continue with the other tips I have, but I really do want to offer further advice. For now, I'll leave you with these things to digest and try out. I'll post part 2 of this next week. So you if want to receive part 2 of this post in your inbox, be sure to subscribe. In part 2, I'll talk about:
- Hunter & Fisherman approaches
- Choosing a cameras & lenses for Street Photography
- Times, Locations & Days to shoot
- Bonus Tip: Expectations of your own efforts
Book Giveaway
Okay, so if you're here for the book giveaway, look no further. I'm giving away my own personal copy of The Street Photographers Manual by David Gibson.
I loved this book so much that I felt compelled to write a review here on the blog (you can read that book right here). Coupled with this post, I thought that it would be a great companion for anyone looking to improve their street photograph and so, I'm giving it away for free!
Review Excerpt:
"Whilst the book itself may be called a manual and does offer instruction to help you create more thought-out and intentional street photographs, this is also a very impressive and vast study of street photography. This book looks at both various techniques and elements that contribute towards stronger imagery and makes use of examples by the greatest street photographers of our time such as; Elliott Erwitt, Bruce Gilden, Saul Leiter, Trente Park and more. These examples give the book's instructions conviction and only serve to show that this thorough - yet concise - book is something you can not only read for inspiration, but learn from at the same time. Within each chapter we are introduced to either another master of Street Photography or another technique of shooting on the street, each accompanying a sample of that master's work or an example of that technique in action to best explain and demonstrate the case in point"
To be in with a chance of winning my own, personal copy of The Street Photographer's Manual, subscribe to the blog using the form below and share this post on social media (be sure to include a link back to this post). If you're already a subscriber, just drop a comment below. I'll canvas all new subscriptions and comments and pick the lucky winner from those.
Good luck everyone! Thanks for stopping by.
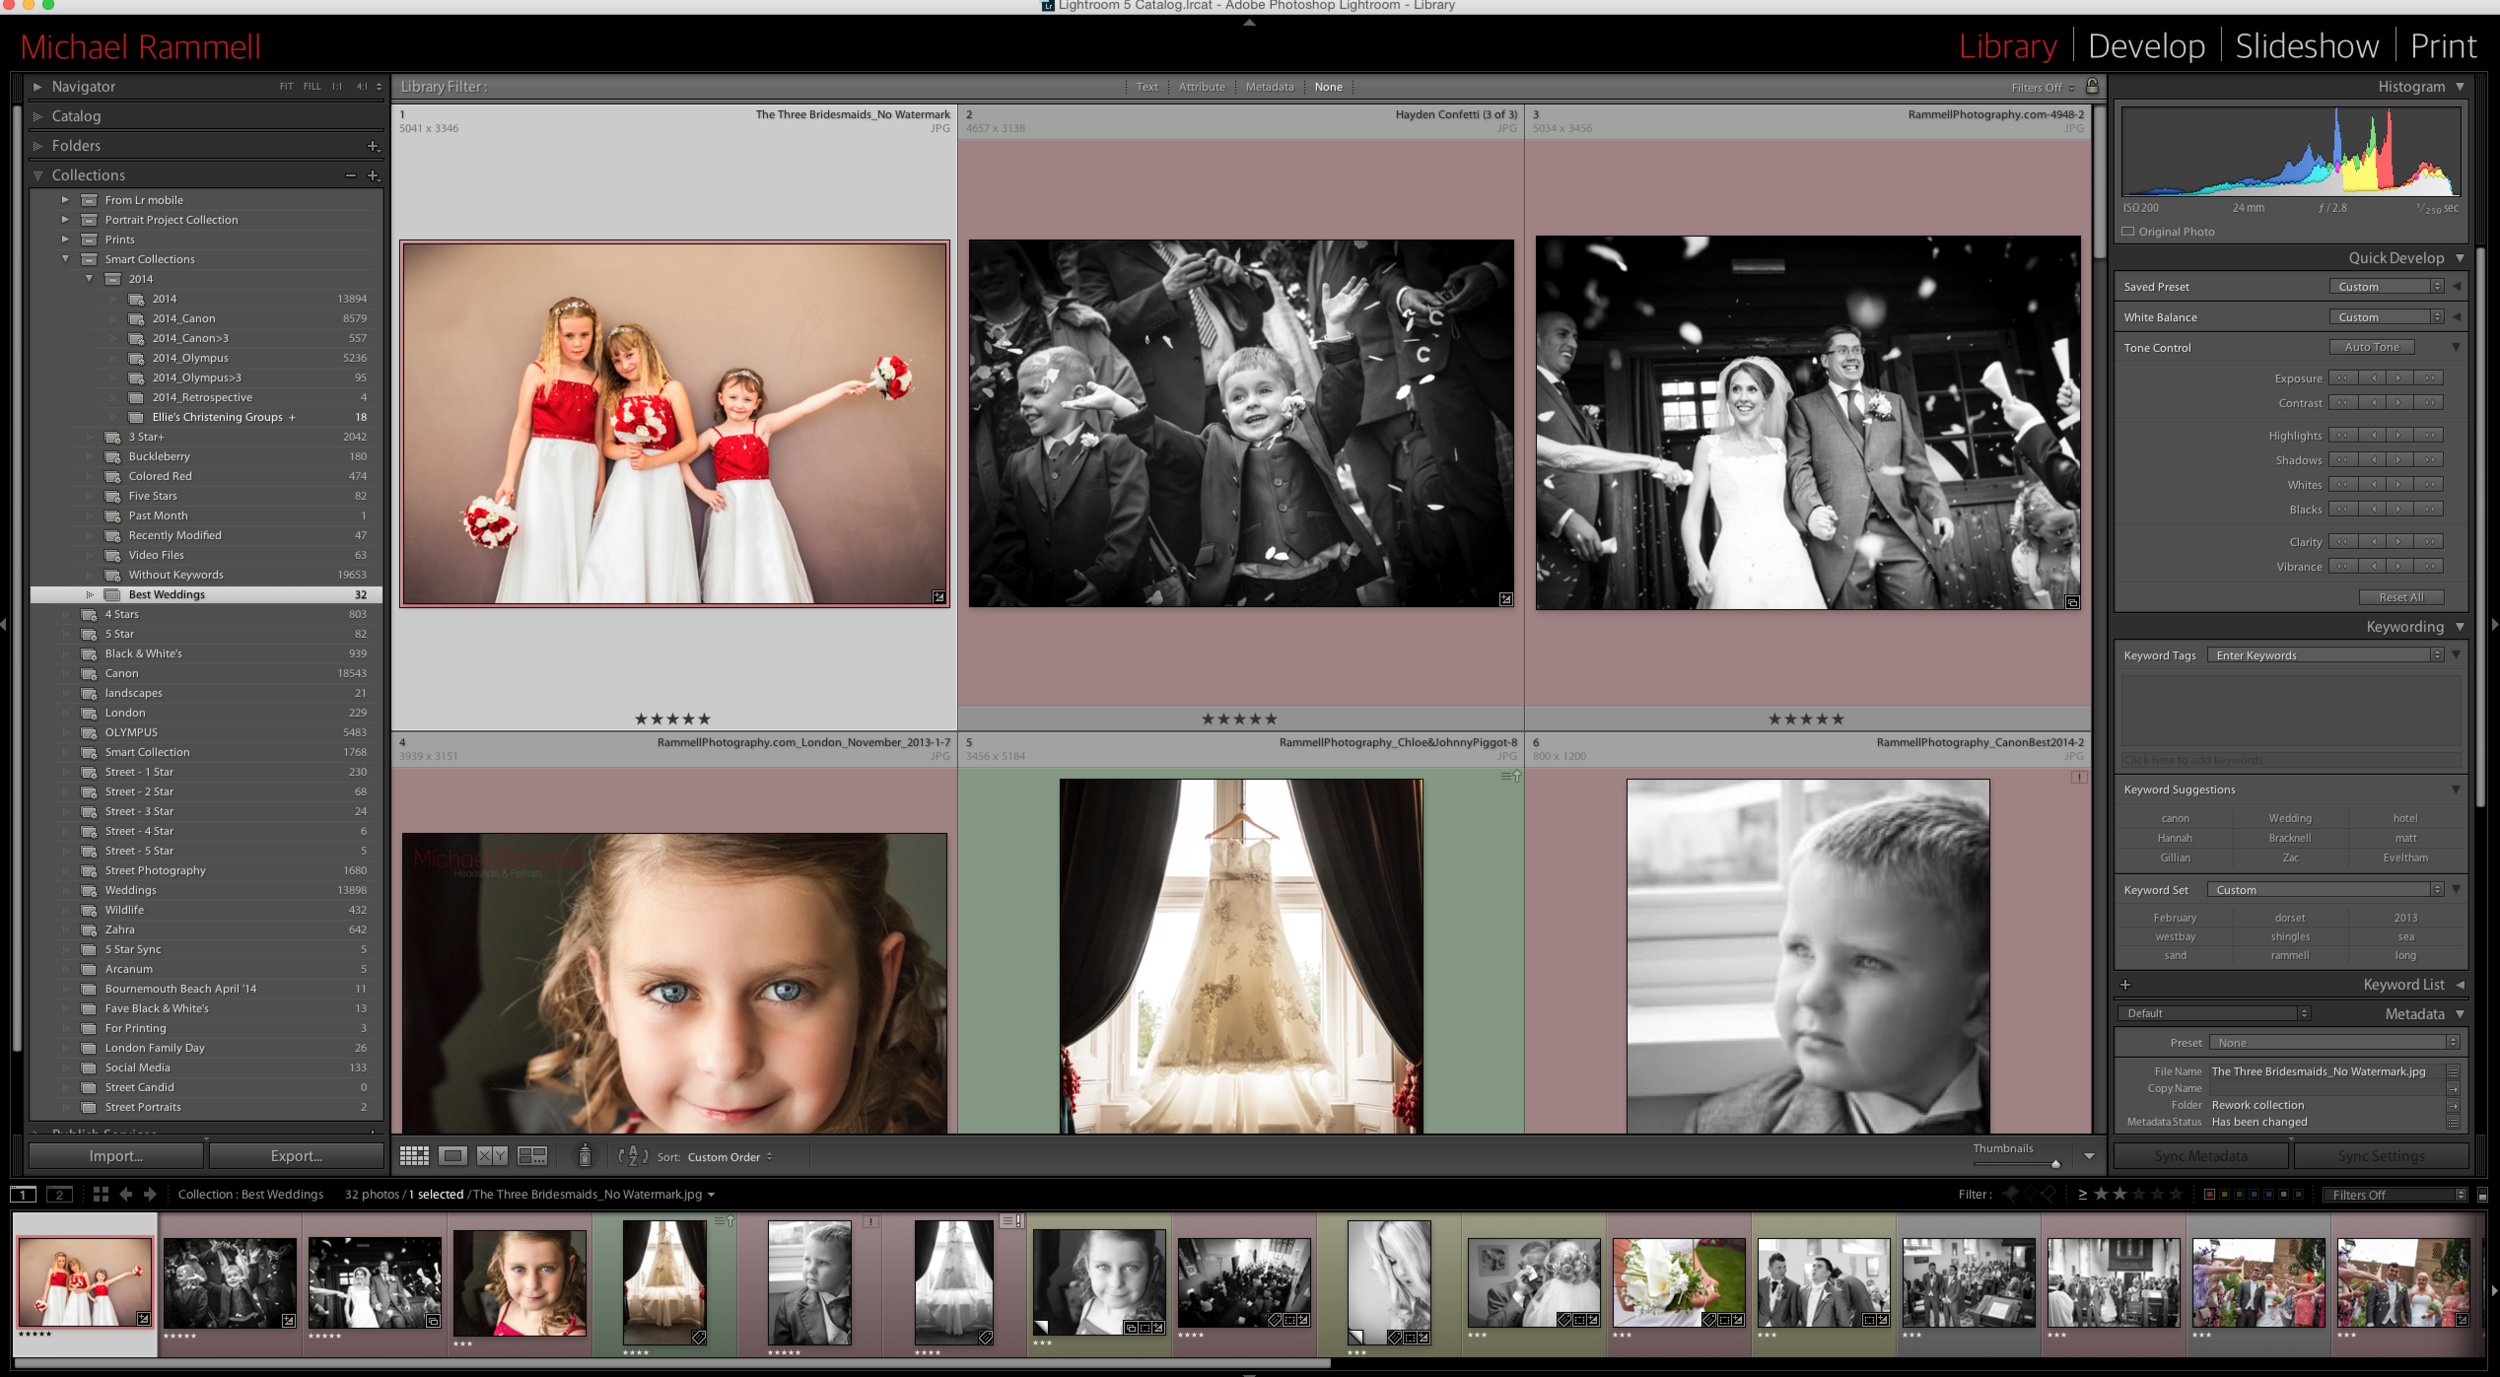
Using Smart Collections in Adobe Lightroom
At this time of year many photographers are looking back on the work they did in the previous 12 months. A retrospective view. A year in review. An assessment. Whatever you decide to call it, it can actually be a tedious enough process just finding your best 10 in amongst thousands and thousands of photographs. Don't get me wrong though, this exercise is worth it's weight in gold as you can really gain some perspective on where you were at the start of the year and where you are now, as a photographer. It can often be a real eye opener to see in what ways you've improved and in what ways you've changed your style. After all, we're always evolving and adapting as photographers and therefore the photographs we produce are inevitably going to change as we grow.
Luckily for us though, this deeply rewarding (yet tedious) process can be made much easier now that we're in the digital era. We're fortunate to have software that can stores tags and meta data. It can order and time stamp our photographs, making sorting and filtering through them all and finding the photographs we're most proud of that much easier.
That is...if you know how to use the software you have.
Many people see Adobe Lightroom as a simple piece of software with a couple of sliders. Trust me, it's much more than that. It has brushes, a simple cloning tool, it's amazing at organizing photographs and preparing photographs for printing. It does nearly all a photographer could ask for.
Today, I want to help you to find your top 10 photographs from the previous year. To do this we'll be taking a look at Adobe Lightroom's Smart Collection feature, Target Collections and a few basic rules to set these up.
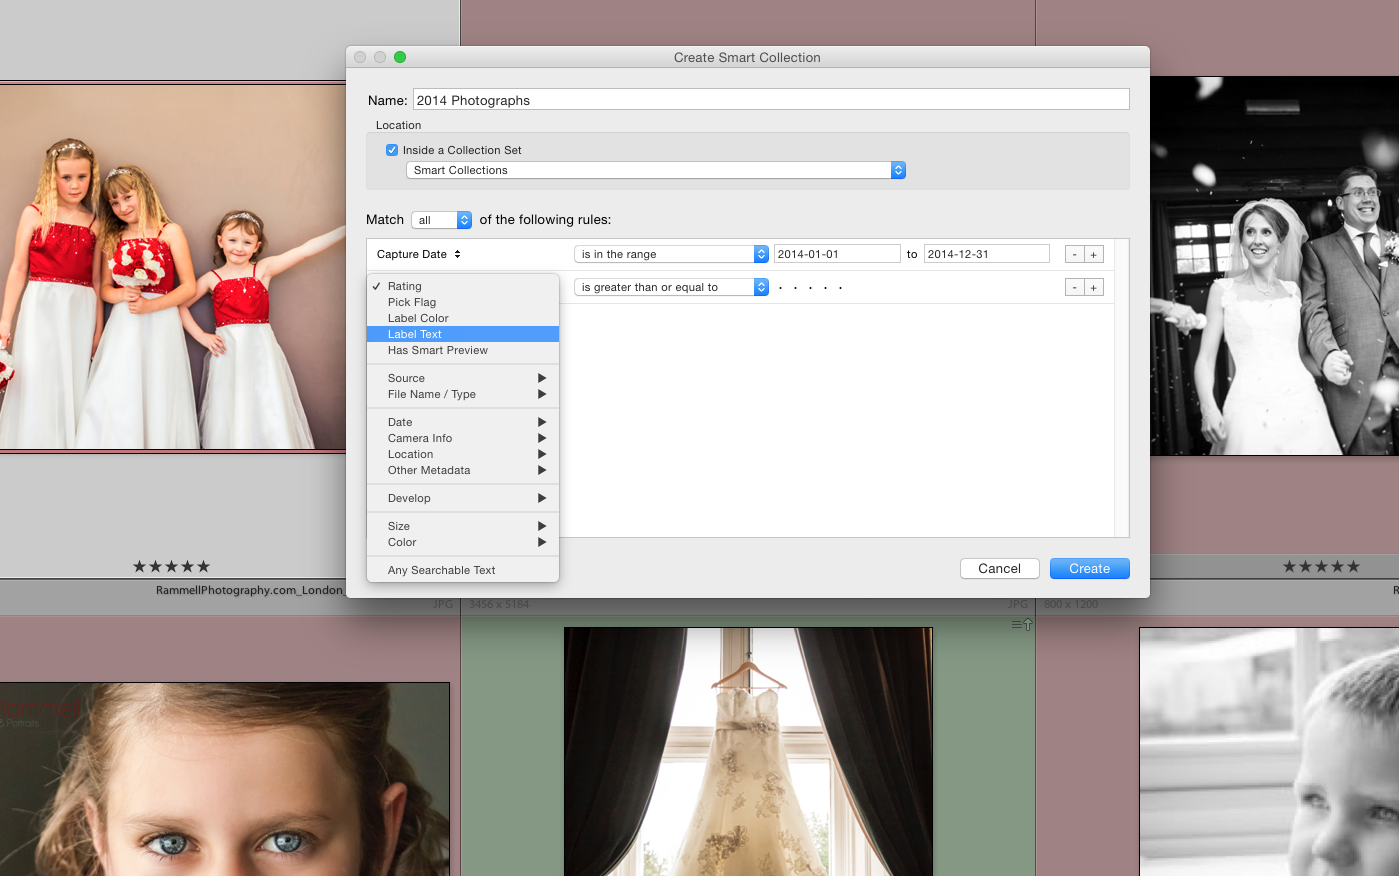
So, if you've been putting off doing a review of the year that has just passed us by have a watch of this video and the re-assess whether you think you have the time or not.
Grab a coffee, press play on the video below and enjoy!

If you have a Lightroom tip you would like to share, or even a question about Lightroom please do post your comments below, or contact me at michae@rammellphotography.com
Thanks for watching.